Whether you’re hosting a high-stakes corporate discussion or a casual team check-in, maintaining the flow and security of your meeting can be the difference between productivity and chaos.
The Zoom Waiting Room is your virtual gatekeeper, ensuring that your meeting space remains secure and well-organized.
In this guide, we’ll walk you through everything you need to know about utilizing this powerful feature, from setting it up to making the most out of its customizable options.
What is Zoom Waiting Room?
The Zoom Waiting Room feature is designed to improve meeting security and control. It allows the host to manage when participants can join the meeting.
When enabled, the Waiting Room is a virtual holding area where attendees can wait until the host admits them into the meeting. This feature is particularly useful for ensuring that only invited participants join the meeting, as it allows the host to screen participants before they enter the main session.
To know how to use the Zoom Waiting Room, you must first enable it in your meeting settings. Once activated, the host can move participants in and out of the Waiting Room as needed, either individually or in groups. This provides an additional layer of security, especially for meetings where sensitive information is discussed. For example, in a Zoom meeting where participants must be verified before entering, the Waiting Room allows you to confirm their identity before granting access. This prevents unauthorized access and helps maintain the meeting’s flow by admitting participants at appropriate times.
What Does Zoom Waiting Room Look Like?
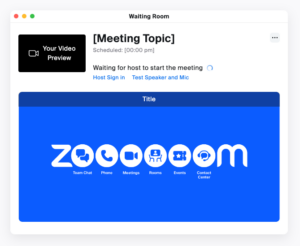
The Waiting Room interface is straightforward and user-friendly, designed to provide a smooth experience for both hosts and participants. When a participant is placed in the Waiting Room, they will see a customizable Zoom Waiting Room message informing them they are in it and that the host will admit them shortly.
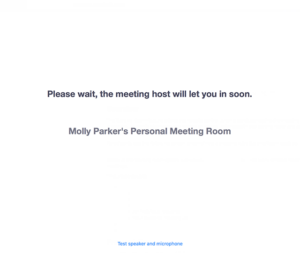
This message can be tailored to fit the needs of your meeting, such as including additional instructions or a welcome note. We’ll discuss how to customize the Zoom Waiting Room later in this article, so stay tuned.
From the host’s perspective, the Participants panel clearly notifies when someone enters the Waiting Room.
How to Let Someone in From Waiting Room Zoom
During a meeting, as a host, you can easily admit participants by following these steps:
- Click Participants,
- In the Waiting Room section, click Admit next to a participant’s name to allow them to join the meeting.
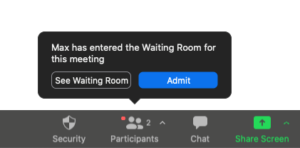
The host can view the names of those waiting, along with any additional information provided by the participants, such as their email address or a note explaining their reason for joining the meeting. This makes identifying and prioritizing participants easy based on the meeting’s needs.
For instance, in a corporate meeting, you might prioritize admitting key stakeholders first, while in an educational setting, you might allow students to enter in a specific order. The Waiting Room helps organize participant entry and ensures that the meeting starts smoothly without interruptions.
How to Set up Waiting Room in Zoom
Setting up the Zoom waiting Room is straightforward. You can do it through the Zoom web portal or directly within the Zoom application.
How to Enable Waiting Room in Zoom As an Admin
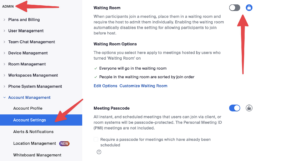
If you want to enable or disable Waiting Room in Zoom, you must sign in to the Zoom web portal as an admin. That’ll give you permission to edit account settings. It’s good to remember that Enabling is available only for scheduled meetings. Your next steps are the following:
- In the navigation menu, click Account Management and then go to Account Settings.
- Click the Meeting tab.
- Under Security, click the Waiting Room toggle to enable or disable it. And yes, you read that right, this is also how to disable Waiting Room in Zoom.

- If a verification dialog appears, click Enable or Disable to verify the change.
- Click Edit Options to specify the Zoom Waiting Room options.
(Optional) To prevent all users in your account from changing this setting, click the lock icon and click Lock to confirm the setting.
Once you’ve enabled the Waiting Room and specified options for all users in the account, you can also allow hosts or co-hosts to rename participants before they enter the meeting. For this feature, the host and any co-hosts must be running version 5.10.0 or higher.
To do the above mentioned, you need to first sign in to the Zoom web portal as an admin. The latter is the only way to edit account Zoom Waiting Room settings.
- In the navigation menu, click Account Management, then Account Settings.
- Click the Meeting tab.
- Under In Meeting (Basic), click the Allow host or co-host to rename participants in the Waiting Room toggle to enable or disable it.
- If a verification dialog appears, click Enable or Disable to verify the change.
(Optional) You can prevent all users from changing this setting by clicking the lock icon and then clicking Lock.
Overall, mastering how to enable Waiting Room in Zoom will allow you to take the next steps in your Waiting Room practice.
Prerequisites And Limitations to Using Zoom Waiting Room
To use the Zoom Waiting Room, along with features like two-way chat and video sharing, you’ll need:
- The Zoom desktop app for Windows, macOS, or Linux (Global minimum version or higher,)
- The Zoom mobile app for Android or iOS (Global minimum version or higher,)
- The Zoom web client,
- A meeting was scheduled with the Waiting Room enabled.
Remember that time spent in the Waiting Room doesn’t count towards your meeting minutes.
Additionally, to rename participants while they’re in the Waiting Room, you need:
- The Zoom desktop app for Windows, macOS, or Linux (Global minimum version or higher,)
- The Zoom mobile app for Android or iOS (Global minimum version or higher,)
- Zoom must be enabled on the Zoom web portal.
If the Waiting Room is set to capture all incoming participants, the “join before host” option won’t work for that meeting. However, you can allow internal account members or participants from a specific domain to bypass the Waiting Room.
By default, the Waiting Room is disabled for instant meetings and Zoom Phone calls that are elevated to a meeting. You can enable it for these meetings using the Security option in your in-meeting controls.
Finally, if you enable two-way chat with participants in the Waiting Room, everyone (host and participants) must be using the minimum required version or higher to join. Participants who can’t update due to IT restrictions can join through the web client instead.
Customize Zoom Waiting Room For Practicality
In your Zoom Waiting Room settings, if you’re a licenced user, you have the option to customize Zoom Waiting Room title, logo, and description at the account, group, or user level.
Once you’ve enabled the Waiting Room, click on Customize Waiting Room to get started. This will bring up the customization window, where you can see a live preview of how your Waiting Room will look to participants.
The preview on the right updates in real-time as you make changes.
Here’s what you can personalize:
A Title
To change the meeting title, you should click inside the text box. Keep in mind that titles can be up to 64 characters long.
It’s good to know that participants in the Zoom Waiting Room will see the default screen, which simply shows the title text and the meeting topic. They’ll also see a logo and description. Thus, you can display the title, add a logo, and include a custom Zoom Waiting Room message.
A Logo
To add a logo, click Upload Logo and select your file. The supported formats are GIF, JPG, and PNG, and the maximum file size is 1 MB. The image resolution should be between 60×60 and 400×400.
This kind of customization can come in handy in different situations. For example, a university might customize Zoom Waiting Room with the institution’s logo and a brief description of the online class to create a professional atmosphere.
You can also update the description by clicking inside the text box. You can use up to 400 characters here.
A Video
Additionally, you can display the title along with a video but you need to be a paid account member to do this.
To upload a video, click Upload Video. The video should be in MP4, MOV, or M4V format and must not exceed 30 MB. While videos can include sound, they will be muted by default.
An Image
This option lets you display an image with the title overlaid at the top. Supported formats are GIF, JPG, and PNG, with a maximum file size of 1 MB. The image resolution should be at least 400×200, and for higher resolutions, a 2:1 ratio is recommended.
Preview options: You can toggle between desktop and mobile previews to see how your Waiting Room will look on different devices.
After you customize Zoom Waiting Room according to your needs, and once you’re happy with the results, click Save. When participants join your meeting, they’ll see your personalized Waiting Room branding.
Such customization can also be highly beneficial in different situations. For instance, clinics or therapists might use a comforting image or an introductory video to reassure patients before a virtual consultation.
Important Notes
Make sure the Zoom Waiting Room feature is enabled before you start customizing. If you’ve customized the Waiting Room at the user level and later disabled it, the meeting will revert to your previous settings once the Waiting Room is re-enabled unless it’s been reset or the account settings have been locked.
Customized Waiting Rooms are only visible when the meeting is scheduled with the Waiting Room enabled. If you enable it during a live meeting using the in-meeting security controls, participants will see the default Zoom Waiting Room.
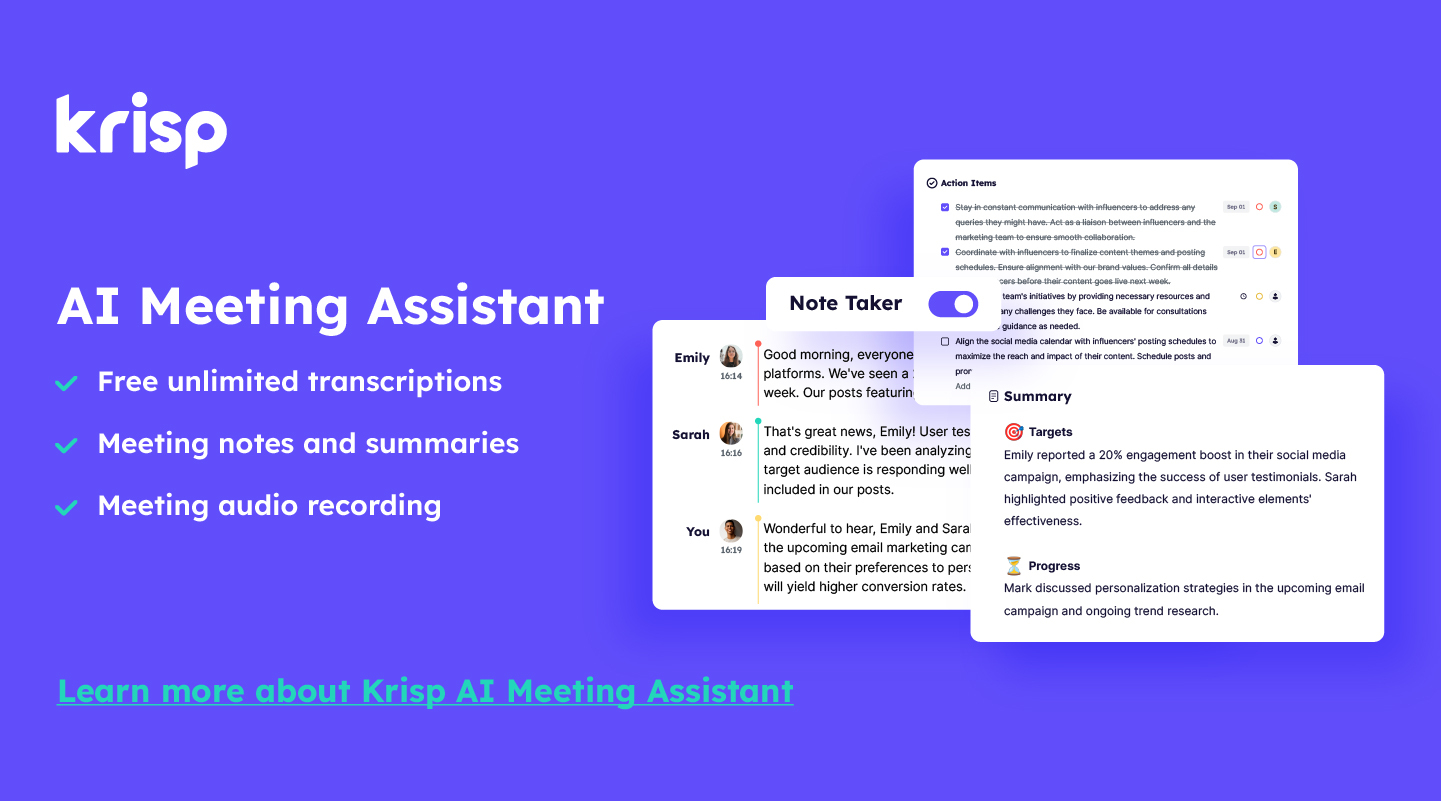
Use Krisp For Impactful Meetings
Some meetings make you sleep with your eyes open, while others go so well you don’t want to miss anything discussed. That’s where Krisp comes in to save the day.
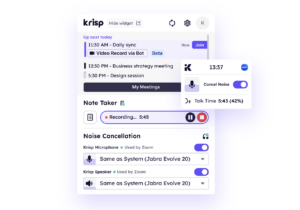
With Krisp, all successful meetings are easily recorded, transcribed, and saved in one convenient place (shown in the interactive graphic below.)
Krisp is an advanced AI-powered meeting assistant that ensures every meeting you host or attend is impactful and productive. By seamlessly integrating noise cancellation, real-time transcription, and recording features, Krisp elevates the meeting experience to a whole new level.
Recording And Transcribing Zoom Meetings With One Click
Recording and transcribing your Zoom meetings with Krisp is as easy as clicking a button. The process is designed to be user-friendly and efficient, ensuring that even the most complex meetings are documented accurately and without hassle.
![]()
How To
To start recording and transcribing a Zoom meeting with Krisp, follow these simple steps:
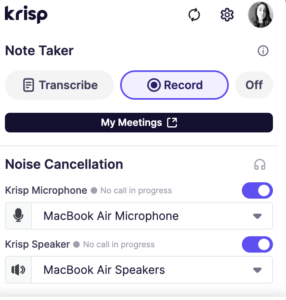
- Select the Krisp Microphone and Speaker: In your Zoom settings, choose the Krisp microphone and speaker as your audio device. This ensures that Krisp’s AI-powered noise cancellation is active throughout the meeting, capturing only the voices you want to hear and filtering out any distracting background noise.
- Start the Meeting and Record: Begin your Zoom meeting as usual, and click the record button, as shown in the image below. With Krisp, the audio quality is optimized, making your recorded meetings clear and easy to transcribe.

- Transcription Made Easy: Once the meeting is recorded, Krisp provides a transcription with remarkable accuracy. The transcription is generated in real-time, allowing you to review and share the content immediately after the meeting concludes.
Prerequisites
There are only a few prerequisites for making the transcription process seamless with Krisp:
- Select Krisp as Your Audio Devices: Ensure that the Krisp microphone and speaker are selected in your recording app or Zoom settings. This step is crucial for activating Krisp’s noise cancellation and audio enhancement features.
- Meeting Duration: Your audio recording should be at least five minutes long, with a minimum of 1 minute of cumulative speech. This allows Krisp to process the audio effectively and generate a comprehensive transcription.
Ensuring Pristine Audio Quality During Calls
Krisp’s commitment to delivering the highest audio quality during meetings is unmatched. By applying pioneering AI algorithms, Krisp eliminates background noise, echo, and other audio disturbances, ensuring that every word spoken is captured with clarity.
Whether you’re in a noisy café or a quiet office, Krisp guarantees pristine audio quality, allowing you to focus on the conversation without any distractions.
Best Practices for Managing Zoom Waiting Rooms
Managing a Zoom Waiting Room can significantly improve the overall meeting experience by ensuring a smooth flow and minimizing disruptions.
If hosts carefully monitor and manage the entry of participants, they can maintain control over the Zoom meeting environment. Below are some key best practices to consider when using Zoom Waiting Rooms to ensure more organized meetings.
Admitting Participants During a Meeting
To ensure a smooth meeting flow, regularly monitor the Participants panel to see who is waiting in the Waiting Room. If you have a co-host, delegate the task of admitting participants to them, allowing you to focus on leading the meeting. Also, consider admitting participants in small groups, especially in large meetings, to prevent disruptions.
Prioritizing Participants When Having a Large Group Waiting
Prioritizing participants can be crucial in maintaining the meeting’s pace. Start by admitting key participants, such as speakers or those with important roles in the meeting. Afterward, admit participants based on their relevance to the meeting’s agenda. In situations where multiple participants are equally important, admitting them alphabetically or in the order they joined the Zoom Waiting Room can be an effective strategy.
Communicating With Participants While They Are in the Waiting Room
Use the customizable Zoom Waiting Room message to communicate essential information, such as the meeting agenda, any documents they should have ready, or when they can expect to be admitted. Additionally, if the meeting is running behind schedule, update the Waiting Room message to inform participants of the delay. This helps manage expectations and keeps participants engaged while they wait.
Final Words
Mastering the Zoom Waiting Room is more than just a technical skill—it’s about elevating the quality of your virtual interactions. By thoughtfully managing participant entry, customizing the waiting experience, and leveraging advanced tools like Krisp for pristine audio, you create a meeting environment where everyone feels prepared and valued.
A well-managed Waiting Room sets the tone for the entire meeting, making it an essential tool for anyone serious about effective virtual communication.
Frequently Asked Questions