Transcribing a video might sound like a tricky task, but it’s actually pretty straightforward—and super rewarding! Knowing how to transcribe a video can make your content more accessible, searchable, and easy to repurpose. A good transcription is a game-changer, whether you’re creating captions, writing blog posts, or just organizing your ideas. And the best part? With tools like Krisp, Google Docs, and Descript, it’s easier than ever to get it done. In this guide, we’ll walk you through the process step by step, share tips for accuracy, and highlight some awesome tools to make your life a whole lot simpler.
Key Takeaways
Transcribing videos makes your content more accessible, searchable, and versatile.
Tools like Krisp, Google Docs, and Descript simplify the transcription process.
Start with high-quality audio to improve transcription accuracy—tools like Krisp can help.
Choose a transcription method that fits your needs: manual for precision or automated for speed.
Look for tools that offer features like noise cancellation, multilingual support, and editing options.
Transcriptions can be used for SEO optimization, creating captions, or repurposing into other formats like blogs or guides.
Step-by-Step Guide to Accurate Video Transcription
Transcribing a video might sound like a daunting task, but it doesn’t have to be! Whether you’re a content creator, a professional, or a student, having a transcript can make your work more accessible, searchable, and versatile. Let’s break it down step by step to make the process as easy and effective as possible.
Step 1: Prepare Your Video
Before you start, make sure your video is transcription-ready.
Ensure Clear Audio: Poor sound quality leads to more errors. Reduce background noise and improve clarity.
Pro Tip: Use a tool like Krisp to clean up your audio effortlessly
File Format Matters: Double-check that your video is in a standard format like MP4 or AVI, so transcription tools can handle it smoothly.
Step 2: Choose a Transcription Method
Manual Transcription
If you’re going old-school:
Break It Down: Work on short sections of the video (30-60 seconds) to make it manageable.
Use Playback Controls: Tools like VLC Player allow you to slow down or pause as needed.
Who It’s Best For: Small projects, custom formatting, or when accuracy is critical, and you don’t mind spending time on it.
Automated Transcription
If you’re short on time, AI automated tools are your best friend:
How It Works: AI tools like Krisp, Descript, or Temi convert audio to text in minutes.
Benefits: They’re fast, reliable, and offer additional features like speaker identification and text editing.
Step 3: Choose a Transcription Tool
Here’s where it gets fun! Picking the right tool can save you tons of time and effort. Here are some key things to look for:
Criteria
Description
Recommended Tools
Accuracy
No tool is perfect, but some are close. Clean audio enhances accuracy significantly.
Krisp, Happy Scribe
Noise Cancellation
Start with a noise-free audio base for better results. Noise reduction improves transcription quality.
Krisp
Speed
Need results quickly? Some tools provide transcriptions in just minutes.
Temi
Editing Options
Built-in editors let you refine transcriptions and sync with video content easily.
Descript
Language Support
Multilingual transcription is a must for global content.
Krisp, Happy Scribe
Budget-Friendly
Free tools work for basic needs, while premium tools offer advanced functionality.
Google Docs (free), Descript (premium)
Quick Tip: Test out a few tools with a short video clip before committing. Most transcription tools offer free trials, so you can find what works best for you.
6 Tools to Transcribe a Video
Transcribing videos doesn’t have to be a time-consuming task. With the right tools, you can quickly and accurately turn your video content into text for captions, blogs, or documentation. Some tools are perfect for quick, automated results, while others offer advanced editing and customization features. Let’s dive into six great options that make video transcription a breeze!
1. Krisp
Krisp is a powerful audio enhancement tool designed to eliminate background noise and distractions, making it an ideal companion for transcription. While it focuses on delivering crystal-clear audio, pairing Krisp with your favorite meeting transcription software can dramatically improve the accuracy of your transcripts.
Best for: Enhancing audio quality to boost transcription accuracy.
Krisp
Key features
Real-time noise cancellation ensures clear audio during transcription.
Improves transcription accuracy by reducing background noise and distractions.
Integrates with various video platforms and transcription tools.
User-friendly interface with minimal setup required.
Pros
Enhanced transcription accuracy due to noise cancellation.
Compatible with a wide range of platforms for flexible use.
Cons
Focused on audio enhancement rather than transcription-specific features.
Requires additional transcription software for full functionality.
Visit Krisp’s website and log in using your account credentials.
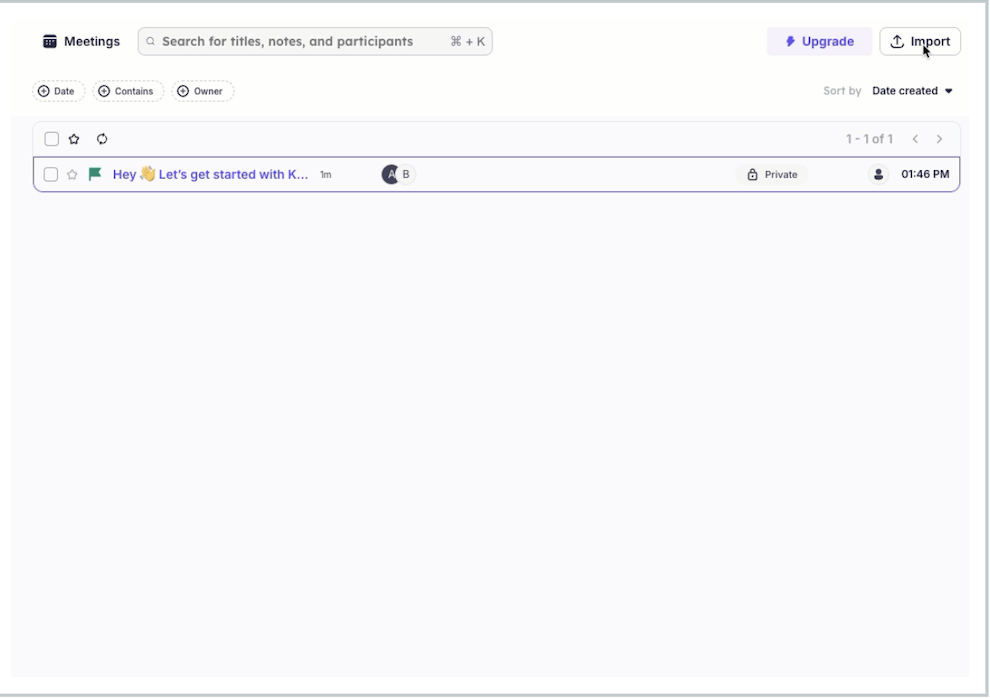
Step 2: Navigate to the Meetings Page
Once logged in, go to the “Meetings” section on your dashboard.
Step 3: Initiate the Import Process
Click on the “Import” button located at the top-right corner of the Meetings page.
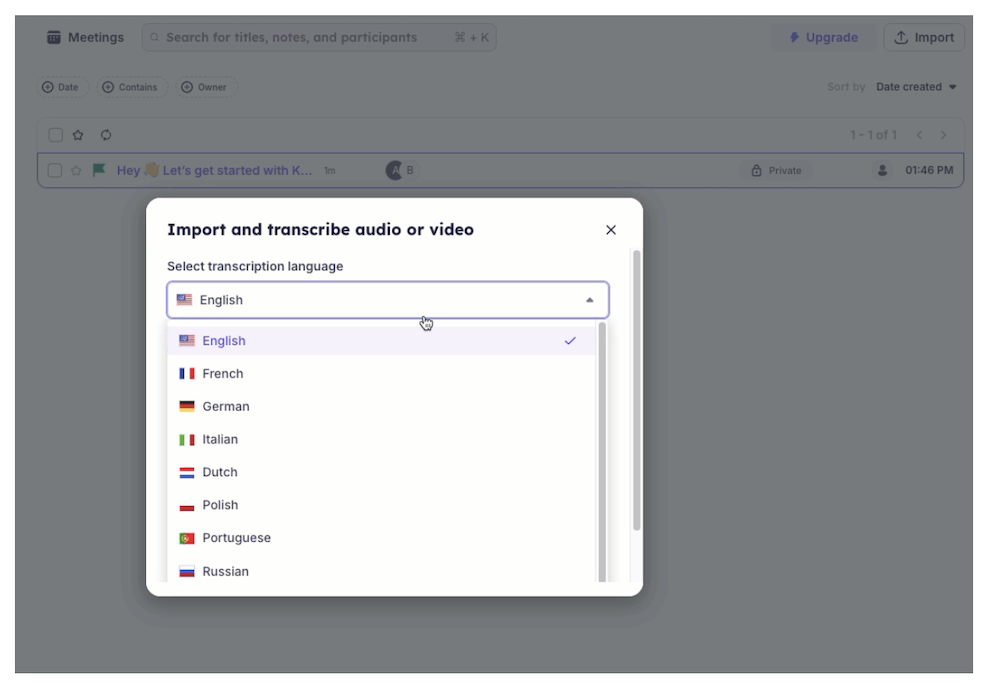
Step 4: Select Transcription Language
In the import window, choose your preferred transcription language from the dropdown menu.
Pro Tip: English is the default language, but Krisp also supports nine additional languages.
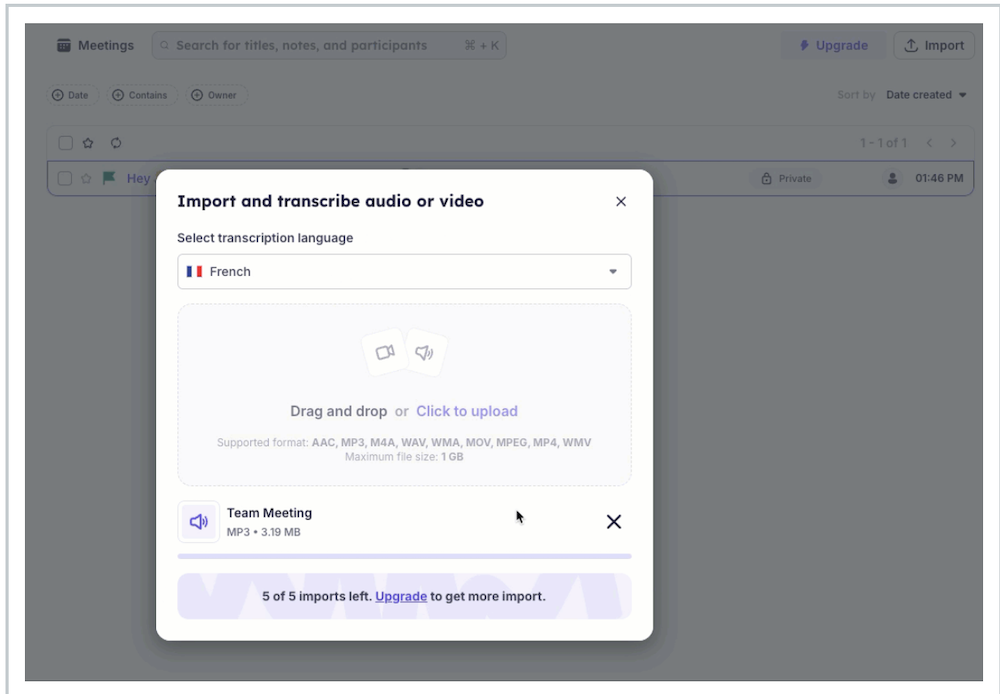
Step 5: Upload Your Video File
Drag and drop your video file into the designated area or click to upload from your device.
Note: Ensure your file meets the format and size requirements based on your subscription plan.
Step 6: Wait for Transcription Completion
Once the file is uploaded, Krisp will process the video and generate a transcript.
The transcript will be available for review and summarization in the Meetings section.
2. Google Docs
Google Docs features a free voice typing tool that allows real-time transcription. While it requires you to play the audio/video in the background, it’s a quick and cost-effective solution for basic transcription needs.
Best for: Free, simple, and manual transcription tasks.
Google Docs
Key features
Voice typing feature allows real-time transcription directly within the platform.
Free and accessible through any web browser.
Supports multiple languages for transcription versatility.
Integrates seamlessly with Google Drive for file storage and sharing.
Pros
Completely free to use.
Easy to access and share transcriptions.
Cons
Requires clear audio for accurate voice typing.
Does not support automated video upload for transcription.
Steps to transcribe video with Google Docs
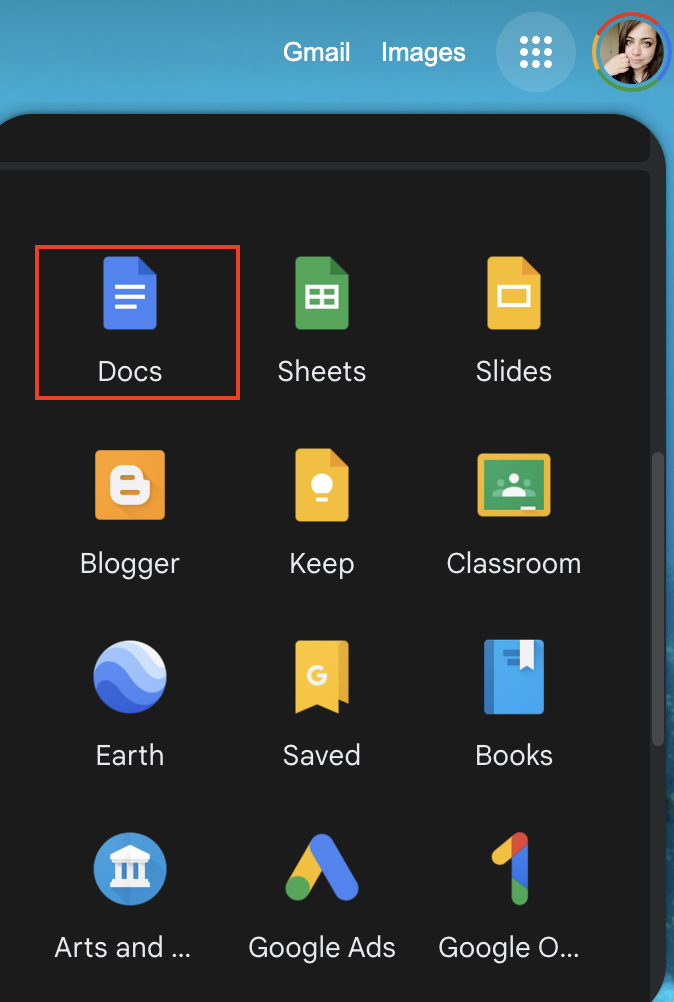
Step 1: Open Google Docs
Log in to your Google account and open a new or existing Google Docs file.
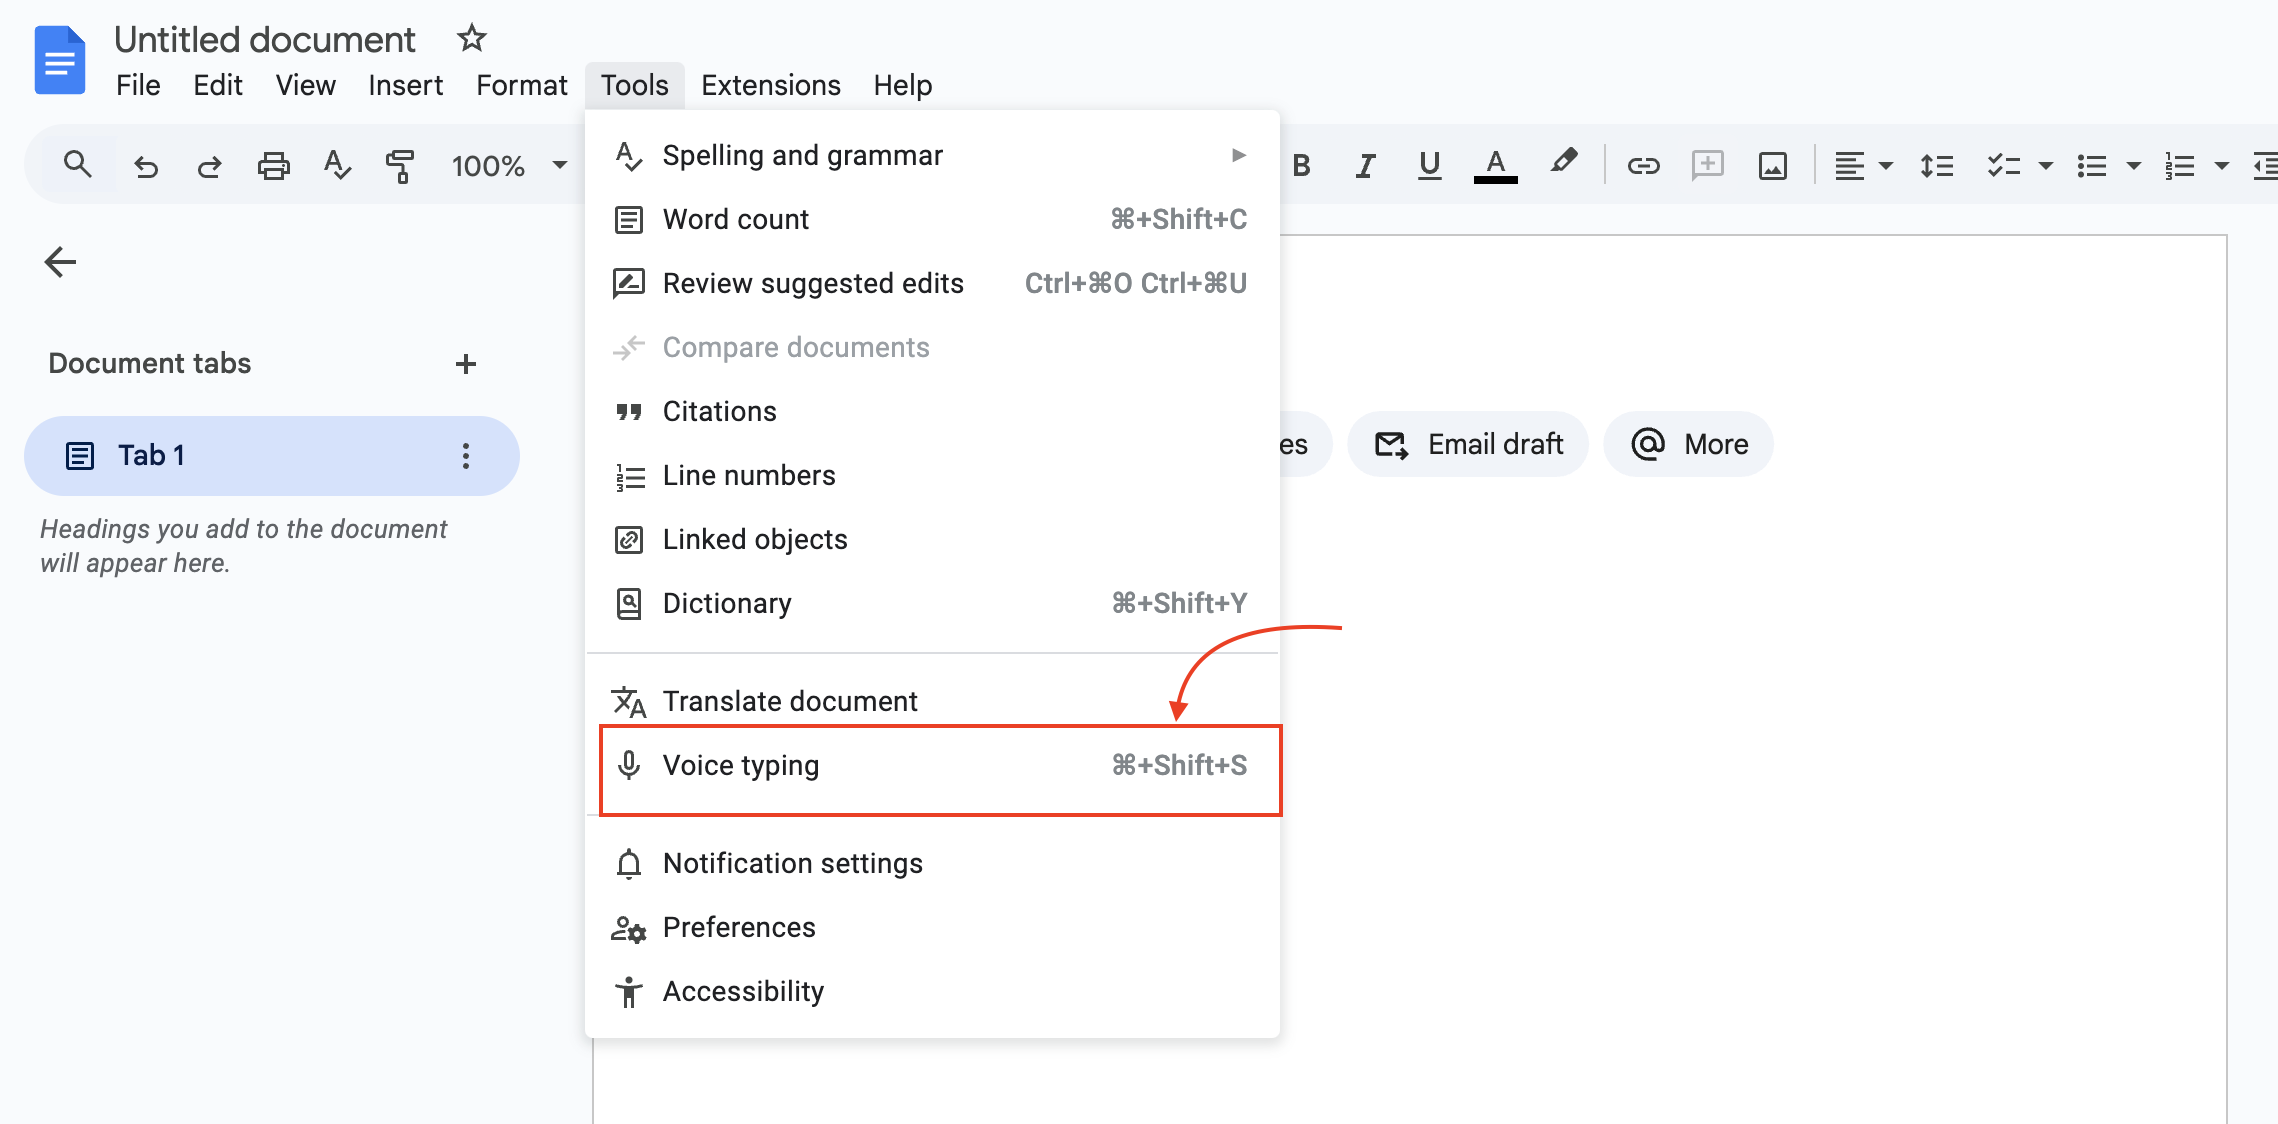
Step 2: Enable Voice Typing
Go to the Tools menu and select Voice Typing.
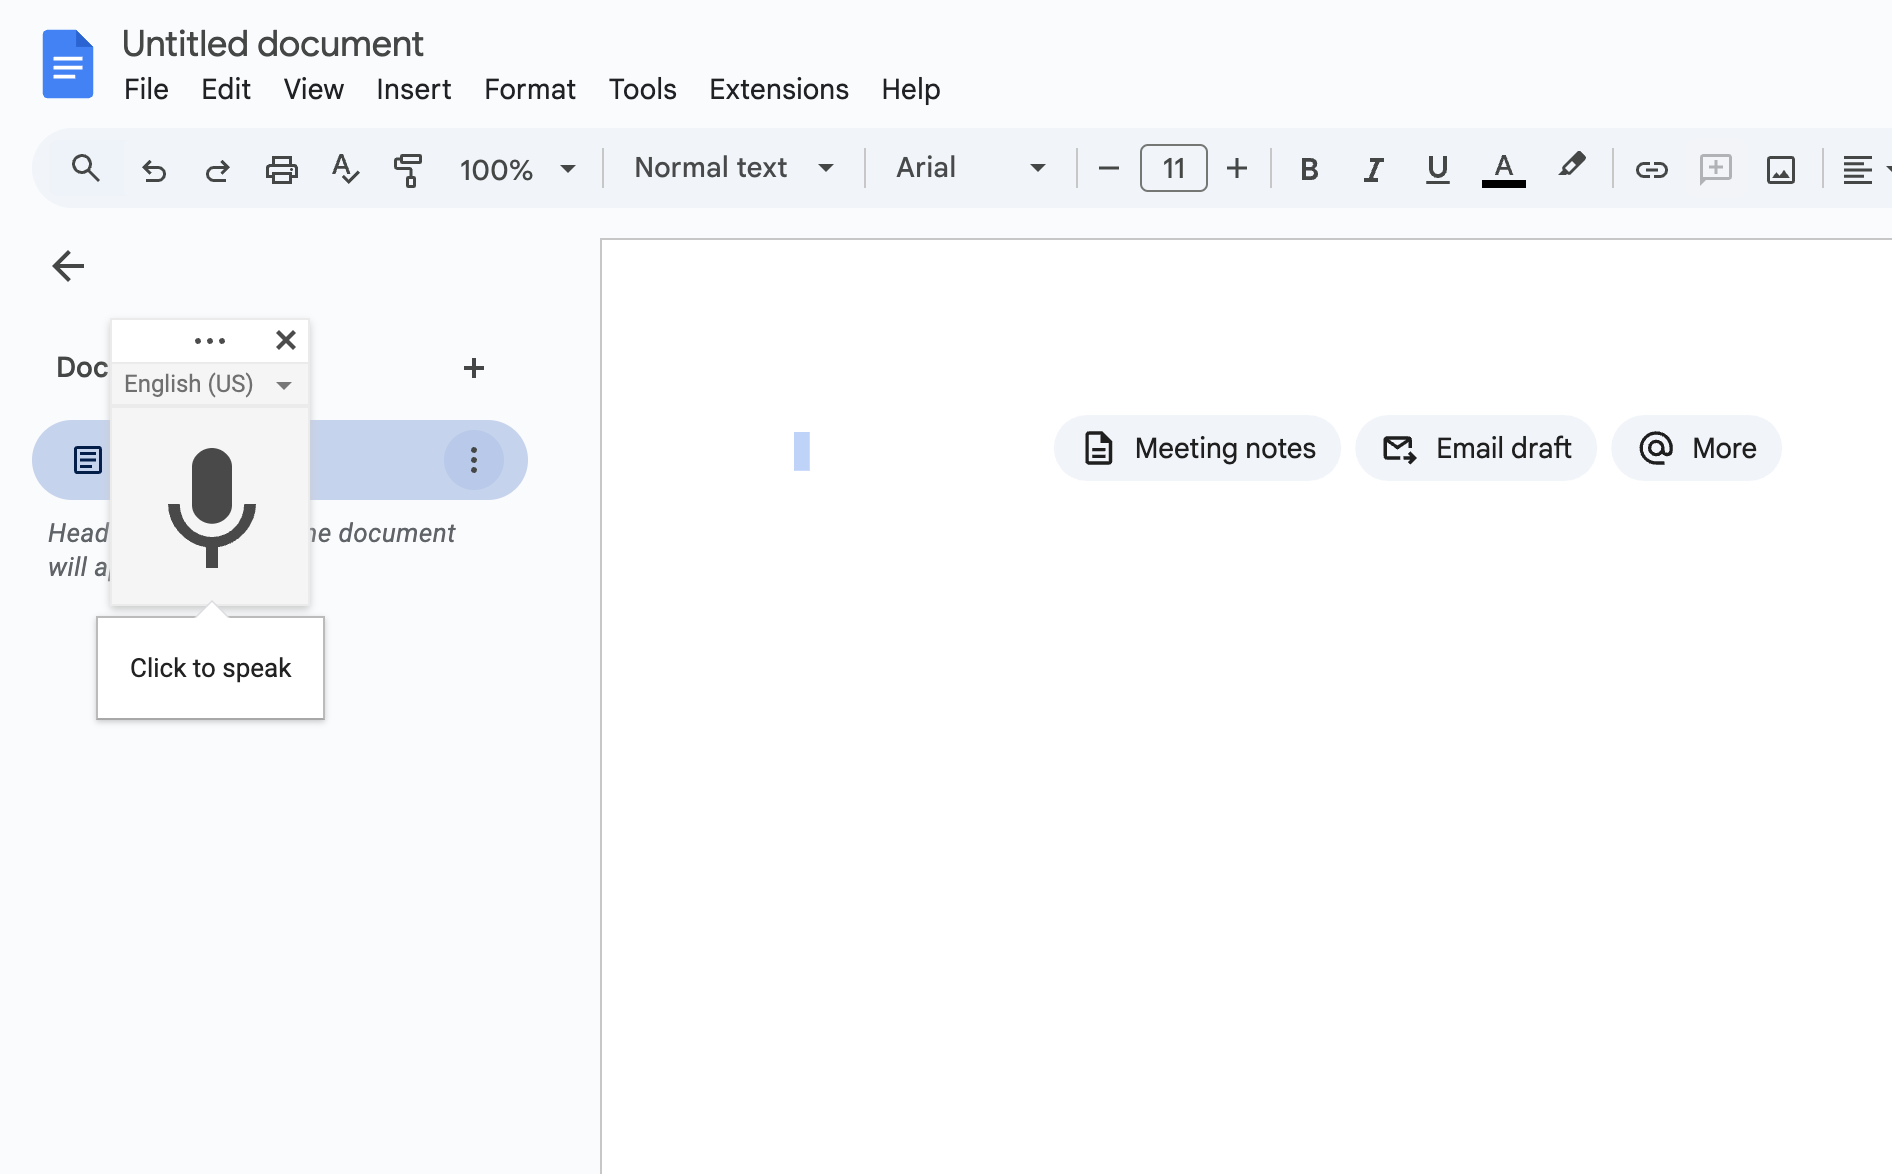
A microphone icon will appear on the left side of your document.
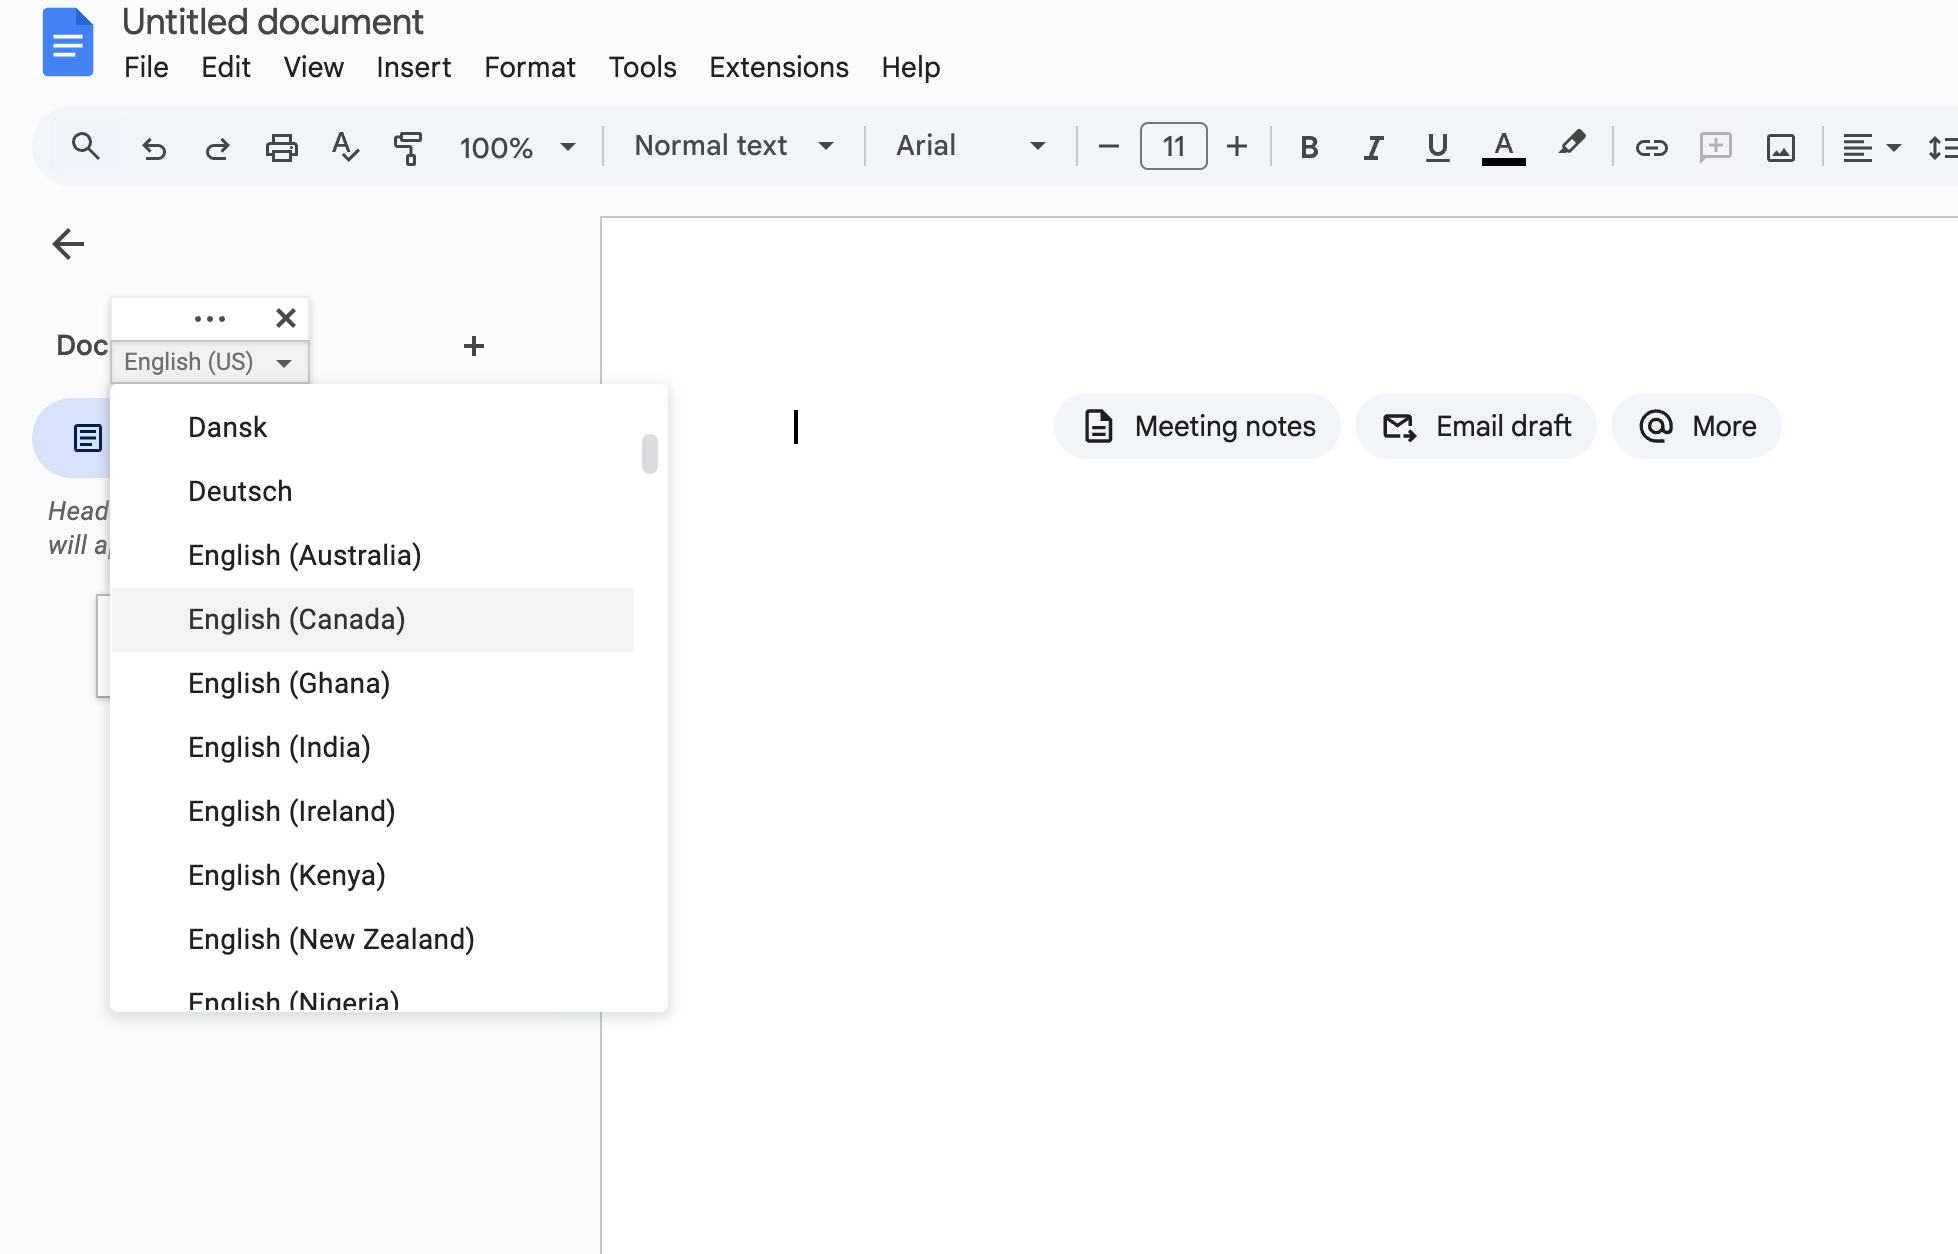
Step 3: Set the Language
Click the microphone icon, then select your desired language from the dropdown menu.
Make sure the language matches the audio in your video.
Step 4: Prepare the Video for Playback
Open the video you want to transcribe on a separate device or media player.
Ensure the audio is clear and played at a volume your computer microphone can pick up.
Step 5: Start Transcribing
Click on the microphone icon in Google Docs to activate Voice Typing.
Play the video, and Google Docs will automatically transcribe the audio into text in real-time.
Step 6: Edit the Transcript
Pause the video and make corrections as needed in the document.
Google’s voice typing isn’t perfect, so review for typos or missed words.
Step 7: Save Your Work
Once the transcription is complete, save the document to Google Drive or download it in your preferred format (e.g., Word, PDF).
3. Descript
Descript is an all-in-one tool that combines transcription, audio editing, and video editing. It automatically generates transcripts and allows you to edit both the text and the video by editing the transcript.
Best for: Professionals needing transcription integrated with audio/video editing.
Descript
Key features
Combines video editing and transcription in one platform.
Automatically generates accurate transcriptions with speaker labeling.
Allows text-based video editing for seamless workflow integration.
Supports exporting captions for video content.
Pros
All-in-one tool for transcription and video editing.
Highly accurate with advanced editing features.
Cons
Premium pricing may be a barrier for casual users.
Requires learning curve for advanced features.
Steps to transcribe video with Descript
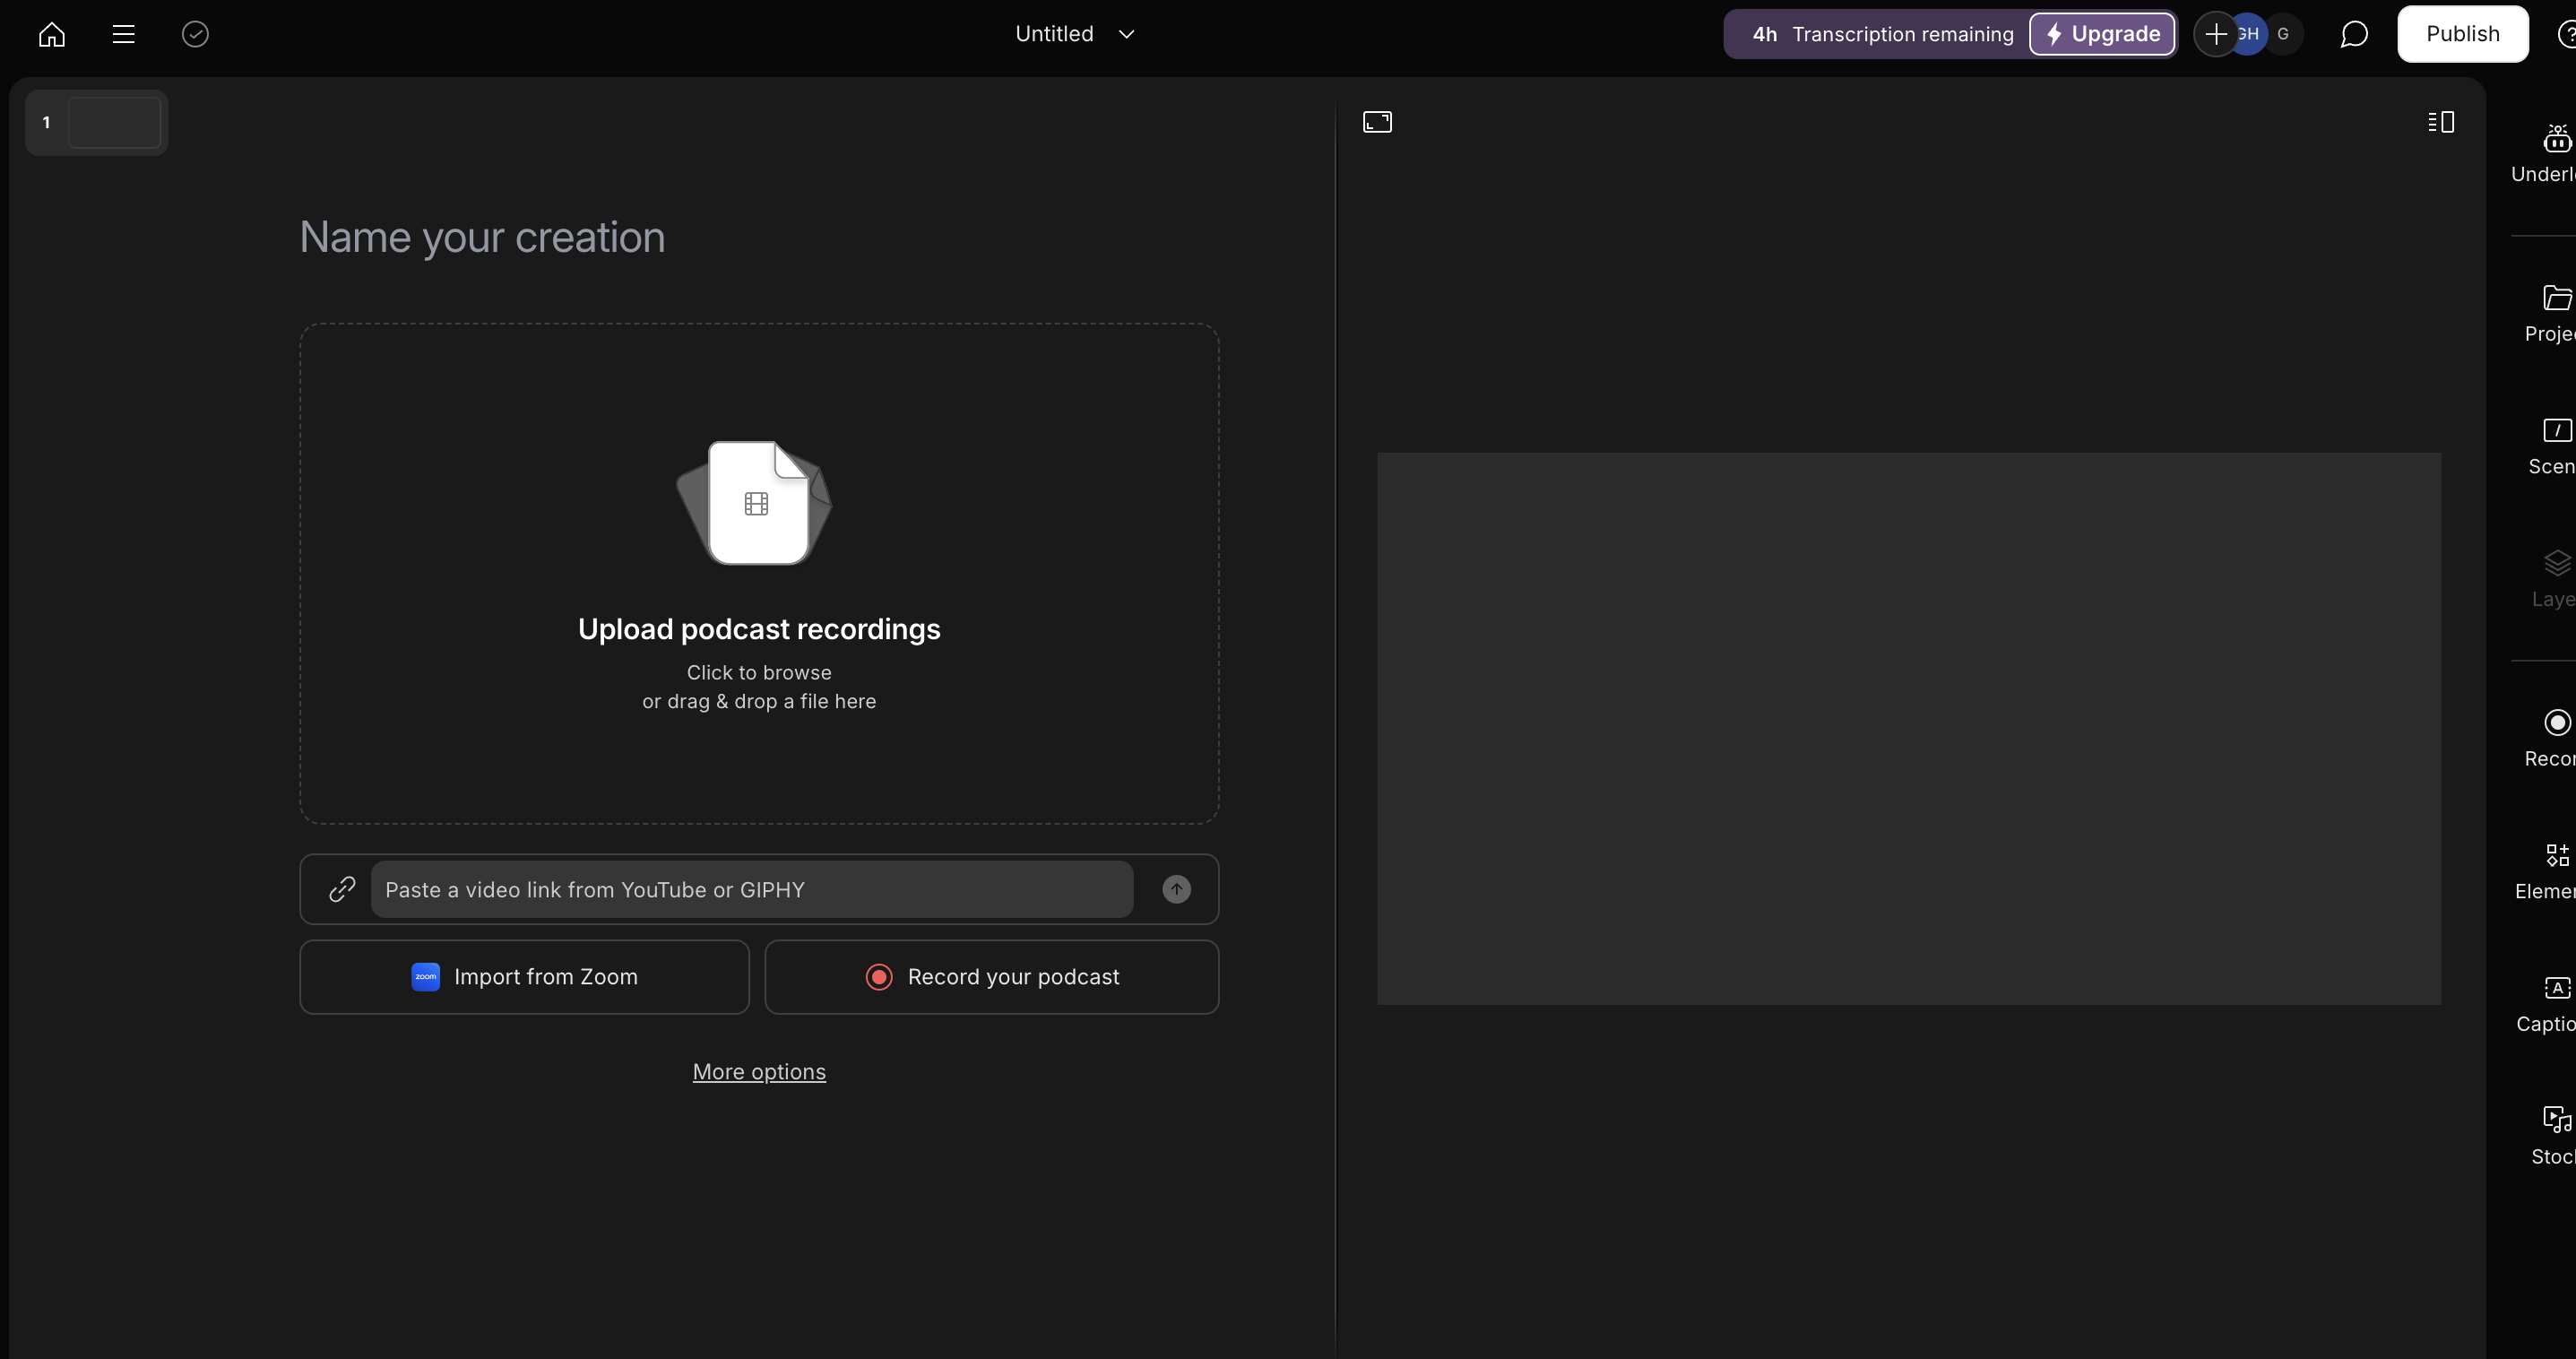
Step 1: Create a New Project
Open Descript and click on “New Project.”
Name your project and select “Video Project” to proceed.
Step 2: Upload Your Video File
Drag and drop your video file into the Descript editor.
Alternatively, click on “Add file” to browse and select your video.
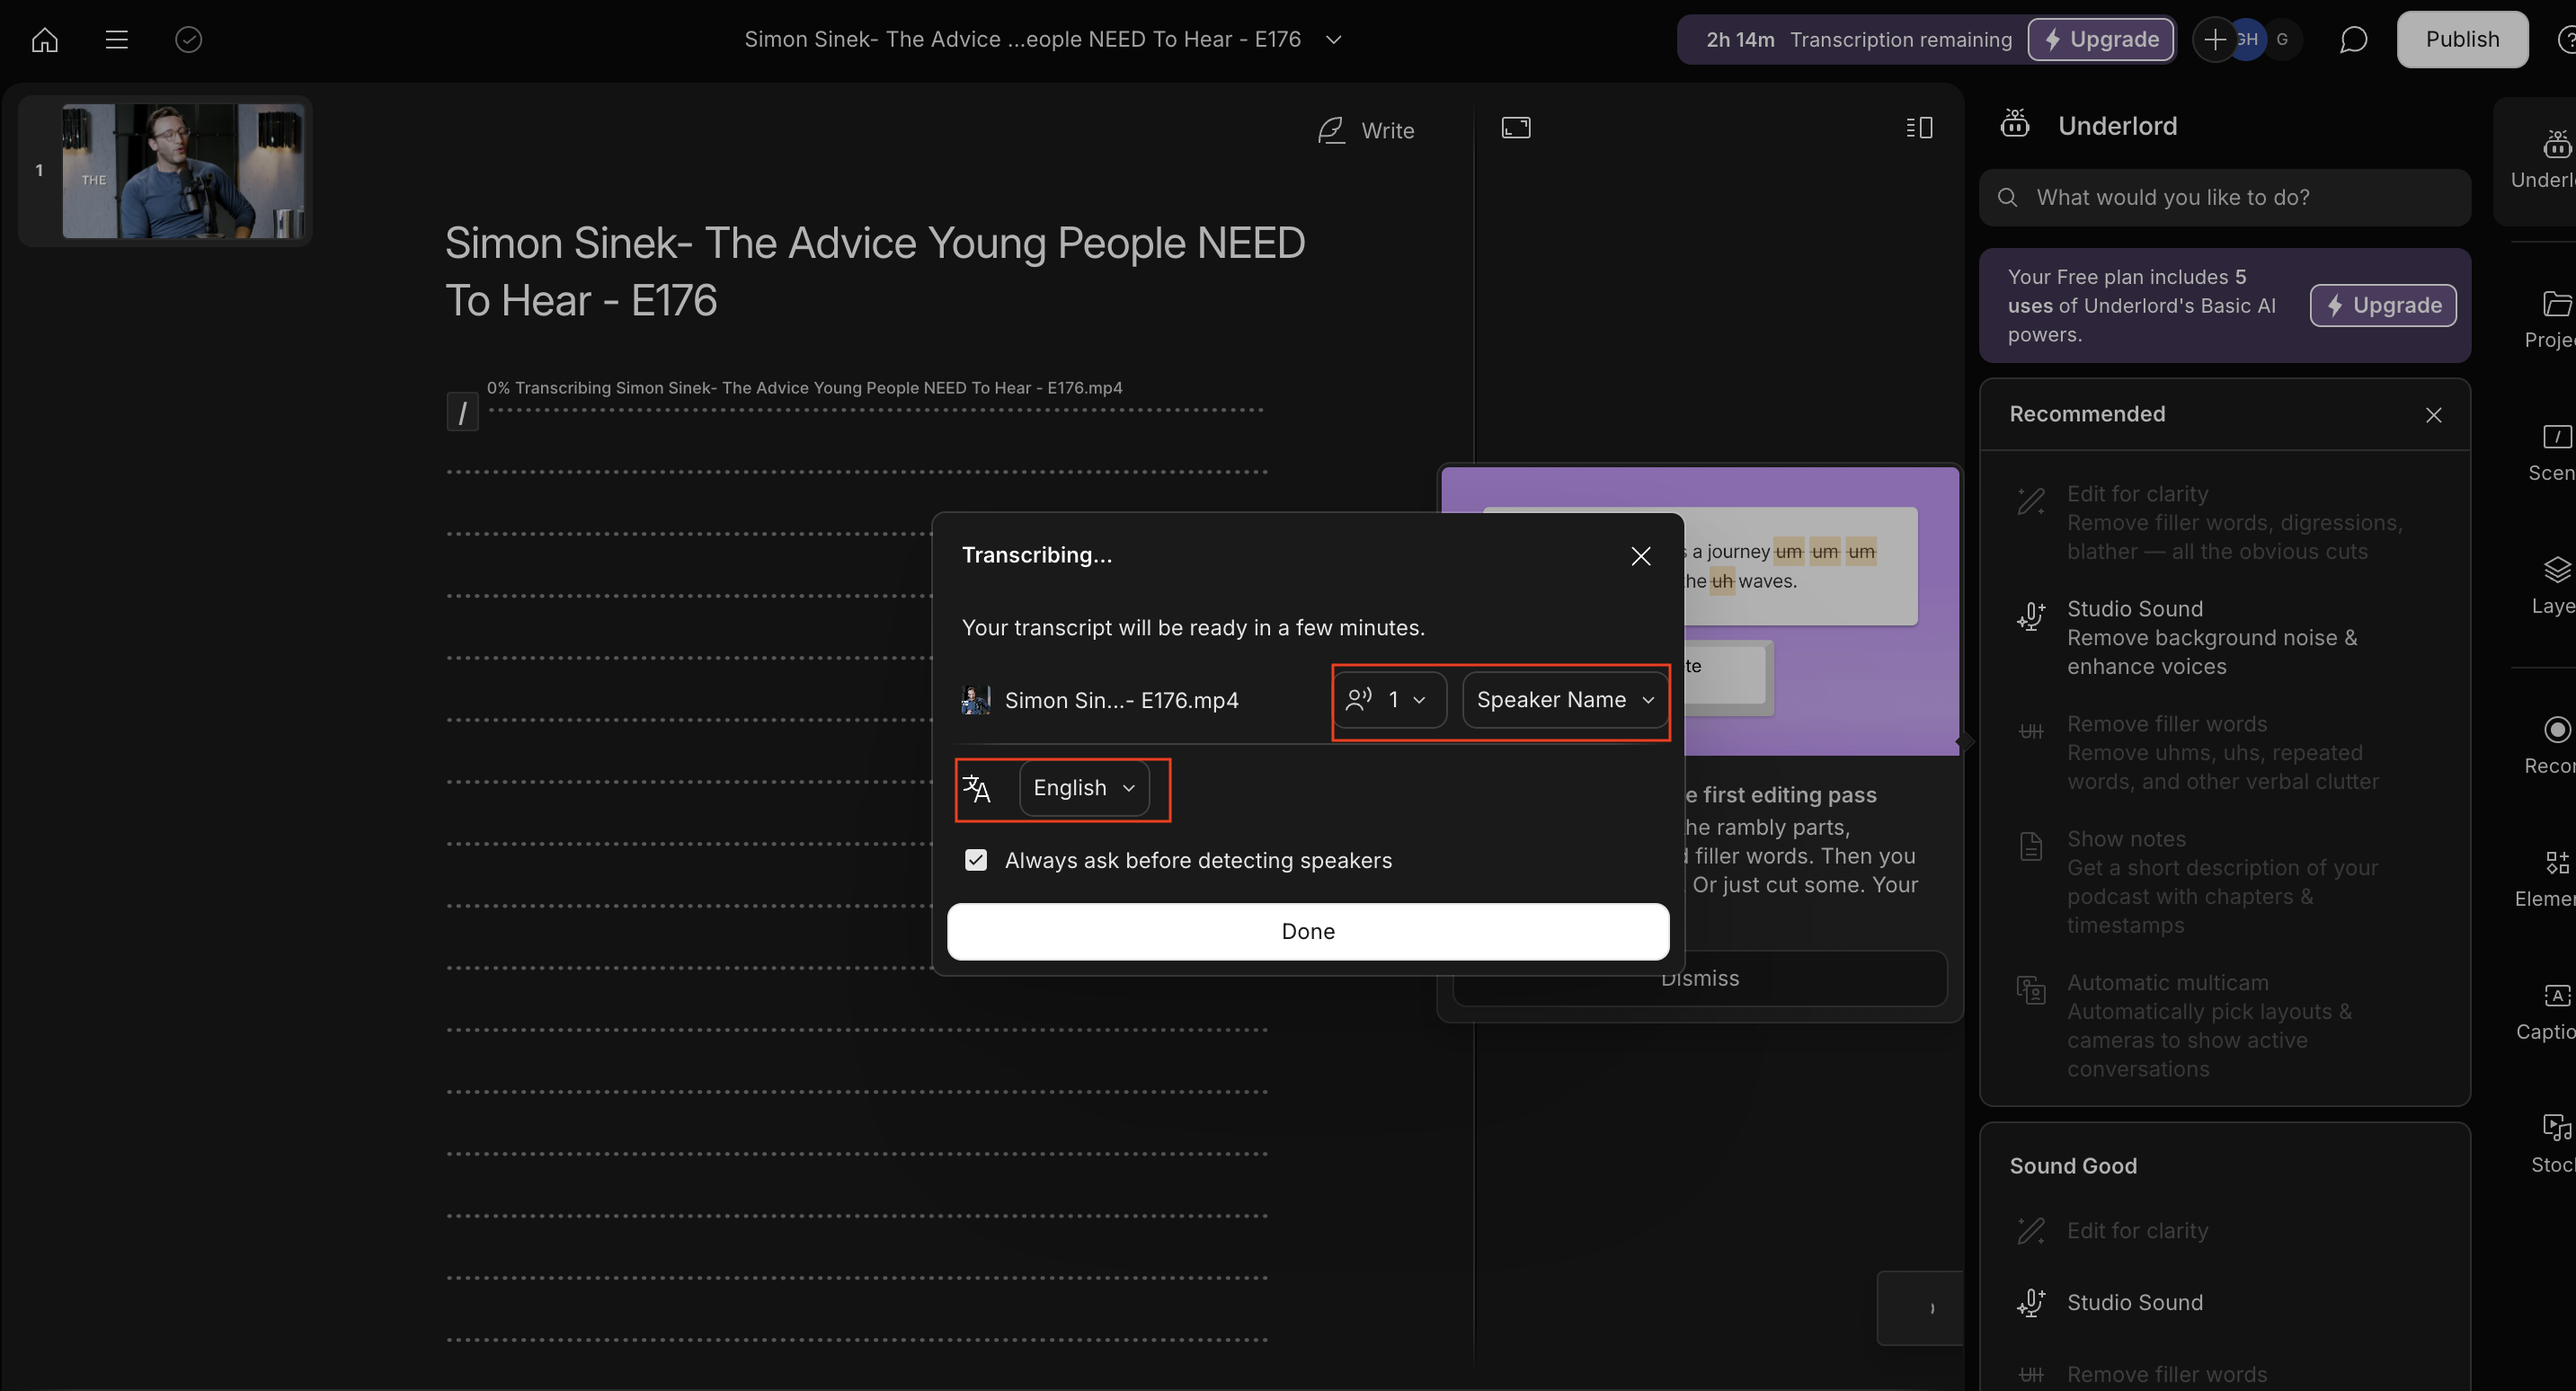
Step 3: Choose Transcription Language
After uploading, Descript will prompt you to select the transcription language.
Choose the language that matches your video’s audio content.
Step 4: Identify Speakers (If Applicable)
If your video features multiple speakers, Descript can detect and label them.
Specify the number of speakers and assign names to each for accurate labeling.
Step 5: Review and Edit the Transcript
Once transcription is complete, review the text for accuracy.
Use Descript’s editor to correct any errors directly within the transcript.
Step 6: Export the Transcript
When satisfied, click on “Publish” and select “Export.”
Choose your preferred format (e.g., Word, PDF, SRT) and download the transcript.
4. Temi
Temi is an automated transcription tool known for its quick turnaround time. It supports multiple file formats and offers a built-in editor for refining transcriptions.
Best for: Fast and affordable automated transcription.
Temi
Key features
Automated transcription service with quick turnaround times.
Supports multiple audio and video file formats.
Affordable pricing for short transcription projects.
Includes a built-in editor for reviewing and correcting transcriptions.
Pros
Fast and affordable transcription.
User-friendly interface for beginners.
Cons
Limited accuracy for noisy audio.
Does not provide advanced editing features.
Steps to transcribe video with Temi
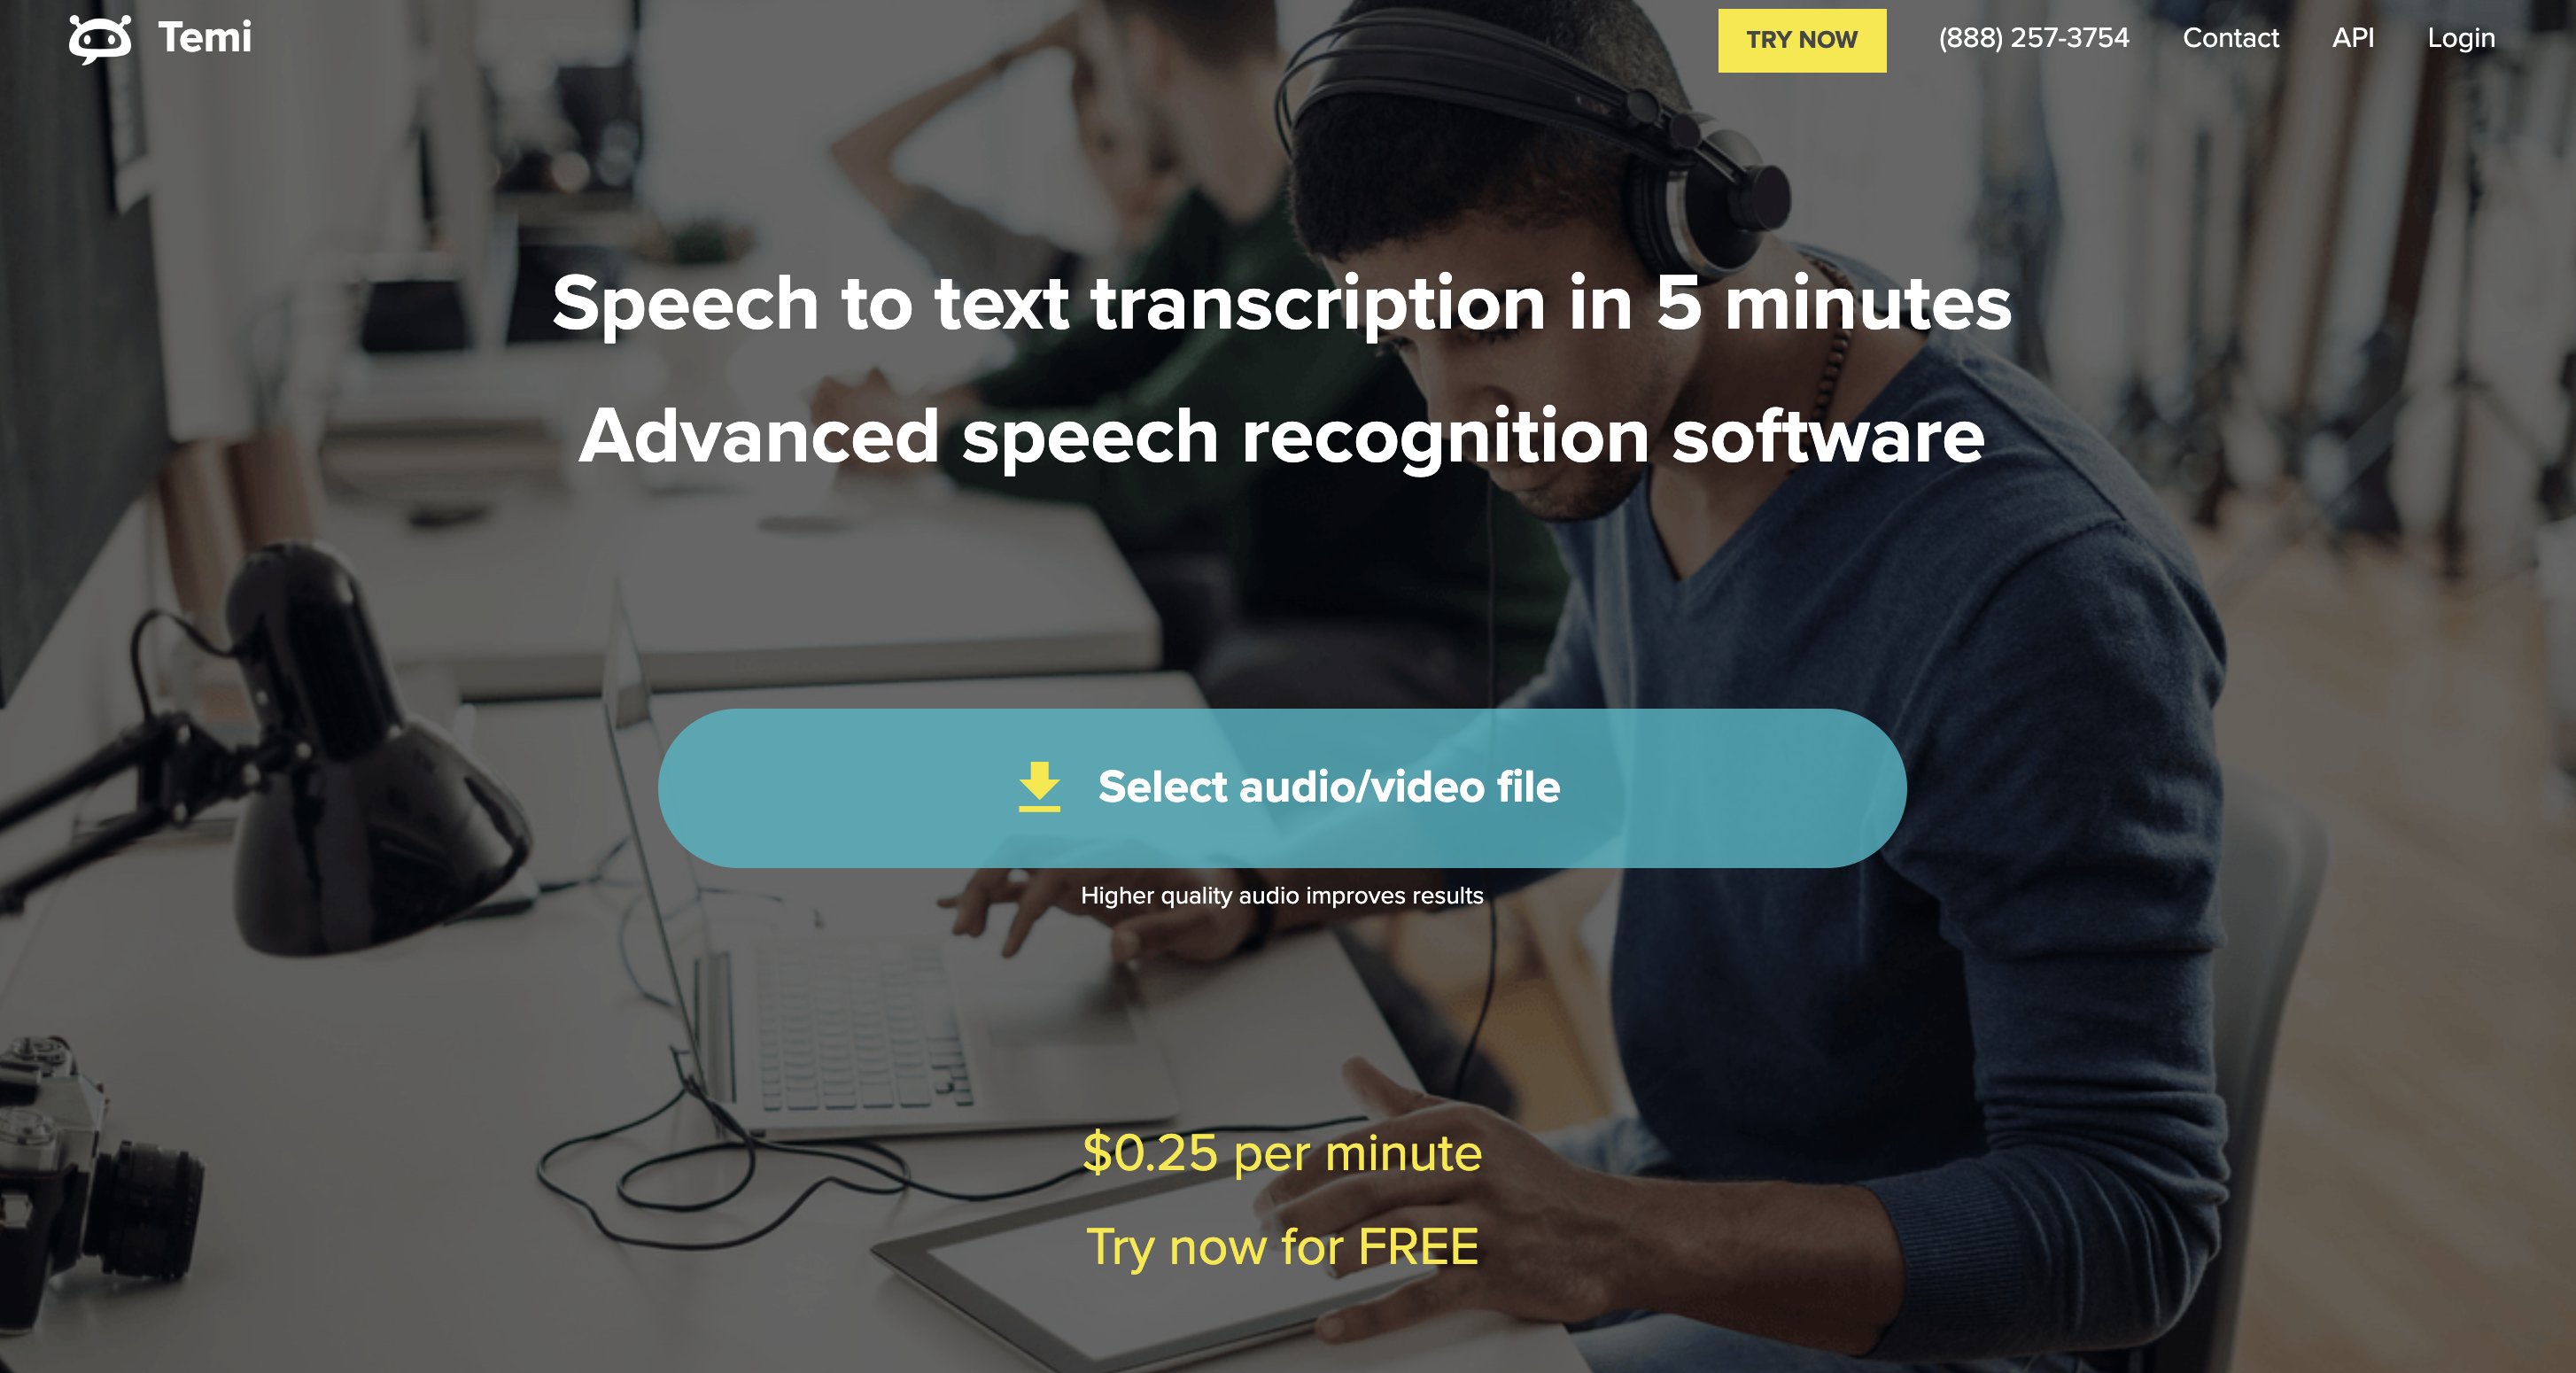
Step 1: Access Temi’s Website
Navigate to Temi’s website using your web browser.
Step 2: Upload Your Video File
Click on the “Select audio/video file” button.
Choose the video file from your device that you wish to transcribe.
Step 3: Provide Your Email Address
Enter your email address when prompted.
Temi will send the completed transcript to this email.
Step 4: Wait for Transcription
Temi will process your video and generate a transcript, typically within minutes.
Step 5: Review and Edit the Transcript
Once you receive the email notification, access the transcript through the provided link.
Use Temi’s web-based editor to review and make any necessary corrections.
Step 6: Export the Transcript
After editing, download the transcript in your preferred format (e.g., MS Word, PDF, TXT, SRT, VTT).
5. Happy Scribe
Happy Scribe offers both automated and human transcription services with multilingual support. It also provides advanced editing tools for formatting and exporting subtitles or captions.
Best for: Multilingual transcriptions and high-quality captioning.
Happy Scribe
Key features
Supports transcription in multiple languages.
Offers both automated and human transcription services.
Provides editing tools for enhancing accuracy and formatting.
Export options include subtitles and captions for videos.
Pros
Versatile options for automated and manual transcription.
Supports multilingual content creation.
Cons
Higher cost for human transcription services.
Occasional delays for large-scale projects.
Steps to transcribe video with Happy Scribe
Step 1: Sign Up or Log In
Visit Happy Scribe’s website and create an account or log in to your existing one.
Step 2: Upload Your Video File
Click on the “Upload a new file” button.
Select your video file from your device or import it from cloud services like Google Drive, Dropbox, or YouTube.
Step 3: Choose the Language
Specify the language spoken in your video to enhance transcription accuracy.
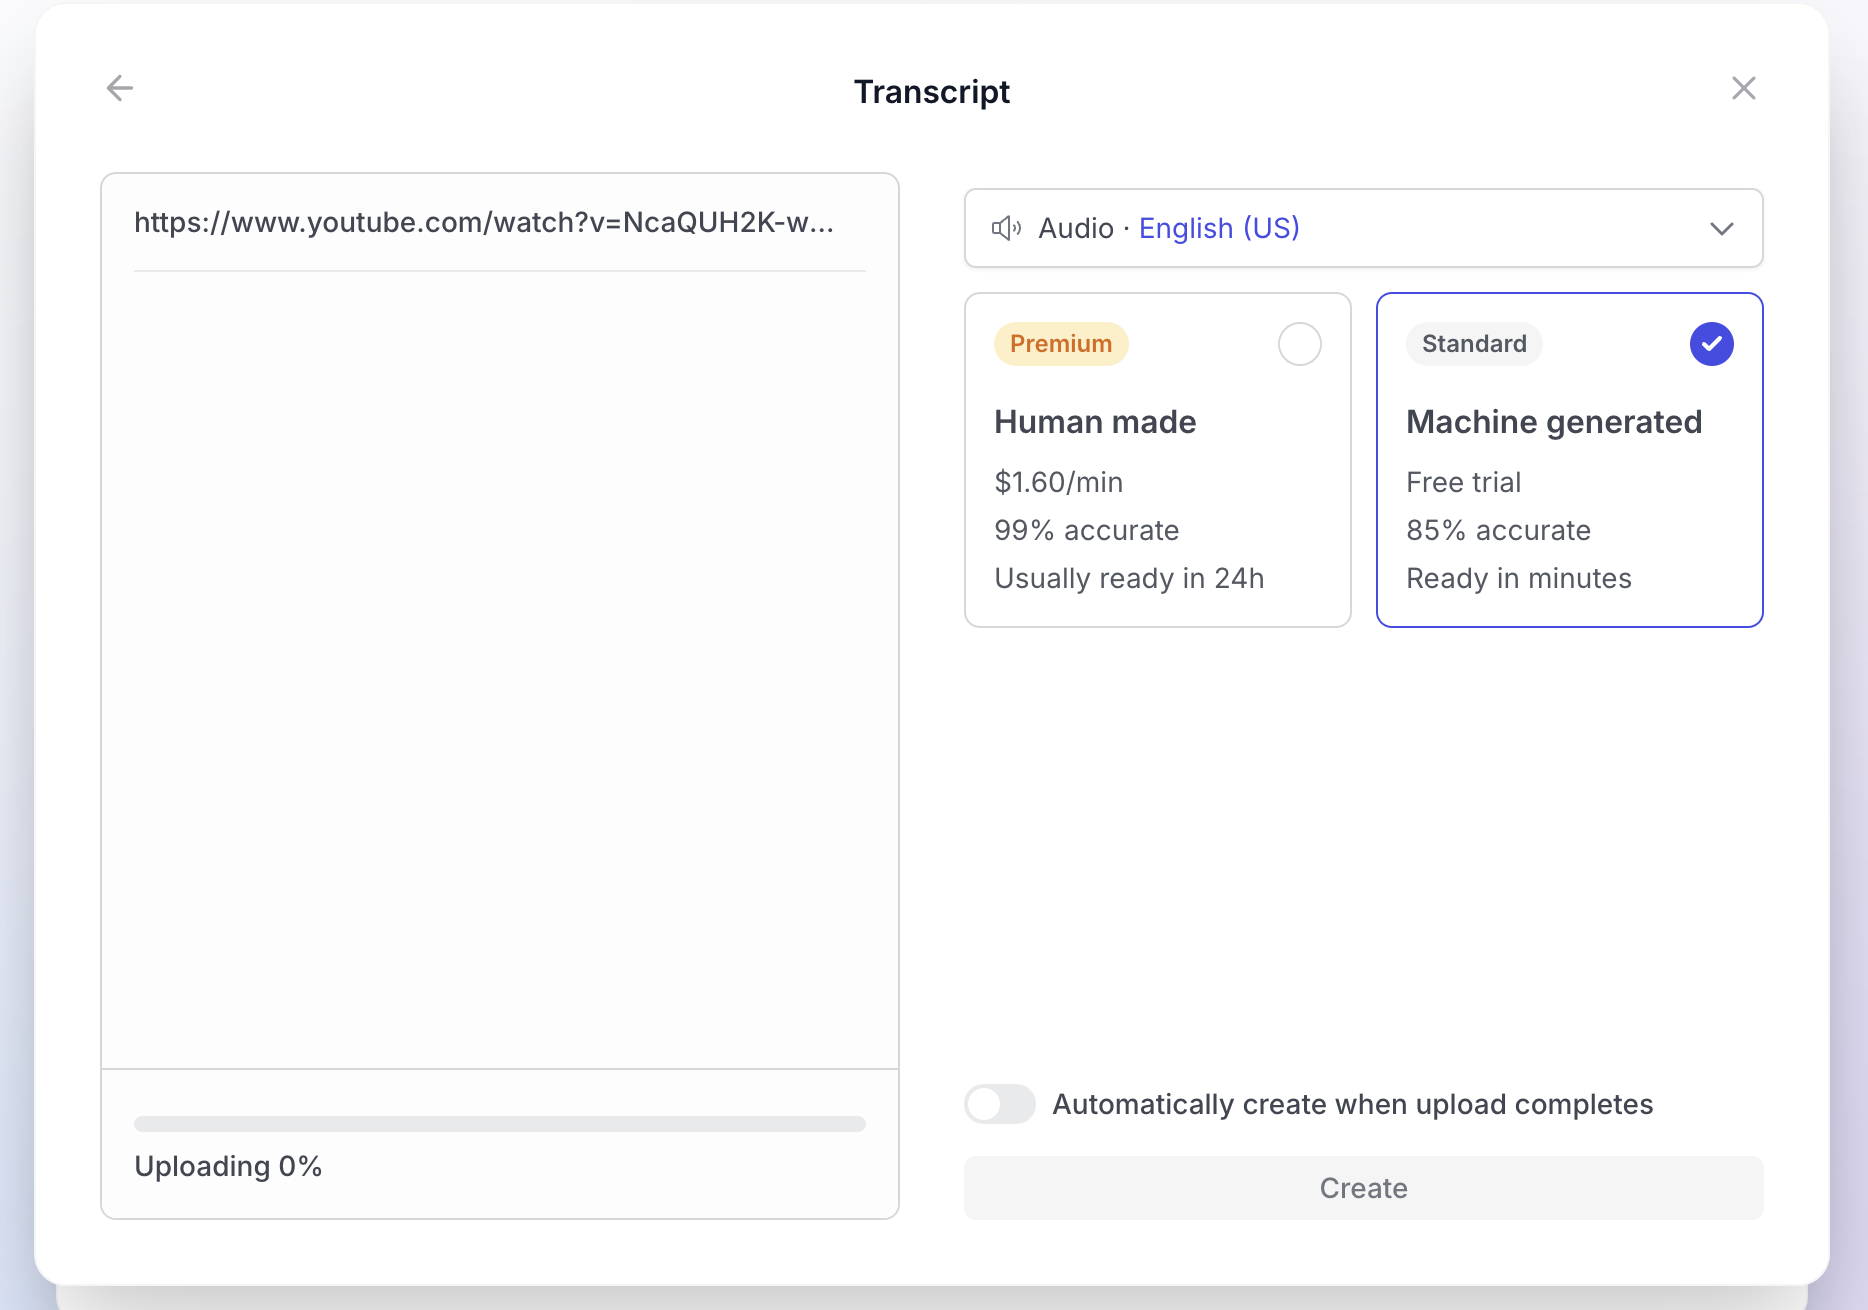
Step 4: Select the Transcription Service
Choose between:
Automatic Transcription: Faster and cost-effective, suitable for clear audio.
Human-Made Transcription: Offers higher accuracy, ideal for complex or noisy audio.
Step 5: Process the Transcription
After making your selections, click “Transcribe” to initiate the process.
Processing time varies based on the service chosen and video length.
Step 6: Review and Edit the Transcript
Once ready, access the transcript through your dashboard.
Use Happy Scribe’s interactive editor to review and make any necessary corrections.
Step 7: Export the Transcript
After finalizing edits, click on “Export” and choose your desired format (e.g., TXT, DOCX, PDF, SRT).
Download the transcript to your device or share it directly from the platform.
How Can You Use a Video Transcript
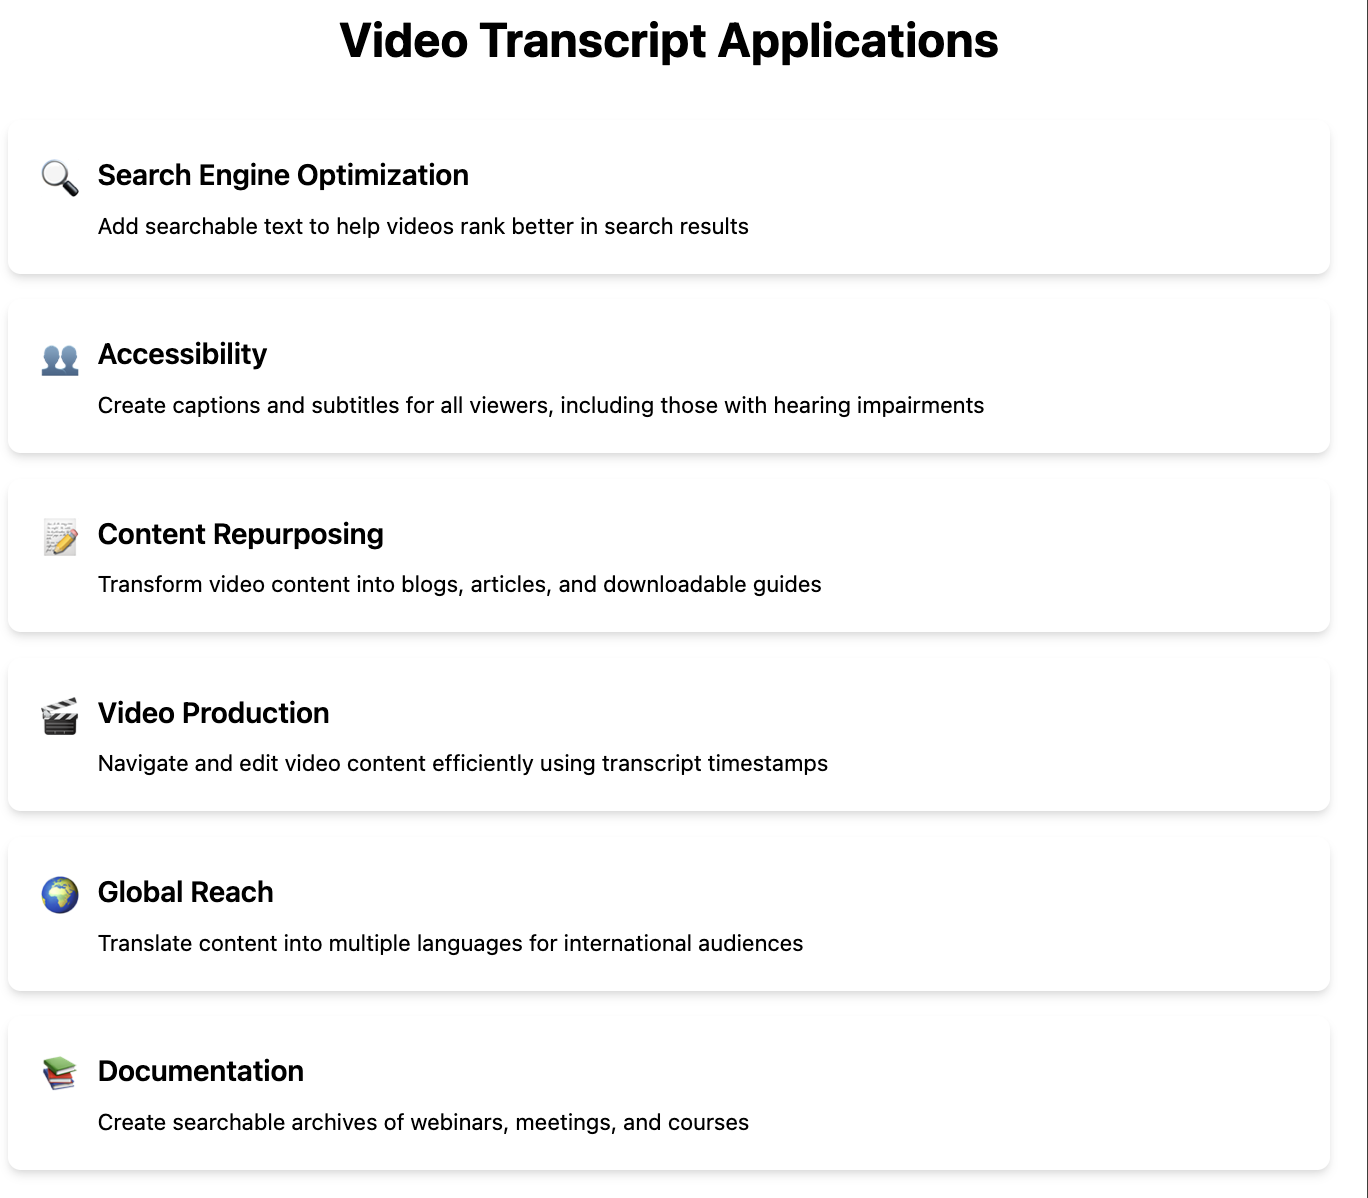
Video transcripts are incredibly versatile tools that go far beyond accessibility. Whether you’re a content creator, business professional, or student, here are some easy-to-understand ways to put them to good use:
1. Boost Your SEO Game
Search engines can’t “watch” videos, but they can crawl text. A transcript of your video can help your content show up in search results, driving more traffic to your website.
Pro tip: Add the transcript to your blog or website as searchable text.
2. Create Captions or Subtitles
Want to make your videos accessible to everyone? Use the transcript to add captions or subtitles. This is especially helpful for viewers who watch videos on mute or those with hearing impairments.
3. Repurpose Content into Blogs or Articles
A video transcript can easily be turned into a blog post, article, or even a downloadable guide. It’s a smart way to make your content go further without creating something entirely new.
4. Improve Comprehension and Accessibility
For educational or corporate content, transcripts can help people follow along better—especially if the material is complex. Plus, it makes your content more inclusive.
5. Save Time on Video Editing
Need to make edits or trims to your video? A transcript can help you locate specific parts of the video without scrubbing through hours of footage.
6. Translate for a Global Audience
If you want to reach international audiences, a transcript is your starting point for translation. It makes adding subtitles in different languages so much easier.
7. Document and Archive Your Content
Video transcripts are great for keeping a searchable record of your video content. This is especially useful for webinars, meetings, or online courses that you may need to revisit later.
Who Needs Video Transcription?
Podcasters
Podcasters can use video transcription to create detailed show notes, episode summaries, or written blogs.
These transcripts improve accessibility for hearing-impaired audiences and help with SEO by making the content searchable online. Transcripts can also be repurposed into social media snippets or email newsletters to engage listeners.
YouTubers
YouTubers rely on video transcription to create captions and subtitles, making their videos more accessible and professional.
Transcripts also improve SEO by providing keyword-rich content that search engines can index. YouTubers can extend their reach beyond the platform by repurposing transcripts into blogs or social media content.
Interviewers
Transcriptions of interviews are essential for journalists, researchers, or HR professionals. They provide a written record that’s easy to search, analyze, and reference. Transcripts also help extract direct quotes from articles or reports and serve as documentation for legal or archival purposes.
Filmmakers and TV Creators
Video transcription is crucial for creating scripts, subtitles, or captions in film and TV production. It ensures content is accessible to a global audience and supports localization efforts. Transcripts are also valuable during editing, helping editors identify key scenes or dialogue.
Bloggers
Bloggers can repurpose video or podcast transcripts into high-quality written content, such as blog posts, guides, or newsletters.
This allows them to reach audiences who prefer reading over watching or listening. Transcripts also make it easier to incorporate multimedia elements like videos or audio into blog articles.
Educators
Teachers, trainers, and course creators use video transcription to provide learners with written versions of lessons, lectures, or tutorials.
Transcripts support better comprehension, enable note-taking, and make learning materials accessible to students with hearing impairments or language barriers.
Tips for Accurate Transcriptions
Whether you’re transcribing manually or using a tool, these tips will help you achieve precise and professional results:
1. Use High-Quality Audio
Ensure your video or audio file is clear and free from background noise.
Use tools like Krisp to eliminate unwanted sounds and improve clarity.
2. Break It into Manageable Sections
If transcribing manually, work on smaller chunks of the video.
Pausing and replaying short sections makes it easier to catch every word.
3. Choose the Right Transcription Tool
Automated tools like Descript, Temi, or Happy Scribe save time and effort.
Look for tools that support features like noise cancellation and speaker labeling.
4. Proofread Your Transcription
Even the best tools can make mistakes, especially with accents or technical terms.
Review the transcript thoroughly and make necessary corrections.
5. Add Timestamps
Include timestamps to mark key sections of the video.
This is particularly useful for long videos, interviews, or educational content.
6. Familiarize Yourself with the Content
Watch or skim the video beforehand to understand the context and key terms.
This helps you anticipate jargon, acronyms, or unique phrases.
7. Adjust Playback Speed
Slow down the playback speed to catch every word without missing details.
Most media players and transcription tools have this feature.
8. Use Headphones
A good pair of headphones can help isolate sounds and pick up subtle nuances in speech.
9. Leverage Speaker Identification
Use tools that can differentiate between speakers in multi-person conversations.
Labeling speakers improves readability and organization.
10. Practice Patience
Transcribing can be a time-consuming task, but accuracy is worth the effort.
Take breaks to avoid fatigue and stay focused.
Why choose Krisp’s Video Transcription Over Other Tools?
Krisp is your secret weapon for clean, accurate, and effortless video transcription. Here’s why it stands out:
Noise-Free Audio: Real-time noise cancellation ensures crystal-clear audio, making your transcriptions more accurate than ever.
Seamless Integration: Works with your favorite platforms and tools, so you don’t need to switch workflows.
User-Friendly: Minimal setup and an intuitive interface make it super easy to use.
Time-Saving: Clear audio means fewer errors and less time spent on editing transcripts.
Krisp AI Meeting Assistant brings all these benefits straight to your meetings, making transcription effortless, audio crystal-clear, and setup seamless.
You can transcribe a video to text by using tools like Krisp, Descript, or Happy Scribe. Simply upload your video, let the tool generate a transcript, and edit it for accuracy.
Use transcription software like Temi or Happy Scribe. Upload your recorded video to the platform, and it will process the audio and generate a transcript in minutes.
Free options like Google Docs let you transcribe videos using the Voice Typing feature. Play your video while enabling Voice Typing to capture the text.
Yes, Google Docs can transcribe audio from a video using the Voice Typing tool, but it requires clear audio and may need manual corrections.