What if I told you you’re not using Zoom to its full capacity?
Zoom’s popularity is widespread as the app has been named the “Preferred Video App” by Okta for two years straight. Hundreds of millions of people use Zoom on a daily basis. And it’s not just professional teams. Your friends, family, neighbors, and even your kids are familiar with it.
All of these people are using their Zoom client differently.
The pitfall is that once you get the hang of the basics, you won’t be interested in learning more about the Zoom advanced features that can make your calls more productive and comprehensive. The biggest issues that could appear are security-related with people popping in a meeting just because they got hold of a link to it.
In this tried-and-tested guide, you’ll find out how to choose the right privacy settings, use advanced screen sharing options, and loads of other advanced Zoom tips you can apply straight away.
Note that all previous meeting etiquette tips apply in order to guarantee a successful meeting be it with your team, partners, clients, or potential candidates.
We’ve divided the following Zoom tips according to when you should consider: before, during, or after a call.
Before a Zoom call
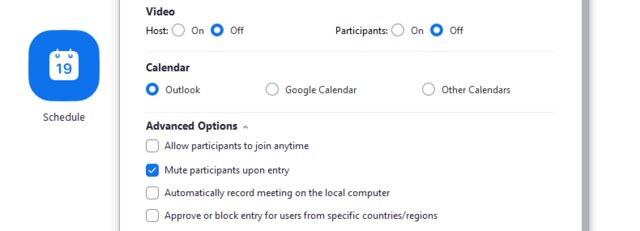
1. Start a meeting on mute every time
Stop the initial buzzing or people tuning in late and distracting the others by having everyone on mute at the start. When scheduling new video calls, simply go to your Advanced Options and check the Mute participants upon entry feature.
Fun fact: Press and hold the spacebar to temporarily unmute your microphone during meetings.
2. Remove background noises completely
Struggling to hear your colleagues or can’t get your point across because your surroundings are bustling? Use Krisp to automatically mute all background sounds, chattering, construction work, barking, and everything else for both you and your listeners.
See Krisp in action:
[demo-new]
Here’s how to set it up in less than one minute for any Zoom account.
3. Get your privacy settings right
Have you ever joined a meeting five minutes early only to find your host was still in another individual meeting?
Yup, happened to me.
Here’s everything you can do to prevent such blunders:
- Enable end-to-end encryption (E2EE): This automatically disables entry before the meeting host, live streaming, cloud recording, and more actions that could leak information.
- Don’t share your meeting link on social media or publicly: Unless you’re hosting a big industry event or webinar via Zoom, share links within other secured communication channels.
- Keep private Zoom meeting rooms separate from public ones: When hosting a public event, make sure you’re not using your Personal Meeting ID.
- Remove unwanted or spammy meeting participants: This is especially helpful if you’re hosting a live event where anyone can join. Remove them from the call or block their video/audio entirely. Limit their screen sharing capabilities or disable the chat, file sharing, and annotations options to avoid them sharing spam or dangerous content.
- Never allow people to join before a host: Head to your profile’s Settings and the Meeting tab to disable the Join before host option. You can also do this for every meeting from the advanced settings when scheduling a call from the desktop app.
Note that Zoom has taken extra caution measures and now makes it mandatory for a meeting to have one of the following: a passcode, a Waiting Room, or the Only authenticated users can join meetings feature turned on. You can add these manually but note that passwords are a must and you can’t completely remove them.
Don’t forget to stick to our full list of privacy tips to prevent hacking, information theft, and “Zoombombing”.
4. Create recurring meetings with a single URL
Whether it’s for a weekly standup meeting or one-on-one call, recurring meetings are a must for every team. Setting these up right off the bat ensures your team won’t forget about them and they’ll always have access to the same URL — so no more “Where’s the meeting link?” issues.
To do so, just schedule a meeting like you’d regularly do and make sure you select the Recurring meeting option. For advanced features, choose No Fixed Time when meeting up with your team or the same person as usual without having a set time. You’ll still use the same meeting settings and meeting link but can always edit the time.

5. Get accustomed to shortcuts you’ll use often
There’s a shortcut for almost everything you want but the most common ones you might want to use for a faster Zoom experience are:
- Alt: To hide or show your meeting controls.
- Alt+A: To mute and unmute your audio.
- Alt+C: To start or end cloud recording.
- Alt+N: To switch your camera when using multiple ones.
- Alt+F: To enter or leave the full-screen view.
- Alt+S: To start or stop screen sharing.
- Alt+Shift+T: To take a screenshot.
These are particularly helpful when you’ve already got multiple windows and browser tabs open and don’t want to switch back to the Zoom app. Keep in mind that you can edit these to suit any other shortcuts you’re using elsewhere.
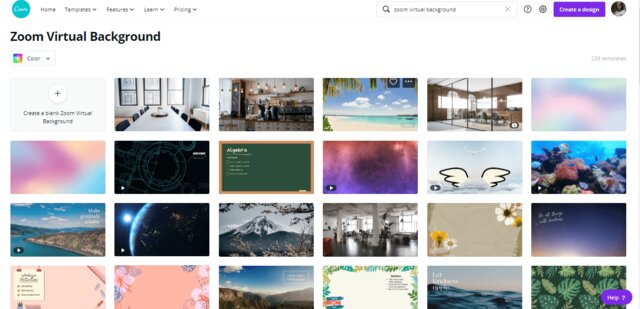
6. Create your own Zoom background
Ditch the classic office or beach background by creating your own. Photoshop will work but a user-friendly version like Canva provides dozens of ready-made templates you can further customize—animated ones includes:
Executives, freelancers, customer support and sales teams, and more can customize the background to match the company’s branding. Depending on the occasion, you can add your contact information, fun or helpful announcements, product features, calls-to-action, general tips for conduct or reminders, or fun easter eggs.
Then, go to your desktop app’s Settings, choose Background & Filters, add your custom background from the plus sign on the right side of the meeting screen, and uncheck the Mirror my video option.
Another one of the best Zoom tricks is to disable this last feature even when you don’t use a background if you often show things with text or imagery on camera. Note that checking “Mirror my video” only mirrors the display for you, but not for others on Zoom.

7. Use filters like a pro during Zoom video conferencing
Filters for Zoom? Why not?
Go to the Zoom web app’s Settings, click on Video, and check the Touch up my appearance option under My Video.
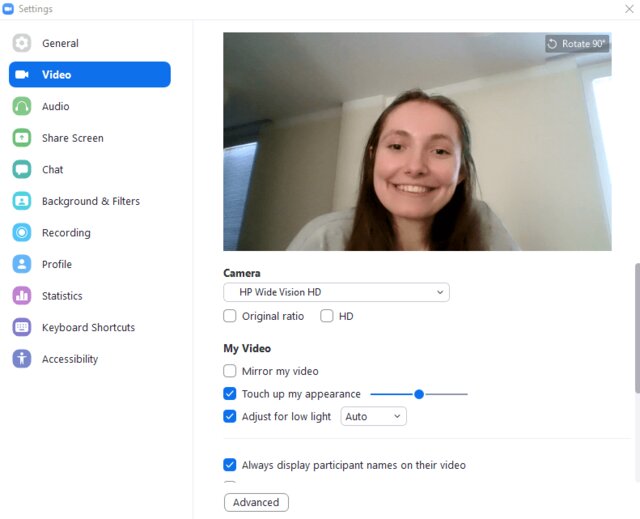
Tip: Under the Touch up my appearance option you’ll find an adjustment for low light which is perfect for dark rooms or cloudy days when you just can’t get the light right.
During a Zoom meeting
8. Use waiting rooms
Zoom has A LOT of privacy settings. When not used correctly, people can get into your common meeting room even if it’s not their time yet. They can get information that’s supposed to be confidential or disturb your current meeting altogether.
The first thing on our list of Zoom tips is the safest privacy measure: to set up a waiting room from which the meeting host needs to approve every participant before they can join.
To enable Zoom meeting rooms at a user-level, go to your profile’s Settings, click on the Meeting tab, go to Security, and toggle the Waiting Room option.
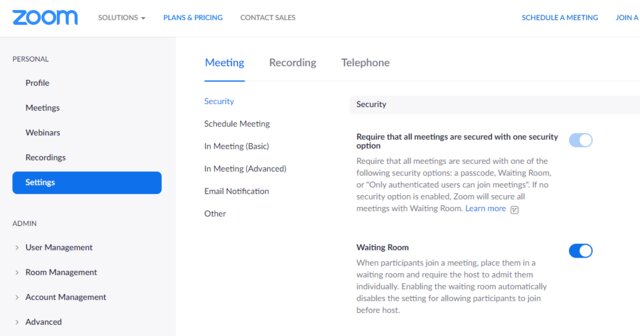
You can also set these for every specific call when scheduling a meeting.
Besides this quick hack, there’s loads of other Zoom privacy tips to use…
9. Raise a hand [two ways]
The worst part about virtual meetings is that it can be hard to signal when you want to say something.
To aid Zoom meeting etiquette, hosts can enable non-verbal cues by going to their profile’s Settings, choosing the Meeting tab, scrolling to the In Meeting (Basic) section, and turning on the Non-verbal feedback capability.
Now, when a user goes to their Reactions option, a Raise hand button will appear, making it extra easy for anyone to get their ideas across.

A tiny hand icon will be displayed next to the participants who called it so hosts will be immediately notified. Alternatively, you can use the other emoji reactions to signal your thoughts or willingness to say something. For example, a Slow down reaction will tell the host to go through their explanation or demo at a slower pace while the No reaction implies disagreement so the host can get back to you to clarify a topic.
10. Try advanced screen sharing options for more accuracy
Ever seen these?
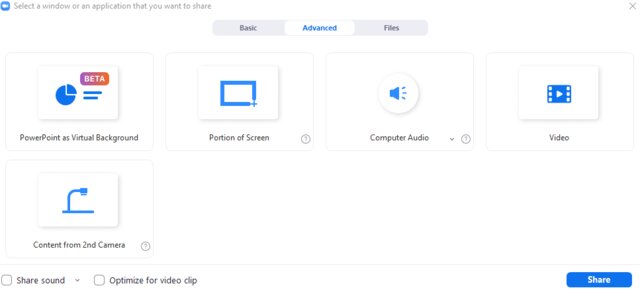
You should check Zoom’s Advanced screen sharing capabilities if you often prefer sharing only a part of your screen, want to use a second camera, or want to share a video. The PowerPoint presentation option is also super handy as it works for virtual backgrounds too:
Note: Krisp lets you set up and use your virtual backgrounds across multiple video communication tools. This way, in case Zoom crashes or someone calls for an unexpected meeting on a different video conferencing app, you can keep a consistent background without having to add it again.
Recording for a video or just want the best quality for the meeting? Use the camera from your phone as a webcam in Zoom:
If you want to later publish the video online, make sure the Optimize for video clip box is checked when choosing which screen to share.
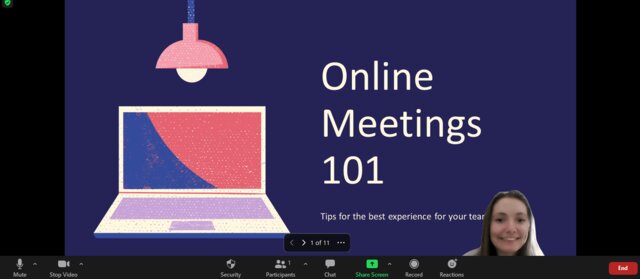
11. Always use a mouse spotlight when sharing your screen
Once you start screen sharing your screen or a whiteboard, this bar will pop up once you hover your mouse at the top:

First, choose the Annotate button. From here, you can use a mouse spotlight, draw on top of the screen, add text or stamps, or more highlighting options to finally show your viewers what you’re referencing.
12. Record meetings
The option to record your meeting in an MP4 format is available for all plans, including the free one. You can record meetings to later upload them to YouTube, social media, or just use them as a reference when writing a case study or analyzing the usability of your website and user feedback.
Besides the audio and video format, the text chat window will also be recorded since you wouldn’t be able to go through it again otherwise like you can with a live event on a social network.
Always ask for permission to record and publish online beforehand. The various recording layouts allow you to film only the speaker or the screen if you want to keep your audience’s identity secured.
Tip: With paid Zoom plans, you can save these directly in the cloud but they can’t be embedded on a website due to security concerns.
13. Use breakout rooms for users without a Zoom account
Breakout rooms help hosts divide a bigger audience into smaller groups so everyone can get to interact with one another. Add themes to rooms so participants can enter or leave as they wish.
You’ll find the option to allow breakout rooms on your personal Settings, under the Meeting tab. Choose In Meeting (Advanced) and head below to Breakout room and enable the feature.
Once you’re in a meeting, the Breakout Rooms option will appear in your meeting controls and you’ll be able to create several such groups and assign hosts and participants for each one:
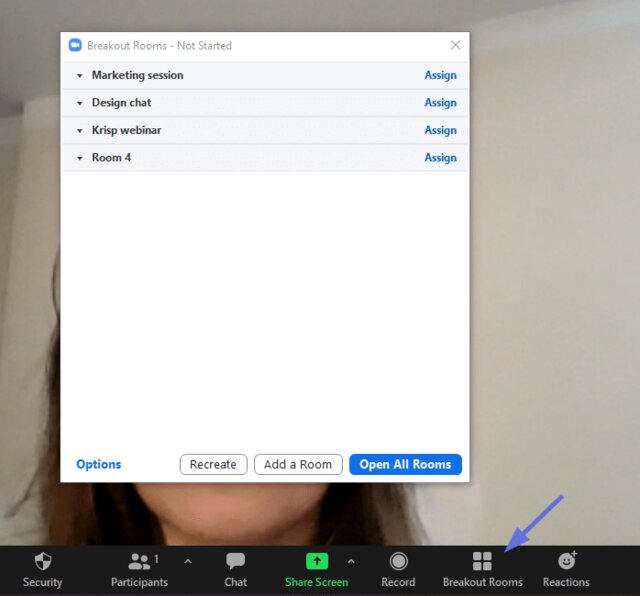
Large-scale events or business meetings can benefit from these so everyone can get the chance to contribute to the discussions. If you want to invite external collaborators or partners, keep in mind that users without a Zoom account can also join these rooms.
14. Bored of Slack? Try Zoom Chat!
I’ve always recommended using a single team communication tool to keep everyone in the loop with their tasks, files, and updates. But in Zoom, this feature is super easy to miss out on. You can find it on your Zoom home screen with the Chat icon at the top.

Just like with a regular team messaging app, you can create channels, set statuses, create polls where people can vote using emojis, and even add custom GIFs. External participants are welcome too.
15. Automatically transcribe your meetings
Transcribe your virtual presentations and meetings through Zoom to review them later or turn your talks into captions. The feature is only available with paid Business, Education, or Enterprise plans as you can only transcribe videos that were saved in the cloud.
To transcribe your Zoom meetings for free, utilize Krisp’s AI Meeting Assistant feature. It offers unlimited transcriptions with high quality, requiring minimal to no edits. Additionally, it provides extra features like generating automatic meeting summaries and action items. Check this resource for more details.
16. Keep all meetings secure as they happen
Zoom is constantly taking active steps towards more secure meetings. We’ve already talked about privacy options but note that during calls, you can find the Security icon on the left side of the main menu:
There’s various options you can quickly make use of in case of an emergency:
- Locking a virtual meeting in case you’re getting uninvited guests
- Hiding profile pictures to maintain the privacy of session participants [especially helpful for online events]
- Allowing certain meeting participants to share their screen, use the chat panel, or do other common actions
- Remove participants who are being rude or sharing spam content

After a Zoom session
17. Review meeting effectiveness
Take each call at a time to improve your online communication skills and provide an excellent video meeting experience with insights and analytics based on your team’s specific needs.
Want to get everyone on your team to participate? Krisp’s Talk Time gives you real-time insight into your meeting participation by displaying the exact amount of time you speak during a meeting. This lets you monitor your own engagement and know when it’s time to leave room for others to speak. Perfect for creating collaborative and inclusive meetings.
Feel like you’re wasting too much time in Zoom meetings? Keep track of call performance with Krisp’s Call Summary. You’ll know how long meetings usually last, how much time you spent speaking, and how much noise Krisp canceled.
In the future, the tool will let you get noise insights and run an overall sentiment analysis to better understand your team and how meetings run.
18. See who attended a meeting or event
This is a big one if you’re hosting webinars via Zoom and need to keep track of attendees. Plus, it’s a must for mandatory online lectures or team training sessions.
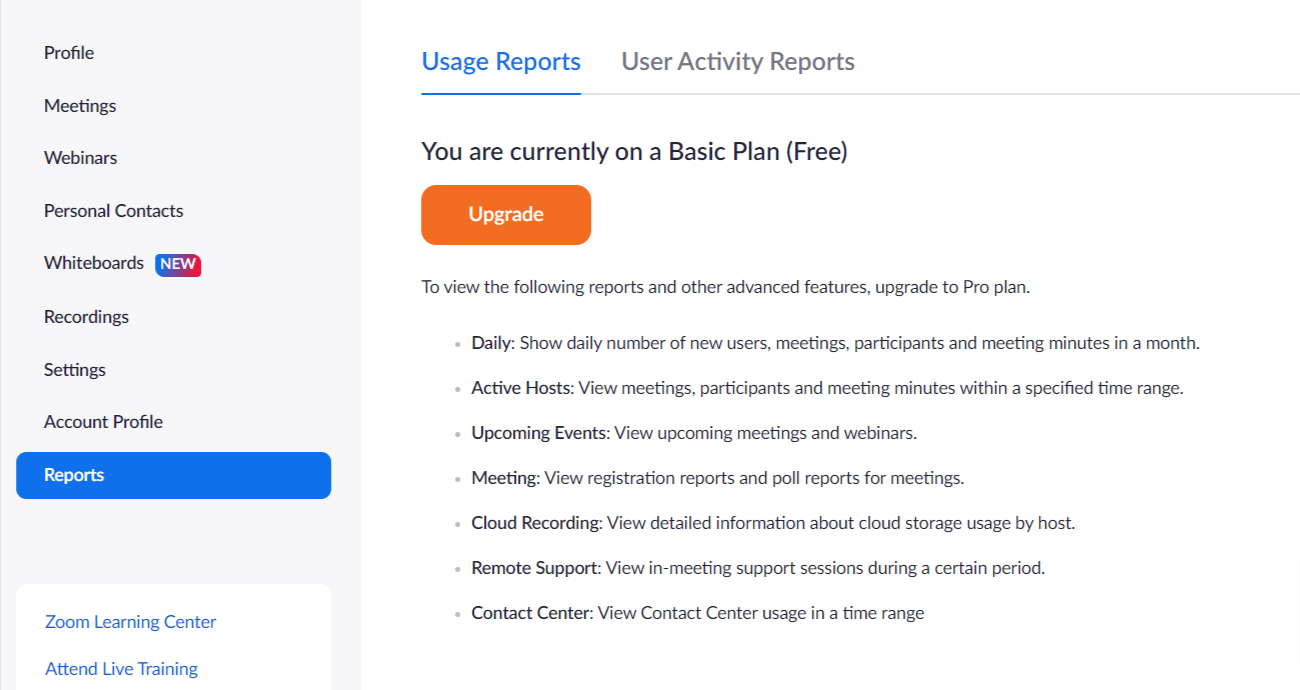
The get this list, head over to the Reports section under Zoom Account Management available here. Pick Usage Reports > Meeting > select the event or meeting you had and choose the report type and date range to create the report.
Keep in mind you can only get this list if you were the host for the meeting, and you’ve got Usage Reports enabled. You can also be the account administrator/owner but this feature doesn’t work for free plans:
19. Run that update after the meeting
Zoom updates can take a while to be completed. So the general best practice is to log in at least an hour before an important session to check for updates and run them. However, in most cases, you’ll get a pop-up with the latest available update right before the actual call.
Whatever you do, don’t accept the update just yet. Meetings will run fine without the most recent update installed. If you choose to update Zoom before a meeting, the upgrade could take too long and delay your meeting. Sure, there’s always short updates that take less than a minute, but you don’t want to risk showing up late for an interview or online event.
20. Get feedback from Zoom meeting attendees
As the meeting organizer, you can run polls or ask your audience questions during the call, but if you want accurate feedback, opt for an anonymous survey you can send after the call.
Classic questions to ask include:
- How would you rate the webinar?
- How would you rate the speakers?
- Were your expectations met?
But you can get into extra details that can help you improve future events, like:
- What topics would you like us to cover in the future?
- Any improvements that can be made to the webinar?
- How did you hear about this event?
Stick to one or two questions though to make sure people won’t be put off by the extensive length of the survey.
Here’s a complete guide on how to set up these surveys directly in Zoom or with your preferred third-party tool.
Two easy ways of sending these are:
- Sharing the survey invite link right at the end of the call
- Sending a follow-up email after the event with the feedback link in there
Enjoyed these Zoom tips?
Share your own Zoom best practices with us and the community on Twitter by mentioning @krispHQ.