Zoom meetings have become a big part of everyday life for many people. Whether it’s for work, school, or catching up with friends, Zoom makes staying connected easy. But like any other technology, Zoom isn’t perfect. One of the most common and frustrating problems people face is when their camera doesn’t work.
If you’re hosting a webinar, joining an online class, or attending a team meeting, a broken camera can be really stressful – especially when you’re recording the meeting and want everything captured clearly The good news is that most camera issues are easy to fix. In this article, we’ll explain why your Zoom camera is not working and show you simple steps to get it working again quickly.
Common reasons: Why is my Zoom camera not working?
The problem of Zoom not detecting your camera can be due to different underlying causes. You should suspect any of the following when you encounter the problem.
Here are some common reasons why your Zoom camera might not be working:
- The camera isn’t selected in Zoom.
- Another app is already using your camera in the background.
- You’re using an outdated version of the Zoom app.
- Your device settings don’t give Zoom permission to use the camera.
- There’s a problem with your webcam or camera hardware.
- Your internet connection is unstable.
- Your device, like some Lenovo PCs, might not fully support Zoom.
How can you fix the “Zoom camera not working” issue?
Before trying advanced fixes, start with simple steps like updating your Zoom app and restarting your device. If those don’t solve the problem, here are some effective solutions to help get your camera working again:
1. Verify if your camera is connected
If you are using an external webcam for Zoom, a wrong device-camera connection can be the reason for your camera not to work.
- Check the connection cable for any physical damage. If you notice any dent, try using another cable to be sure it is not the cause of the problem.
- Also, you can try connecting to a different USB port to verify that the port isn’t the culprit.
- Lastly, if you use a wireless camera, ensure your device’s Bluetooth is active and the camera’s battery is fully charged, as these can cause a break in transmission during your Zoom meeting.
2. Make sure the video is turned on
The first step in fixing your Zoom camera problems is to ensure your camera is switched on. That could be all you need to save yourself all the trouble.
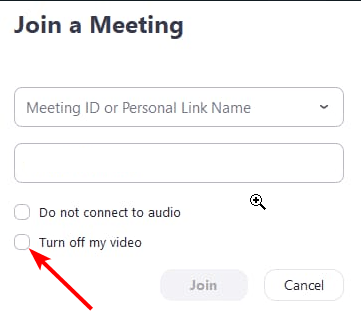
Whether using a PC, tablet, or other smart devices, Zoom prompts users at the launch of a meeting to check a box with the message, “Turn off my camera”. With that box checked, your device camera is off and won’t work for your Zoom meeting.
3. Step-by-Step Guide: Allow access to your camera
Another backstage reason that might cause your camera not to work in Zoom might be your device’s privacy settings.
Due to security reasons, your device, by default, denies third-party app permission to access the camera. You need to permit applications like Zoom before your camera works manually.
Here’s how to do it on different devices;
For Windows PC Users
- Press and hold the Window + I keys on your keyboard to open Settings.
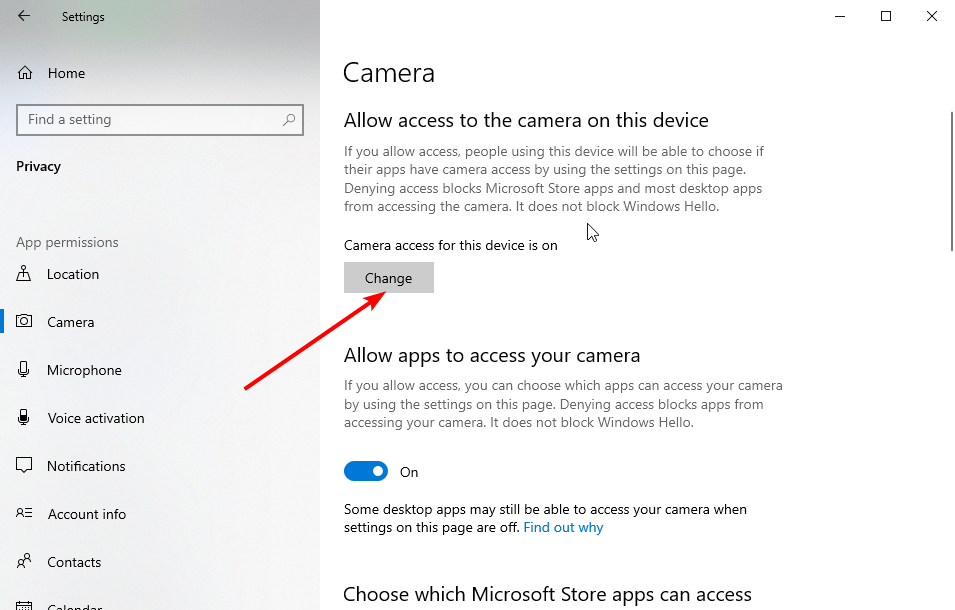
- Click on Privacy and select Camera on the left pane.

- Click the Change button under Allow access to the camera on this device section.

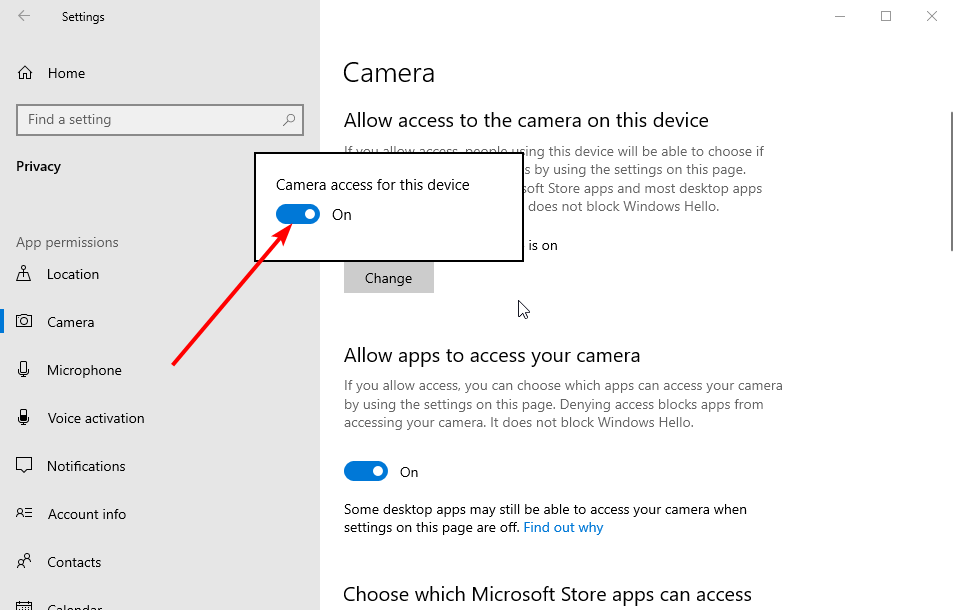
- Toggle the switch for Camera access for this device forward to turn it on.

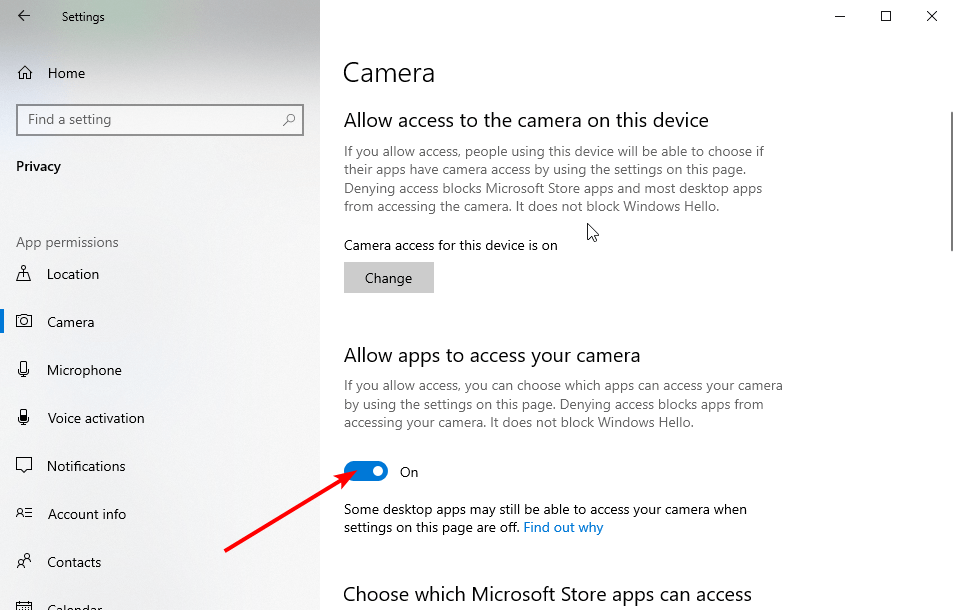
- Lastly, toggle the switch under the Allow desktop apps to access your camera section forward to turn it on.

For macOS users
- Click the ‘Apple menu’ on your desktop
- Go to System Preferences and select Security and Privacy.
- From the privacy tab, Locate the ‘Lock Icon’ (On the bottom left of your screen). Click on it and navigate to the Privacy setting.
- On the left navigation, find and click on the camera icon. Check the box next to the Zoom App.

- You have successfully given Zoom access to your camera. Launch Zoom to check if the issue is solved.
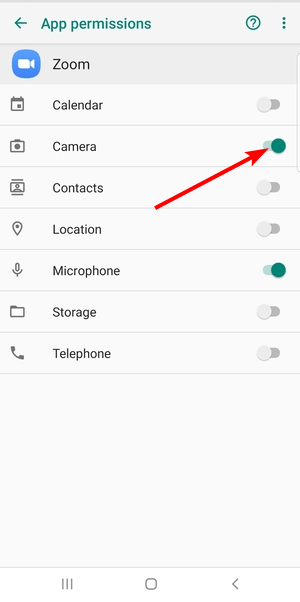
For Android Users
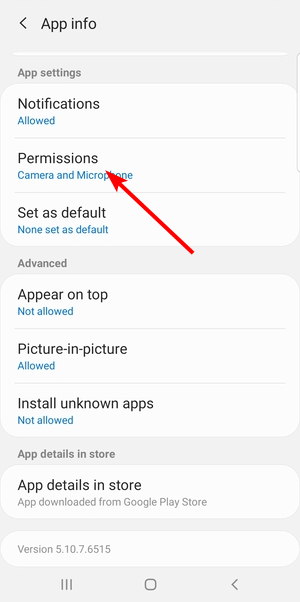
- Go to Settings > Apps on your device and find the Zoom app.
- Now, tap on Permission.

- Toggle the switch before the Camera option forward to enable it.

For iOS Users
- Go to Settings > Privacy on your iPhone.
- Choose Camera to see which apps have access to it.
- Locate Zoom and turn access for this app.
- Go back to Zoom and check if your camera is working.
4. Close Other Apps Using the Camera
If your camera isn’t working on Zoom, it might be due to missing, outdated, or corrupt drivers.
The camera driver is essential because it helps your computer’s hardware and software work together smoothly.
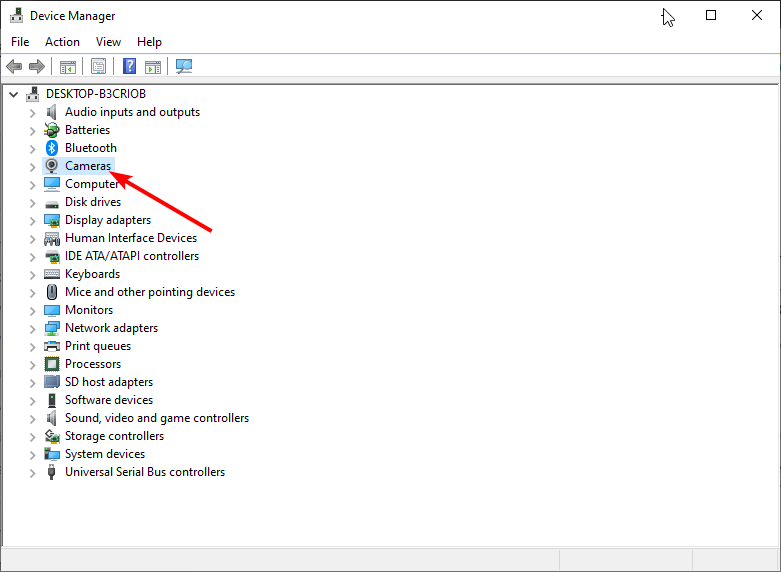
Here’s how to update your camera driver on your PC:
- Press the Windows + X keys and select Device Manager.
- Click on the Cameras option to expand the drivers.

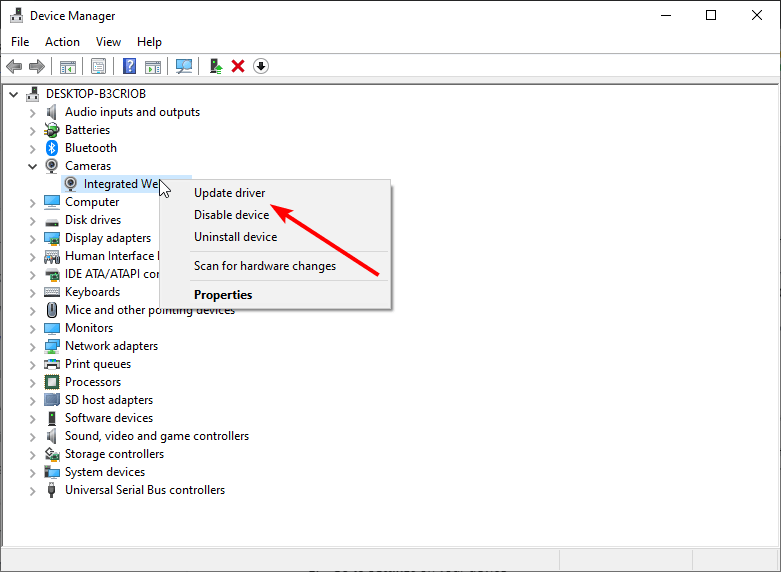
- Right-click on the Integrated Webcam option and select Update driver.
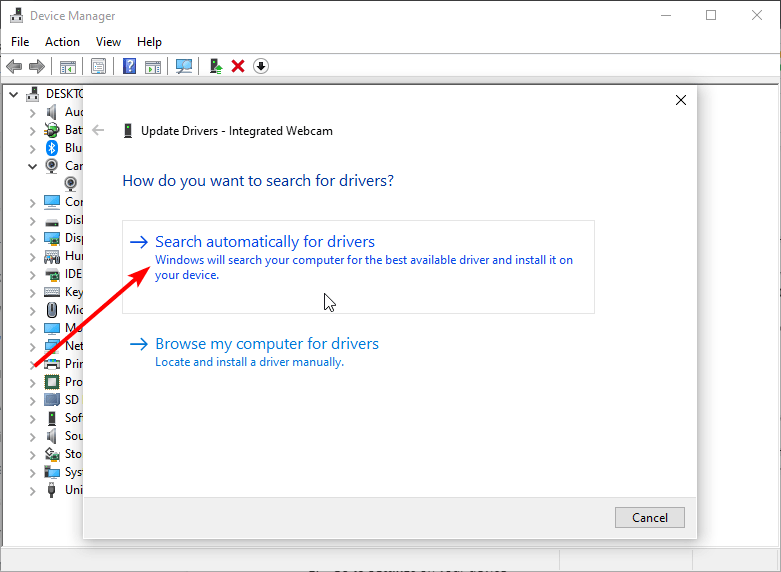
 4. Select the Search automatically for drivers option.
 5. Your PC will show if there are any updates available to install.
Finally, if you use an external or standalone camera, you must visit the manufacturer’s website to update the driver.
5. Uninstall and Reinstall Zoom
If none of the fixes work, try uninstalling and reinstalling the Zoom app. This can clear out any settings or glitches that might be causing the issue.
To reinstall Zoom, go to the official Zoom website, download the latest version, and follow the simple installation steps. This should give you a fresh start and fix the problem.
6. Turn off camera privacy mode (for Lenovo users)
Some Lenovo PCs have webcam compatibility issues with Zoom. This often prevents Zoom from accessing its camera. Below is a quick fix to get over it once and for all.
Note: This fix works for all modern computers starting from Windows 10.
- Click on the Windows key on your desktop and type Lenovo in the search box.
- From the result, click on Lenovo Vantage. You can download it from the Microsoft Store if you can’t find it. It’s free.
- Open the app, then navigate to Hardware Settings > Audio/Visual.
- Go to Camera settings, then toggle off the Camera Privacy Mode.
Troubleshooting camera issues during a meeting
If your video is not showing up during a meeting, there might be issues with your device’s camera. The following steps might help you solve these issues.
If you’re experiencing video-related crashes, you might want to try troubleshooting steps for video crashes or you can also test your video before joining a meeting to ensure that it is working.
How to troubleshoot camera issues during a Zoom meeting
Your device might have more than one camera. If you are already in a meeting and are experiencing camera issues, using a different camera might help.
- While in a meeting, click the arrow next to Start / Stop Video.
- Select Video Settings.
- If your device has more than one camera, it will be displayed under Camera. Click the drop-down menu and select another camera.
- Note: You can also select a camera by clicking the arrow next to Start / Stop Video and selecting a camera under Select a Camera (Alt+N to switch).
How to Have a Better Zoom Experience with Krisp?

Using Zoom for virtual meetings can be incredibly productive, but background noise and missed details can sometimes ruin the experience. Krisp offers powerful tools to enhance your Zoom calls, making them clearer, more efficient, and distraction-free. When you record Zoom meetings with Krisp, here’s how Krisp can help you have a better Zoom experience:
- Noise-Free Communication
Krisp’s AI-powered noise cancellation removes unwanted background sounds from both your microphone and your speaker. Whether you’re in a noisy café or a bustling home environment, Krisp ensures crystal-clear audio for everyone on the call.
- AI Meeting Transcription
With Krisp, you can turn your meetings into searchable transcripts. This feature allows you to focus on the conversation without worrying about taking notes, ensuring you never miss an important detail.
- Echo Removal
If you’re in a room with poor acoustics, echoes can disrupt your call. Krisp’s echo removal feature eliminates this issue, delivering professional sound quality regardless of your environment.
- One-Click Setup
Integrating Krisp with Zoom is straightforward and quick. Once activated, Krisp AI Meeting Manager works seamlessly in the background, improving your audio without any additional effort during meetings.
- Focus on What Matters
By reducing distractions and providing accurate transcripts, Krisp helps you focus entirely on your discussions and decisions, boosting your productivity and making meetings more effective.
Using Krisp alongside Zoom can transform your virtual meetings into smooth, professional experiences. Try it today to take your Zoom calls to the next level!
How to Set up Zoom with Krisp?
This section explains how you can make noiseless calls using Krisp with Zoom on your Mac/Windows device. All you need is a 2-sided configuration.
- Select Krisp Microphone and/or Speaker to work in Zoom. For that, go to Zoom and click on the Settings icon from the upper right corner of the screen.
- From Settings, go to the Audio tab and change the Speaker/Microphone to Krisp.
- Open Krisp and pick the physical microphone and speaker you wish to use and turn on Noise Cancellation toggles.
- Start your noiseless call. The “No call in progress” indicator will be switched to “Used by zoom.us” when there is an ongoing call.
To maximize the effectiveness of Krisp’s noise cancellation, configure your Zoom audio settings based on the recommended setup here.
FAQ
• Open the Zoom app.
• Click on the gear icon to access Settings.
• Navigate to the Video tab.
• Choose the correct camera from the dropdown menu under Camera.
• If your video doesn’t start during a meeting, click the Start Video button on the bottom left of the meeting window.
• Your video is turned off. Click the Start Video button to enable it.
• Your camera is not selected correctly. Check your settings in the Video tab.
• Permissions for Zoom to access your camera are disabled. Ensure camera permissions are allowed in your device settings.


