So, you’ve decided to get Zoom up and running on your Mac, whether for remote work, catching up with friends, or those endless virtual meetings that now fill your calendar. But before you dive in, there are a few things to know.
Navigating the installation process might seem simple, but a few extra steps can make all the difference in ensuring everything runs smoothly.
In this guide, we’ll cut through the noise and give you a clear, concise walkthrough on installing Zoom for Mac, tailored to work seamlessly with Apple Silicon and Intel-based Macs.
Before You Download Zoom For Mac
This section of the article covers what you need to know before opening the download page on Zoom. As soon as you type the words “Zoom for Mac,” you’ll find the following page:

If you’re not the most tech-savvy person, this is where you might get a little confused: what’s the difference between Apple Silicon and Intel? Well, let us quickly explain.
In late 2020, Apple began transitioning its Mac computers from Intel processors to its own Apple silicon.
If you have a MacBook Pro from 2021 or later, you’re already using Apple silicon or the 13-inch MacBook Pro with the M1 chip from 2020. The same goes for MacBook Air models introduced in 2022 or later and the M1 version from 2020.
For desktop users, Apple silicon powers the iMac models introduced in 2021 and later, the Mac mini from 2020 onward, the Mac Studio from 2022, and the Mac Pro from 2023.
To check which chip your Mac uses, click on the Apple menu and select ‘About This Mac.’ If your Mac has Apple silicon, you’ll see ‘Chip’ followed by the chip’s name. If it’s Intel-based, you’ll see ‘Processor’ instead.
This transition to Apple silicon is designed to deliver better performance and efficiency, making tasks like Zoom calls smoother and more reliable.
How to Download Zoom For Mac on Your Desktop
Now that you know the technical difference between Apple Silicon and Intel, you can set up Zoom for Mac OS.
One way to start with is when you type Zoom on Google, enter their official website, scroll down, and click on the “Zoom App” shown in the image below.
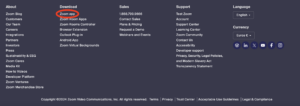
The latter will lead to the Zoom for Mac OS download page.
Alternatively, you can go to this Zoom page (the same page described above) to install Zoom for Mac. Once you have identified the version you need to download, click download.
Once the download is complete, open the Finder to go to your Downloads folder and double-click on the Zoom file.
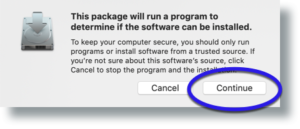
Next, click Continue to run the installer in the pop-up window and follow the other prompts to complete the installation process.
After that, the Zoom Cloud Meetings window will appear.
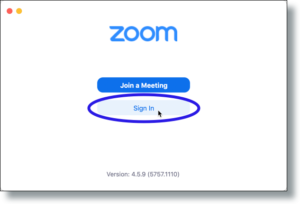
From there, you should either join a meeting via a link or a code you’re provided, or you should just sign in or sign up if you don’t have an account. That’s all. You’re all set, and you should be able to see a workspace similar to the one shown below.
How to Use External Camera on Mac For Zoom
If you’re a remote worker, a digital nomad, an entrepreneur with daily meetings, or someone in this category, you prioritize meeting quality. You’re also someone who might want to upgrade their default Mac camera and use something more professional during Zoom meetings.
To use an external camera on your Mac for Zoom, follow these straightforward steps:
- Start by plugging the external camera into your Mac using a USB cable or another method. Your Mac should recognize the camera automatically within a few seconds.
- Launch the Zoom for Mac app.
- In the top menu, click “Zoom” and select “Preferences” from the dropdown menu. This will open the settings window.
- In the settings menu, navigate to the “Video” tab.
- Under the “Camera” dropdown menu, select your external camera. You should see the video feed switch to the external camera immediately.
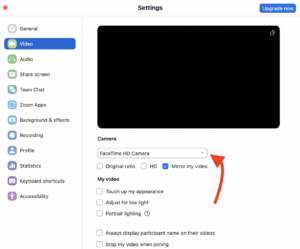
Zoom allows the camera to be tested within the “Video” settings. The latter is an excellent opportunity to ensure everything is functioning as expected.
If you encounter any issues, such as the camera not being detected, try disconnecting and reconnecting the camera or restarting your Mac.
Additionally, check if the camera requires specific drivers, usually found on the manufacturer’s website.
Using an external camera can significantly improve the quality of your Zoom calls, offering better resolution and more flexible positioning than the built-in Mac webcam.
Make Your Zoom Calls Flawless With Krisp
Zoom meetings take a while to get used to as part of a daily work routine.
But when you have Krisp, they might even be enjoyable. It’s a subtle yet significant improvement that you really need to try to appreciate fully.
Krisp is more than just a noise-canceling app; it’s a comprehensive AI-powered meeting assistant designed to make your Zoom meetings truly effective. By integrating seamlessly with Zoom, Krisp ensures that your virtual meetings are smooth, transparent, highly productive, and easy to manage.
Let’s explore how Krisp can transform your meetings into impactful and efficient interactions.
Automatic Transcription And Meeting Notes
Krisp’s AI provides accurate transcriptions and automatic meeting notes. The transcription feature accurately captures every word spoken, allowing you to review and search through the content easily.
Krisp also generates concise meeting notes that summarize the key points and action items, saving you the effort of manual note-taking.
These transcriptions and notes are instantly available after your meeting, making it easier to share insights and follow up on tasks.
Prerequisites
To ensure a smooth transcription process with Krisp, follow these key steps:
- Set Krisp as Your Audio Device: Select the Krisp microphone and speaker in your Zoom or recording app settings. This is essential for activating Krisp’s noise cancellation and audio enhancement features.
- Meeting Duration: Make sure your audio recording is at least five minutes long, with at least one minute of spoken content. This allows Krisp to process the audio and generate a complete transcription effectively.
Meeting Recording For Zoom
![]()
Krisp takes meeting recording to the next level by offering an intuitive and high-quality recording feature.
When you record a Zoom meeting with Krisp, you capture not just the video but also enhanced audio that is free from background noise, thanks to Krisp’s noise cancellation. This ensures that your recordings are clear, making them easier to review and share.
Additionally, Krisp’s recording feature is straightforward—simply start your meeting and click record on Krisp’s widget. Your meetings are captured in high-definition audio and video, ready for you to access whenever needed.
Zoom For Mac OS Best Practices
To ensure a smooth and professional experience with Zoom on your Mac, following a few best practices tailored to the macOS environment is essential.
Keeping Zoom Updated
This recommendation is standard for all software to ensure access to the latest features and security patches, verified by general best practices in software usage.
Optimizing System Resources
Closing unnecessary applications to improve performance during Zoom calls is a well-documented strategy to prevent lag and overheating, especially on MacBooks, which can be resource-sensitive.
Using External Devices
The use of external cameras and microphones to enhance video and audio quality is supported by multiple sources, including guides on improving Zoom call quality on Mac.
Using Virtual Backgrounds
Zoom’s virtual background feature is widely recommended for maintaining a professional appearance, especially when the physical environment isn’t ideal.
Improving Security
Enabling the waiting room and requiring a passcode for Zoom meetings are standard security practices to control meeting access, as Zoom and other security guidelines recommend.
Using Keyboard Shortcuts
Zoom’s keyboard shortcuts are well-documented and recommended for improving efficiency during meetings, particularly for users on macOS.
By following these best practices, you’ll ensure that your Zoom meetings on Mac are smooth, and secure but also professional and efficient.
Conclusion
If you follow the above tips, you’ll have Zoom for Mac installed and running smoothly in no time.
Along the way, you’ve learned how to optimize your setup with Krisp’s noise cancellation, recording, and transcription features, making your virtual meetings functional and practical. With these best practices in mind, you’re now fully equipped to handle any Zoom meeting confidently, ensuring high-quality communication and a professional presentation every time.
So, whether you’re hosting or attending, you can focus on what matters: connecting with others without worrying about the tech behind it all.
Frequently Asked Questions on Zoom For Mac
- Internet Connection: Ensure you have a stable internet connection during the download and installation.
- Storage Space: Check if your Mac has enough storage to install Zoom.
- Software Conflicts: Existing software or security programs sometimes block the installation. Temporarily disable or adjust settings in such programs to allow the installation.
- Uninstall Zoom: Go to Finder > Applications, locate the Zoom app, right-click, and select “Move to Trash.” Then, empty the trash.
- Download Zoom Again: Visit the Zoom Download Center and download the latest version of Zoom for Mac.
- Install Zoom: Open the downloaded file and follow the on-screen instructions to reinstall Zoom on your Mac.