Have you ever wished you could replay a key moment from a Teams meeting? Whether you’re looking to capture brilliant ideas and important decisions or keep a record for those who missed out, knowing how to record a meeting in Teams is your go-to solution.
This article will guide you through the simple steps to record a Microsoft Teams meeting, save and share it with others to make every session accessible anytime, anywhere.
Importantly, you’ll discover how an AI-driven meeting assistant can help you meticulously transcribe your meetings and make them noise-free to enhance productivity and efficiency.
Key Takeaways for How to Record a Teams Meetings
Knowing how to record a Teams meeting lets you enhance your team’s productivity by providing a reference for absent participants or those who need to review discussions.
Recording a meeting in Teams offers various advantages, such as making them more effective, accessible, and cost-effective.
Integrating an AI-enabled meeting assistant with Microsoft Teams can elevate your meeting experience and make it more productive.
What Are the Benefits of Recording Teams Meetings?
Recording a Microsoft Teams meeting is like having a rewind button for virtual gatherings. Here are some of the main benefits:
Enhanced Accessibility: Recordings make meetings accessible to team members who missed them due to conflicting schedules or time zones. As a result, everyone stays in the loop and knows what post-meeting steps they should take.
Resource for Review and Training: Knowing how to record a Teams meeting helps you save resources for training and education. Specifically, team members can revisit the recordings to understand complex topics better.
Additionally, companies can use the recordings to train new hires by showing them real-life scenarios and solutions discussed.
Documentation and Compliance: Recording meetings provides a reliable documentation method. Namely, businesses that need to adhere to compliance protocols or legal requirements can use meeting recordings for audit trials and legal defenses.
Finally, meeting recordings ensure all decisions and discussions are well-documented and retrievable.
Improved Efficiency: By recording a Teams meeting, participants can focus more on the discussion than note-taking. Thus, they can better engage in the discussion and contemplate the critical meeting points during the meeting itself.
Facilitated Post-Meeting Follow-ups: Meeting members can review the recorded materials to follow up on action items, decisions, and assignments as effectively as possible. Facilitated post-meeting follow-ups boost accountability and execution in project management and operational processes.
Before Learning How to Record on Teams
Videoconferencing software witnessed a market penetration of nearly 68 percent in 2023. Learning to use video conferencing software in a post-COVID business environment is no longer a convenience, but a must. Still, before answering the question “how do I record a meeting on Microsoft Teams?” we should first understand “is Microsoft Teams free?”
The simple answer is “Yes, Microsoft Teams is free to use,” but like most software, you will need an account. Using almost any Microsoft product, such as Skype, OneDrive, or Outlook is going to require a Microsoft account. If you lack one, you can create a free Microsoft account to sign up for Teams for free.
You can use Teams for Home without a subscription, and the free version of Teams for Home lets you make free 1:1 calls between Teams users for up to 30 hours. As for free group calls and meetings, they last for up to 60 minutes.
Do I Need to Install Teams to Join a Meeting?
No, you don’t need to install it. You can join a Teams meeting through your web browser by clicking on the provided meeting link without downloading the app. Your browser may ask to use your microphone and camera for Teams.
However, installing Microsoft Teams can provide a more seamless and feature-rich experience. Specifically, you can access background effects, meeting recordings, and more robust meeting controls and organize and participate in multiple teams and channels.
The app offers better integration with Office 365 apps, offline access, and faster performance than the web version.
How to Schedule a Microsoft Teams Meeting?
To schedule a Microsoft Teams meeting:
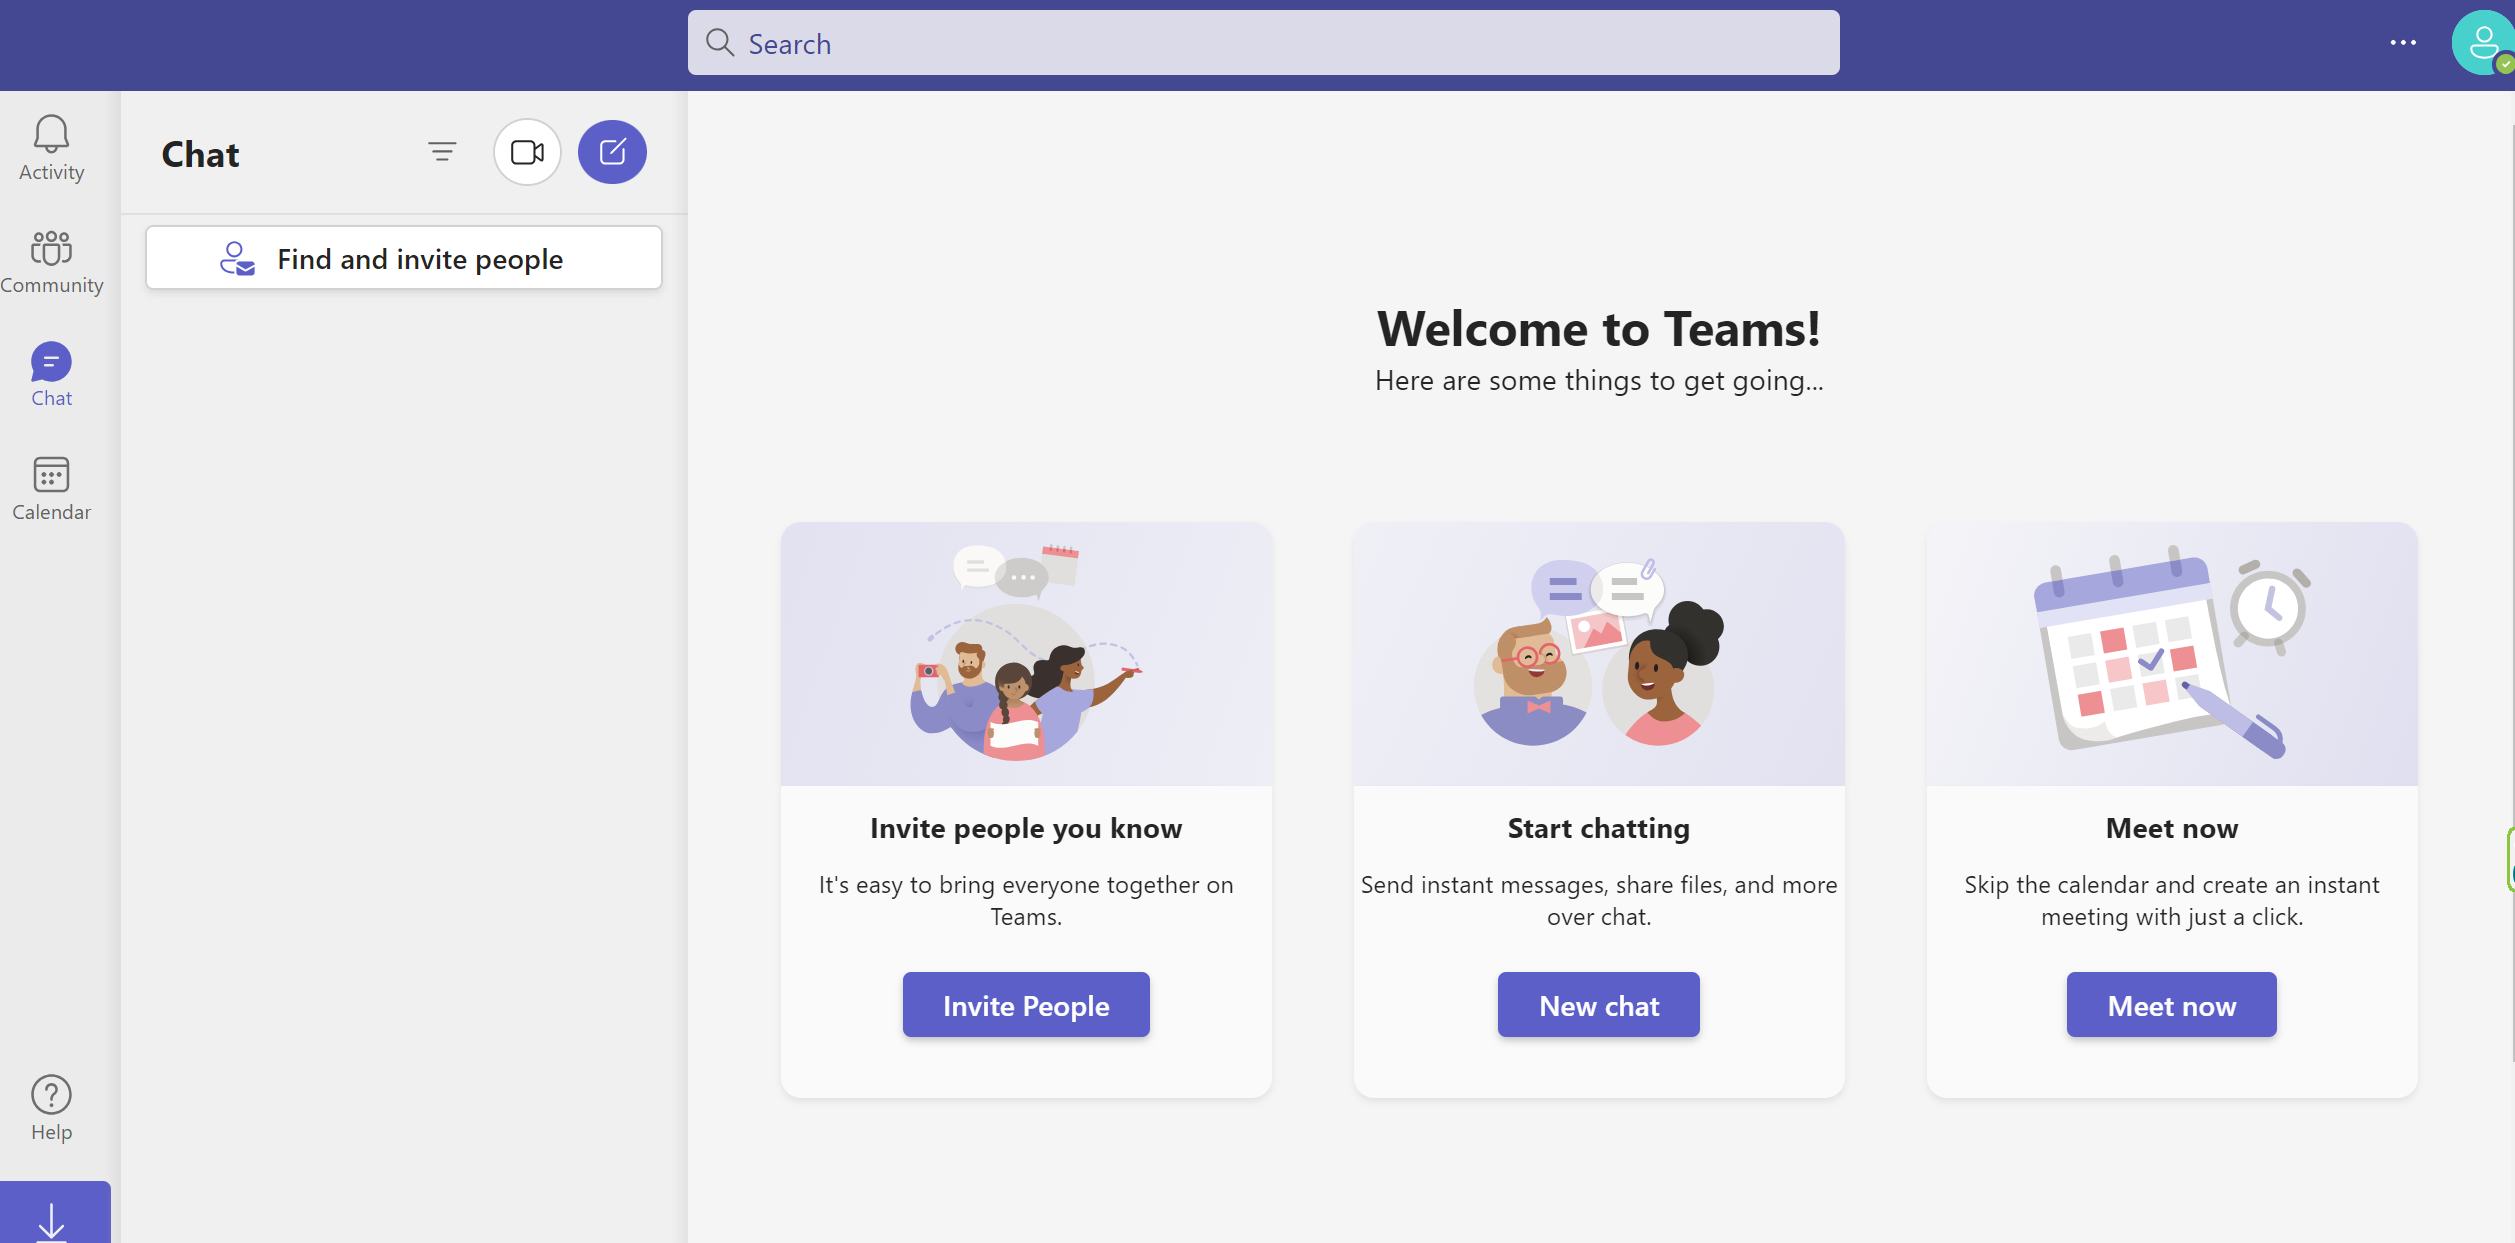
Open the Teams app.
Go to “Calendar” on the left-hand side.
Click on “New Meeting” at the top right.
In the pop-up form, fill in the title, date, time, attendees’ names, and email addresses.
You can also set the meeting to recur by choosing an option under “Does Not Repeat.” Enter the details and click “Save.”
Participants will receive an invitation.
The meeting will appear in your Teams calendar.
Starting a Teams Recording
First, inform participants that you’ll be recording the meeting, then set up the meeting and activate the built-in Teams recording feature.
If you’re using Windows:
Click Start.
Open Microsoft Teams.
Note that if you’re using Microsoft 365, you must sign in with your username and password to access Teams, as it’s part of Microsoft 365.
If you’re using a Mac:
Open the Applications folder.
Click Microsoft Teams.
If you’re on mobile:
Click on the “Teams” app.
To initiate the recording:
During the meeting, navigate to the meeting controls.
Select “More Actions”
Choose “Record and Transcribe”
“Start Recording.”
The recording will capture video, audio, and shared content during the meeting. Once the meeting ends, it will be available in Microsoft Stream. Find the Microsoft Stream tab by opening Microsoft Teams and selecting the plus icon on the tab bar of your Team channel.
How to Record a Meeting in Teams with Audio
Join or host the virtual gathering.
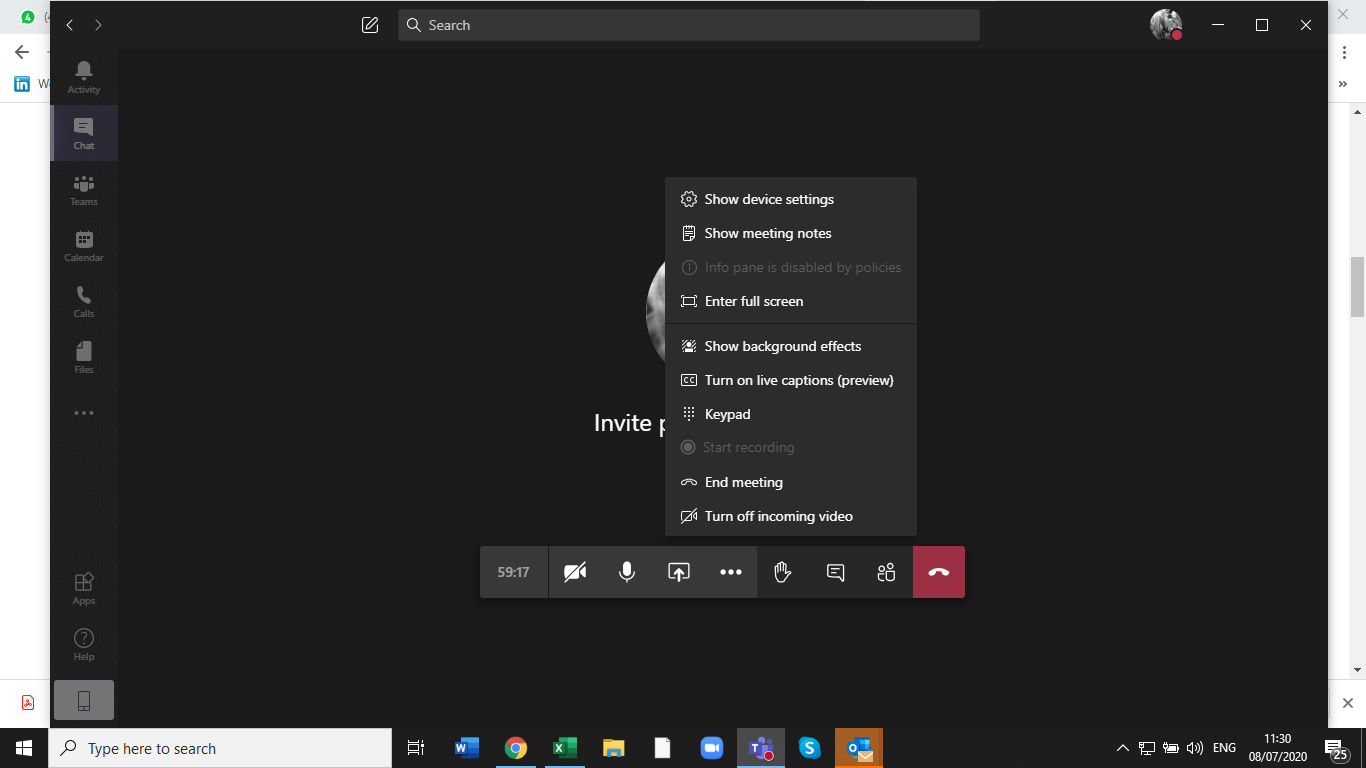
Click on the three dots in the meeting control bar to open more options.
Open the drop-down menu to select “Start Recording” to record both the meeting video and audio.
Note that you can make only one recording at a time, which will be stored in the cloud for all participants. Meeting members can view transcriptions live for a more inclusive meeting experience.
Can You Automatically Record Teams Meetings?
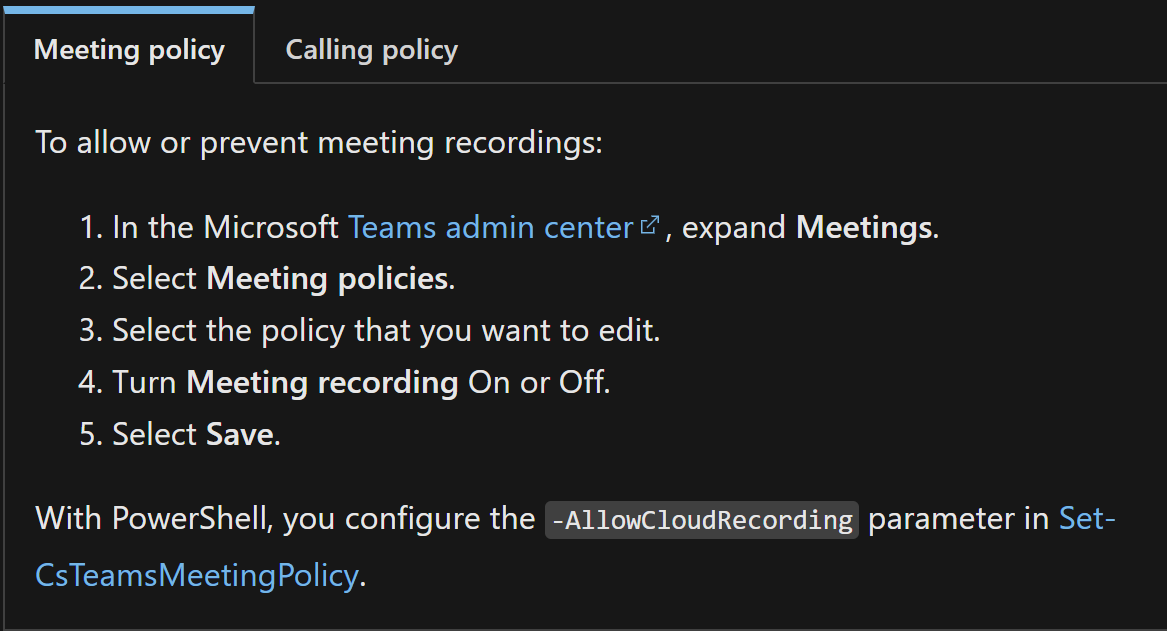
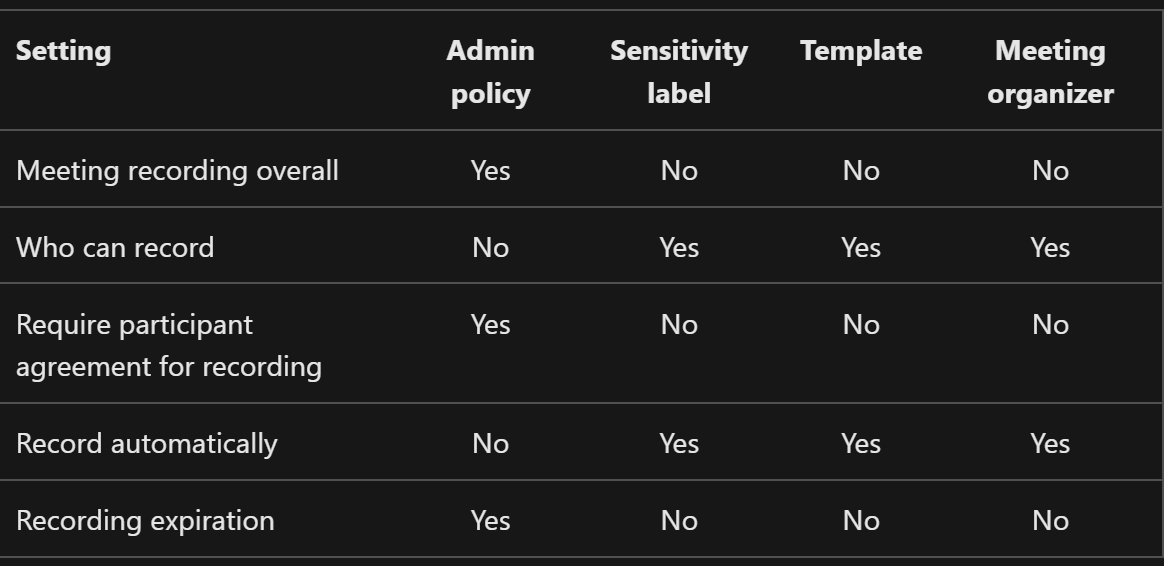
Yes, just set them to record automatically when meetings start. Meeting organizers usually choose this option when creating the meeting. If you should always record certain meetings, use a meeting template or a sensitivity label to enforce this option.
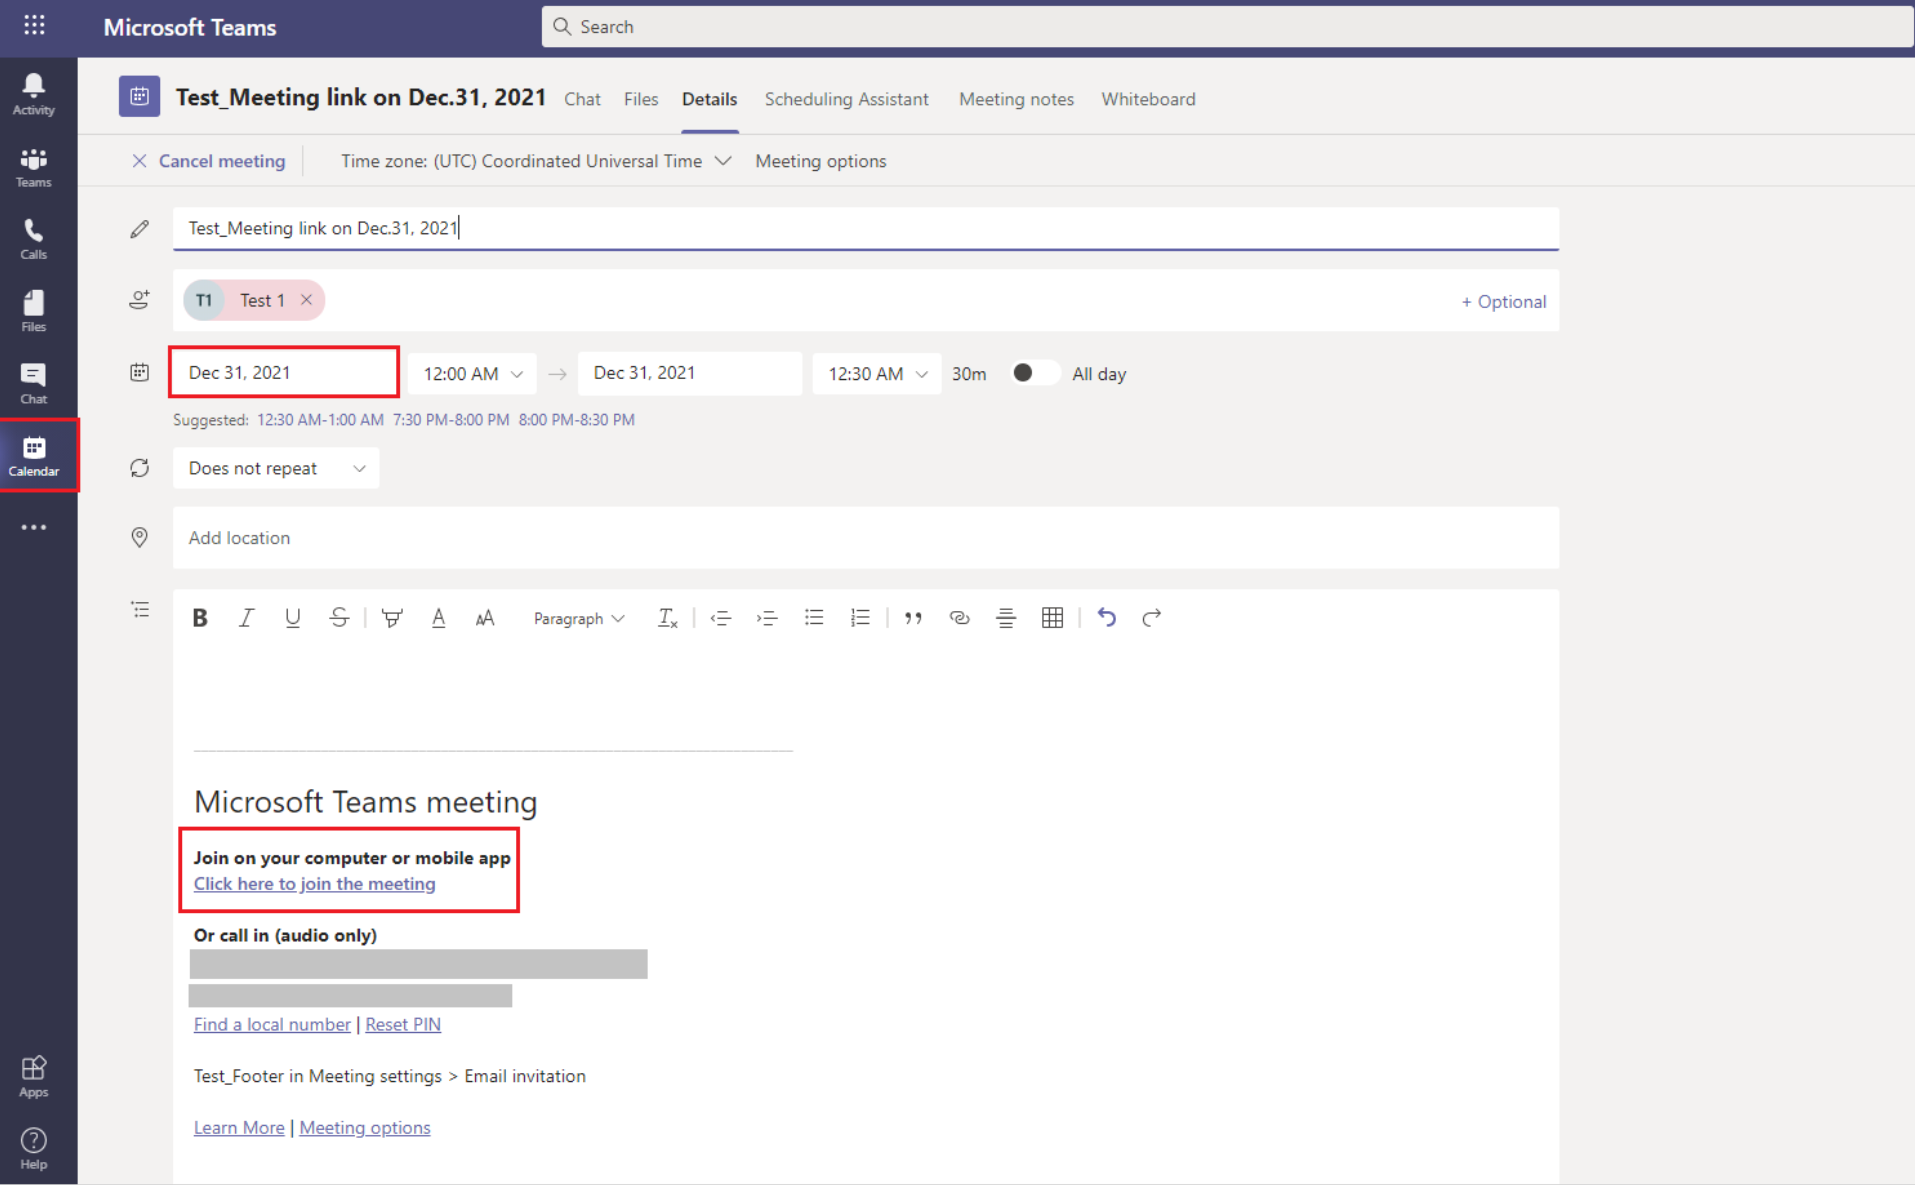
How to Set Up a Teams Meeting Link?
Follow the steps below to set up a Microsoft Teams meeting link. Once saved, Teams generates a meeting link you can share with attendees via email or any other preferred communication method to join the meeting.
Open the Teams app.
Go to the Calendar tab.
Press “New Meeting” in the top-right corner to fill in the details, such as the meeting title, date and time, participants’ email addresses, agenda and objectives, location,
Customize the invitation to suit your needs.
Add the attendees’ email addresses and adjust their permissions.
Click “Send” to share the link.
If a meeting will occur regularly, you can set up a meeting schedule with daily, weekly, or monthly recurrences in the “Recurring Meeting Options.” Additionally, you can use “Channel” to associate the meeting with a specific channel in Teams so all channel members can see and join the meeting.
Adding these details can help automate your schedule to keep participants informed and prepared for every meeting.
Stopping and Accessing the Recording
You can stop the recording at any time.
Return to the meeting controls.
Select “More Actions” or the three dots.
Choose either “Stop Recording” or “Stop Transcription.”
If you forget to stop the recording, it’ll automatically stop when everyone leaves the meeting or after four hours of inactivity.
How to Save a Recorded Teams Meeting
The recorded Teams meeting will automatically save to Microsoft Stream, OneDrive, or SharePoint.
The recording can be found in the meeting chat history or channel conversation. Depending on the chosen settings, clicking the recording link in an email received will redirect you to Microsoft Stream, OneDrive, or SharePoint.
Access Microsoft Stream by logging into your Microsoft 365 account and clicking on the app launcher or the nine dots in the upper left corner. Next, select “Stream.” Alternatively, visit the Stream website at stream.microsoft.com.
Access OneDrive by clicking the app launcher in your Microsoft 365 account and selecting “OneDrive.” Alternatively, visit onedrive.live.com. Specifically, you’ll appear in your personal or organizational cloud storage space.
Access SharePoint via the app launcher in your Microsoft 365 account and choose “SharePoint.” Alternatively, navigate to your organization’s SharePoint site URL. SharePoint integrates with your company’s workflows, sites, and content.
How to Share a Recorded Teams Meeting
Once saved to Microsoft Stream, OneDrive, or SharePoint, you can share the recording with others via the link received. You can even control who can access it and add captions or subtitles.
Be mindful of privacy and data protection policies, especially when sharing the recording outside your organization.
When sharing the file from OneDrive or SharePoint, ensure even those not invited to the meeting can access the recording if needed.
The meeting organizer and the person who started the recording can download the recording to revisit the discussion, actions, and decisions at any time.
Click on the recording link in Microsoft Stream, OneDrive, or SharePoint.
Click the download icon.
Once downloaded, move the file to your preferred location on your desktop.
How to Delete a Teams Meeting Recording
You can find the recording in the chat history of the Teams meeting or in Microsoft Stream, OneDrive, or SharePoint.
Deleting from Microsoft Stream:
Open Stream
Go to “My Content” and then “Videos.”
Find the recording to delete.
Click “More Options” or three dots next to the video.
Choose “Delete.”
Deleting from OneDrive or SharePoint:
Navigate to the folder with the meeting recordings.
Select the file.
Click “Delete” (the trash can icon).
Confirm the deletion.
Can I Record a Teams Meeting if I Am Not the Host?
How to record Teams meeting as a participant, or how to record a Teams meeting outside of Teams? You should have permission to record or use alternative methods if direct recording isn’t possible. However, compliance with legal, ethical, and organizational guidelines is essential.
Request Permission from the Host: Ask the host or meeting organizer to grant you recording privileges to start the recording. Importantly, ensure that you follow all legal and privacy guidelines. Alternatively, if the meeting settings allow, the host can grant you co-hosting rights to record the meeting.
If recording was impossible during the meeting, you can ask the host to get the official recording with you.
Check Organizational Policies: Ensure that your organization’s policies and the permissions within Teams allow you to record meetings. Why? Some companies restrict recording capabilities to specific roles or require all participants to be notified about the recording.
After Getting Permission: During the meeting, open the meeting control bar, click on the three dots, and select “Start Recording.” All participants will be informed that the recording has started.
The recording will be in the meeting chat and saved to Microsoft Stream, OneDrive, or SharePoint, depending on your organizational settings.
Use Alternative Methods: Consider using screen recording tools, third-party software like OBS Studio or Camtasia, or built-in solutions like Windows Game Bar or macOS screen recording.
Ensure the entire Teams window is within the capture area. When the meeting concludes, stop the recording and save it to your preferred location on your device.
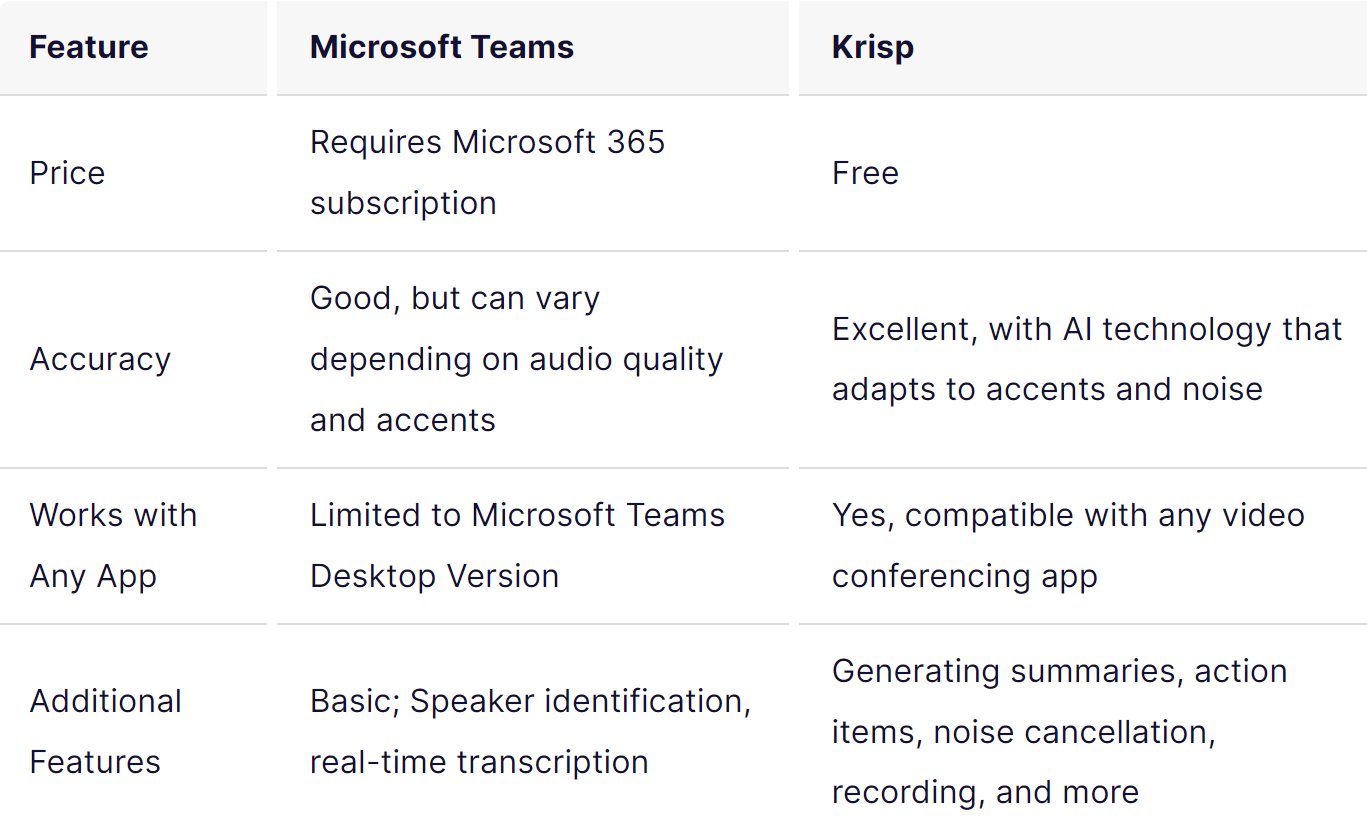
Additionally, an AI meeting assistant like Krisp can record a Microsoft Teams meeting. Specifically, Krisp enhances audio quality by suppressing background noise, voice, and echo and automatically transcribes and generates meeting summaries. Importantly, you can set up any app with Krisp.
Ensure all participants are informed and obtain necessary legal and ethical compliance permissions.
You can protect your meeting data and discussions from unauthorized access and disruptions by utilizing features leveraging Teams’ built-in features. Here are key strategies to consider:
Meeting Options: To control access and interaction during the meeting, configure who can bypass the lobby, who can present, and who can mute other participants.
Lobby Settings: You can set meetings so that only people from your organization or guests are admitted while others wait in the lobby.
Require Authentication: To ensure that only invited and authenticated users can join, attendees must be logged in to Teams.
Roles and Permissions: Assign roles such as Organizer, Presenter, and Attendee to manage participants’ actions participants during a meeting. You can prevent unauthorized information sharing by limiting who can share content and speak.
End-to-end Encryption: To ensure the security of conversation data during sensitive discussions, use end-to-end encryption for Teams calls.
Secure External Participants: When interacting with external participants, ensure they have appropriate permissions that reflect their temporary and limited engagement with your team.
Regularly Update Teams: Use the latest version of the Teams app to ensure you have the most recent security features and patches.
Troubleshooting Teams Recording Issues
When facing issues with recording in Microsoft Teams:
Check Your Permissions: Check if your IT admin has enabled the recording permissions. Only meeting organizers and certain users have recording rights.
Check the Storage: Ensure the meeting recording’s destination, such as Microsoft Stream, OneDrive, and SharePoint, has sufficient storage space. Clear your browser cache or restart the app if you have storage issues.
Technical Problems: If problems persist, consult your IT department or contact Microsoft support. Also, consider restarting Teams or checking for updates.
How to Record a Teams Meeting with Krisp to Enhance Productivity
Leading virtual teams requires leveraging advanced AI transcription and noise-cancellation apps like Krisp to enhance remote communication and collaboration. Krisp can record online meetings without relying on Microsoft Teams.
How to Record and Transcribe a Teams Meeting with Krisp
Krisp Automatically Records Your Meetings Securely: You can revisit your meetings to review essential discussions and points or share them with others. Thus, Krisp makes your meetings easily shareable, more accessible, and productive.
Krisp Automatically Transcribes Your Meetings and Generates Detailed Meeting Notes and Summaries with 96% Accuracy: Krisp’s note-taking feature highlights actionable items and facilitates access to your meeting discussion and post-meeting follow-ups, helping participants stay organized and accountable.
Multilingual Transcripts: Unlimited multilingual transcriptions in Spanish, French, German, Portuguese, and 91 other languages.
Innovative and Effective Note-taking: You can enjoy intelligent and productive transcriptions through AI-based meeting notes templates. As a result, you can save time and concentrate on the discussions instead of note-taking during the meeting.
Accurate Meeting Transcriptions for Individuals with Disabilities: Individuals with disabilities, such as hearing impairments, can enjoy comprehensive meeting transcriptions and summaries.
Krisp Guarantees the Highest and Clearest Recording Quality: Makes your meetings more professional by removing background noise, voice, and echo.
Krisp Synchronizes Playback with Meeting Transcription: You can easily navigate through audio recordings alongside accurate text. Besides, you can quickly locate specific discussion points within the meeting, enhancing review efficiency without missing critical information.
Krisp Provides Easy Downloading and Sharing of Your Meeting Materials: You can enhance collaboration and efficiency.
How to Set up Teams with Krisp and Record Meetings
Record Teams Meetings with Krisp to Simplify and Secure Your Meetings
Knowing how to record a Teams meeting is critical for enhancing the effectiveness of virtual meetings, especially for a diverse and geographically dispersed workforce. Importantly, meeting recording allows you to review action items and key points of meetings, facilitating meeting summaries and follow-up actions.
With specific steps described in the article above, you can learn how to access a recorded Teams meeting, make it secure, and download and share it with others.
Additionally, by integrating an AI meeting assistant like Krisp, you can improve meeting productivity, efficiency, and clarity. As a result, you can transform the communication landscape for remote teams, paving the way for seamless collaboration.
Frequently Asked Questions
How to Record a Teams Meeting Secretly?
While recording a Teams meeting in secret is technically possible, doing so can result in serious consequences for the recorder. There are obvious ethical issues with recording someone without their knowledge, but laws and company policies likely have severe ramifications for recording a meeting without everyone’s permission. Recording a Teams meeting secretly will likely result in termination at best and legal action at worst. In short, do not record anyone without their permission and knowledge.
How to Record a Teams Meeting
Go to “More actions > Record and transcribe” and select “Start recording.”
Where Are Teams Recordings Stored?
In SharePoint for channel meetings and OneDrive for others.
Why Can't I Record on Teams?
Possible reasons include lack of permissions, insufficient license, or technical issues.
Can You Record a Teams Meeting?
You can record Teams meetings if you have the necessary license and permissions from your organization.