Hosting a Zoom webinar isn’t just about jumping online with a camera. It’s about creating an experience that runs smoothly, keeps your audience engaged, and meets your event goals.
But before we dive in, there are a few technical must-haves and lesser-known details to get right. Think about licenses, compatible devices, and how to manage large groups; Zoom lets you scale from a cozy group of 500 to a massive audience of up to a million viewers.
Beyond the technical setup, there are critical details about video quality, webinar roles, and device compatibility to consider.
Whether you’re presenting to a small group or a global audience, understanding these nuances can make the difference between a smooth, professional event and one filled with hiccups.
Before we get into setting up a webinar, let’s explore some key factors that will shape your event’s success.
What to Consider Before Hosting a Zoom Webinar
In almost all industries, Zoom webinars have been booming in popularity with the rise of remote work and flexible work environments. And although technically, hosting a Zoom webinar isn’t that hard, you need a few things first, namely,
- You need to be a licensed user with the Webinar Add-on on Zoom,
- You need a Zoom desktop client for Windows, macOS, or Linux: Global minimum version or higher,
- You also need a Zoom mobile app for Android or iOS: Global minimum version or higher to tune in on your phone,
- Zoom Rooms for macOS, Windows, or Appliances: version 5.16.0 or higher.
Depending on the size of your license, you can host a Zoom webinar for up to one million view-only attendees. Licenses start at 500 attendees and increase up to one million.
There are also some other things to keep in mind when researching how to host a webinar on Zoom. Those are:
- Windows Zoom Rooms and CRC (H.323 and SIP) devices can join a webinar and be panelists, but they cannot be the hosts of the webinar.
- For attendees to view the webinar in 720p or 1080p quality, submit a request to Zoom Support to enable the respective quality. All other prerequisites for 720p or 1080p Group HD must also be met.
How to Host a Webinar on Zoom
After learning about the prerequisites of Zoom webinars, you know exactly what you need before setting up your webinar. Before actually setting up and scheduling the webinar, let’s explore:
Roles in Zoom Webinars
In a Zoom webinar, each participant has their role. There are hosts, co-hosts, panelists, and attendees. Both the host and co-host play key roles in managing the event, though their responsibilities differ slightly.
The Host
The host is the primary person in charge, with full control over the webinar. As a Zoom webinar host, you can share your screen, video, and audio during webinars. You can start and end the session, manage panelists (muting/unmuting them), assign roles like co-hosts, share their screen, and handle interactions such as the Q&A or chat features.

The Co-Host
Co-hosts act as support to the host, helping with many of these tasks. They can manage participants, mute or unmute them, and share their screen, but they can’t start or stop the webinar. This makes co-hosts particularly useful for larger events, allowing them to manage the audience while the host focuses on presenting content.
Panelists
Panelists are participants in Zoom webinars; they have almost like host privileges. Panelists can view and send video, screen share, annotate, etc. Additionally, they receive their own invitation via email, separate from the general attendee invitations, with a unique link and detailed instructions for joining the webinar.
Attendees
Different from panelists, attendees are much different. The host controls their participation, and they can either only watch the webinar or be unmuted by the host and speak if necessary. They can only interact with the host or the panelists using the chat or Q&A option.
Keeping these roles in mind, you can effectively plan your Zoom webinars.
How to Set Up a Zoom Webinar
Now that you know everything about the roles and responsibilities of Zoom webinar attendees, let’s see how to create a Zoom webinar.
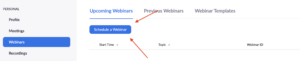
- Sign in to the Zoom web portal and select “Webinars” from the menu,
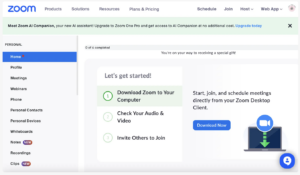
- Click “Schedule a Webinar” and enter the topic and description,
- Set your event’s date, time, time zone, and duration,
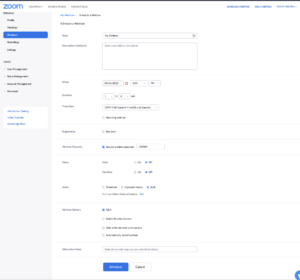
- Adjust your video, audio, and other options, then click “Schedule.”
There are two options you can use to enable attendees to join the webinar. In the first option, as a host, you need to create a registration for attendees to pre-register.
Here, you can create particular registration questions and pull insightful reports after the webinar. To create such a webinar, you must sign in to the Zoom web portal and select “Webinars” from the menu. Then,
- Click “Schedule a Webinar” and adjust any necessary Zoom webinar settings,
- In the registration section, check the box for “Require registration.” Choose whether attendees must register once or for each session for recurring webinars.
- Click “Schedule” to finalize everything.
After the attendees try to enter the meeting, you’ll either approve each attendee manually or automatically all of them.
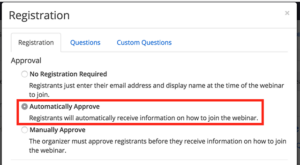
To approve automatically,
- After scheduling your webinar, scroll to the “Invitations” tab.
- Under “Registration Settings,” click “Edit” if manual approval is listed.
- Choose “Automatically Approve” under the “Approval” section.
- Click “Save” before sharing the invite.
To approve manually,
- After scheduling your webinar, go to the “Invitations” tab on the details page.
- In “Registration Settings,” click “Edit” next to the approval option.
- Select “Manually Approve” under the “Approval” section.
- Save your changes.
When attendees register, return to the “Webinars” page, find the event, and go to the “Invitations” tab. Click “Edit” beside “Manage Attendees,” select users, and confirm or deny their registration.
Alternatively, you can copy the sharable link for attendees to join and share it with them without registration. Here, the only data you’ll pull will be their name and email, which they must enter when joining the webinar via a link.
In both cases above, your attendees must receive emails inviting them to join the webinar.
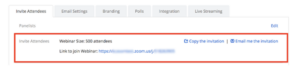
You can invite attendees to register for your webinar in three ways:
- Copy the registration link and share it via email, your website, or other platforms.
- Choose “Copy the invitation” to get the invitation Zoom has created, then send it to your attendees.
- Select “Email me the invitation” to receive the Zoom invite in your inbox, which you can forward to potential attendees.
How to Start The Webinar
As a host, to start a webinar from the Zoom desktop client, first sign in and navigate to the “Meetings” tab. From there, locate the webinar you want to begin and simply click “Start.”
To start a webinar from the Zoom mobile app, sign in, go to the “Meetings” tab, find the webinar you want to begin and tap “Start.”
How to Give Control in a Zoom Webinar
As the host, once you start screen sharing, you can grant control to another participant:
- While sharing your screen, click the Remote Control option on the Zoom toolbar,
- From the drop-down menu, select the participant you want to give control to,
- The selected participant will receive a prompt asking them to accept control. Once they do, they can navigate your shared screen using their mouse and keyboard.
This feature is handy during collaborative sessions or when you want someone else to manage a specific part of your presentation. You can always take back control by clicking anywhere on your screen.
What Are Zoom Breakout Rooms?
Zoom’s webinar breakout rooms allow you to split participants into smaller, focused groups during the session. You can assign participants manually automatically or even let them choose which room to join.
While participants are in these breakout rooms, they can interact freely, while the host and co-host can move between rooms to check in or manage discussions.
You’ll need a Zoom Events or Zoom Sessions license to use webinar breakout rooms. This feature can support up to 200 rooms, which is excellent for creating more interactive sessions, especially when handling larger audiences.
You can also control the settings—like the number of rooms, how many people can join each, and whether participants can return to the main session anytime. However, remember that breakout rooms aren’t recorded. Only the main webinar session is.
To set up breakout rooms during a Zoom webinar, follow these concise steps:
- Log into your Zoom account, go to “Settings,” and enable breakout rooms under the “In Meeting (Advanced)” section.
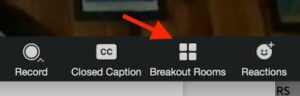
- Launch your scheduled webinar and click the “Breakout Rooms” button in the control panel.
- Choose how many breakout rooms to create and how participants will be assigned automatically, manually, or let them choose.
- Adjust options like setting a time limit or allowing participants to return to the main session anytime.
- Click “Open All Rooms” to start the breakout sessions.
- As the host, you can move between rooms to check in and close all rooms with a single click when ready.
This simplified process helps divide large groups into smaller, focused discussions.
Practical Tips for Optimizing Your Zoom Webinar Experience
To host a successful Zoom webinar, both the technical aspects and the participant experience must be seamless. Here are some practical tips to help you deliver a great webinar:
Prepare in Advance
Don’t leave anything to chance. Plan the structure of your webinar, prepare materials, and make sure everything is ready ahead of time. This gives you the opportunity to troubleshoot and handle potential issues before they become problematic.
Test Your Equipment
Check your camera, microphone, and internet connection well before the webinar begins. Run a test session to ensure everything works properly. This includes testing features like screen sharing, Q&A panels, and any interactive elements.
Set Up a Quiet, Well-Lit Environment
Conduct your webinar in a quiet room to minimize distractions and background noise. Ensure you’re well-lit, with natural light or a proper lighting setup, so participants can clearly see you.
But you do have an alternative if your environment is even a bit noisy. You know, life happens, and you can’t always guarantee absolute control over your personal space during your online meetings and webinars. In these kinds of situations, you should rely on Krisp. It’s quite easy to set up and start using. The following visual shows you how to do it:
Krisp’s advanced AI-powered noise cancellation instantly blocks background sounds, allowing only your voice to come through, even in the noisiest environments. Whether it’s chatter, barking dogs, or traffic noise, Krisp ensures your voice remains crystal clear, letting you focus on delivering your content professionally.
Using Krisp, you can guarantee a distraction-free experience for your audience, no matter what’s happening in the background.
Create Engaging Visuals
Use clean, distraction-free backgrounds, and take advantage of Zoom’s virtual backgrounds if needed. Keep your slides and visuals simple but engaging, and avoid overcrowding them with too much information.
Use a Co-Host For Support
Having a co-host can help manage the technical side of the webinar, like muting participants, managing the chat, or troubleshooting issues. This allows you to focus entirely on delivering content.
Engage With Your Audience
Keep your audience involved by using interactive features such as polls, Q&A sessions, and the chat function. Engaged participants are more likely to stay focused and absorb the content.
Send Reminders And Follow-Ups
Schedule reminders to ensure that participants don’t forget about the event. After the webinar, follow up with additional materials, recordings, or a summary to keep the engagement going.
With Krisp’s automatic transcription feature, you can generate highly accurate, real-time transcripts of your webinar. These transcripts provide a clear record of the session and make extracting actionable items easier, allowing attendees to revisit key points and take necessary steps.
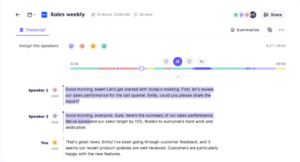
Whether it’s sharing meeting minutes or creating a detailed summary, Krisp ensures that nothing gets lost in translation.
Additionally, Krisp’s screen recording feature (available for Pro and Business users) allows you to record your webinar directly from the app or the widget. You have complete control to start, pause, or resume recordings, capturing essential moments you can share with your audience later.
This is especially useful for webinars with critical insights that participants might want to revisit or catch up on. The combination of transcription and recording makes post-webinar engagement seamless and effective. So, would you give it a try?
Be Punctual And Professional
Moving on with our practical tips—arrive early to make sure everything is working properly and to greet participants as they join. Being punctual reflects well on your professionalism and sets the tone for a smooth event.
By applying these tips, you’ll be well-prepared to run a smooth and successful webinar that leaves a lasting impression on your audience.
Wrapping Up
Hosting a successful Zoom webinar isn’t just about having the right technology—it’s about mastering the details that ensure your event runs smoothly from start to finish.
If you understand the roles of hosts, co-hosts, and attendees, know how to set up breakout rooms, and use tools like Krisp for clear audio, you can elevate your webinar experience.
Whether you’re hosting 500 or a million attendees, preparation and engagement are key. Follow these steps, and you’ll master how to host a webinar on Zoom that leaves a lasting impact on your audience.
Frequently Asked Questions
How much does it cost to host a webinar on Zoom?
The cost starts at $79/month for up to 500 participants with a Zoom Pro plan. Pricing increases based on attendee capacity, such as $340/month for 1,000 participants, with larger licenses available for up to 10,000 attendees.
How to make someone a co-host on Zoom webinar?
To assign a co-host during your Zoom webinar, start the webinar and open the Participants panel. Hover over the person’s name, click More, and select Make Co-Host.
How to host a paid webinar on Zoom?
To host a paid webinar, you can use Zoom Events, which integrates ticketing directly through Zoom, or you can link to third-party platforms like PayPal or Eventbrite for payments. After registration, Zoom automatically sends the webinar link to attendees.
How to host a webinar on Zoom for free?
Zoom does not offer a free plan for webinars. To host a webinar, you need a Zoom Pro plan (starting at $14.99/month) plus the Webinar Add-on, which starts at $79/month.