Ever wondered how to turn on transcription in Teams and make sure you capture every detail of your meetings? It’s a simple yet powerful feature that allows you to generate real-time transcripts, so you can focus on the conversation instead of scrambling to take notes.
MS Teams offers a built-in transcription tool, and for those looking for even more accuracy and features, tools like Krisp can take it up a notch. In this guide, I’ll show you two easy ways to enable transcription in Teams and make the most of your meetings. Let’s dive in!
How to Turn On Transcription Within the Teams App
Prerequisites for Turning On Transcription in Teams
Before you can start using transcription in Teams, there are a few things you need to check off the list:
- Right Microsoft 365 License: Ensure you have an Office 365 Enterprise E1, E3, or E5 license. If you’re using a lower-tier plan, transcription might not be available.
- Admin Permissions: If you can’t see the transcription option, it could be because your IT admin hasn’t enabled it. Ask them to turn it on for you in the Teams Admin Center.
- Up-to-Date Teams App: Ensure you’re running the latest version of the Teams desktop app. Some older versions don’t support transcription.
- Language and Region Settings: Transcription works best with English and might not be available in all regions. Double-check that your meeting language is set to English.
- Meeting Recording Enabled: For transcription to work, recording might need to be enabled. So, if you can’t get transcription going, check that recording is allowed for your meetings.
Step-by-Step Guide to Enable Transcription in Teams
- Start or Join a Teams Meeting: Open the Teams app and either create a new meeting or join an existing one.
- Access Meeting Controls: Once you’re in the meeting, look for the meeting toolbar at the top of the screen and click on the “More actions” button (it looks like three dots).
- Start Transcription: In the dropdown menu, select “Start transcription.” You’ll see a message notifying all participants that transcription has started.
- Viewing the Transcript: The live transcript will appear on the right side of the screen. You can scroll through it during the meeting or download it later for reference.
- Stop Transcription: To stop transcription, click on the “More actions” button again and choose “Stop transcription.”
Pros and Cons of Teams’ Built-in Transcription
| Pros 😊 |
Cons 😕 |
| Easy to Use: It’s built right into Teams, so you don’t need any extra tools. |
Limited Language Support: Only supports English and a few other languages. |
| Auto-Save Transcripts: Automatically saves transcripts for easy reference later. |
Accuracy Issues: Transcription quality can vary, especially with background noise or strong accents. |
| Real-Time Transcription: See live captions during the meeting for better accessibility. |
Requires Permissions: Admins need to enable it, so not everyone can use it right away. |
| No Extra Cost: Included in Office 365 Enterprise plans without additional fees. |
Region Restrictions: Not available in all regions, so some users might be left out. |
How to Use Krisp for Transcription in Teams Meetings
Why Choose Krisp for Teams Transcription?
If you’re looking for something beyond what Teams’ built-in transcription can offer, Krisp is a fantastic option. Here’s why:
- Higher Accuracy: Krisp uses advanced AI to provide more accurate transcripts, even with different accents and speech variations.
- Background Noise Cancellation: You can get a crystal-clear meeting transcription because Krisp removes background noise from your meetings.
- Multiple Language Support: Krisp supports a variety of languages, making it a great choice for diverse teams.
- Additional Features: Beyond transcription, Krisp offers meeting summaries, speaker recognition, and meeting recording.
Step-by-Step Guide to Using Krisp for Transcription
Ready to try Krisp? Here’s how to get started:
1. Download and Install Krisp: Head over to Krisp’s website and download the app for your device.
2. Set Up Krisp with Teams:
- Open the Krisp app and log in.
- In the Krisp app, select ‘Teams’ as your preferred app for noise cancellation and transcription.
3. Start or Join a Teams Meeting: Open Microsoft Teams and join or start a meeting as you normally would.
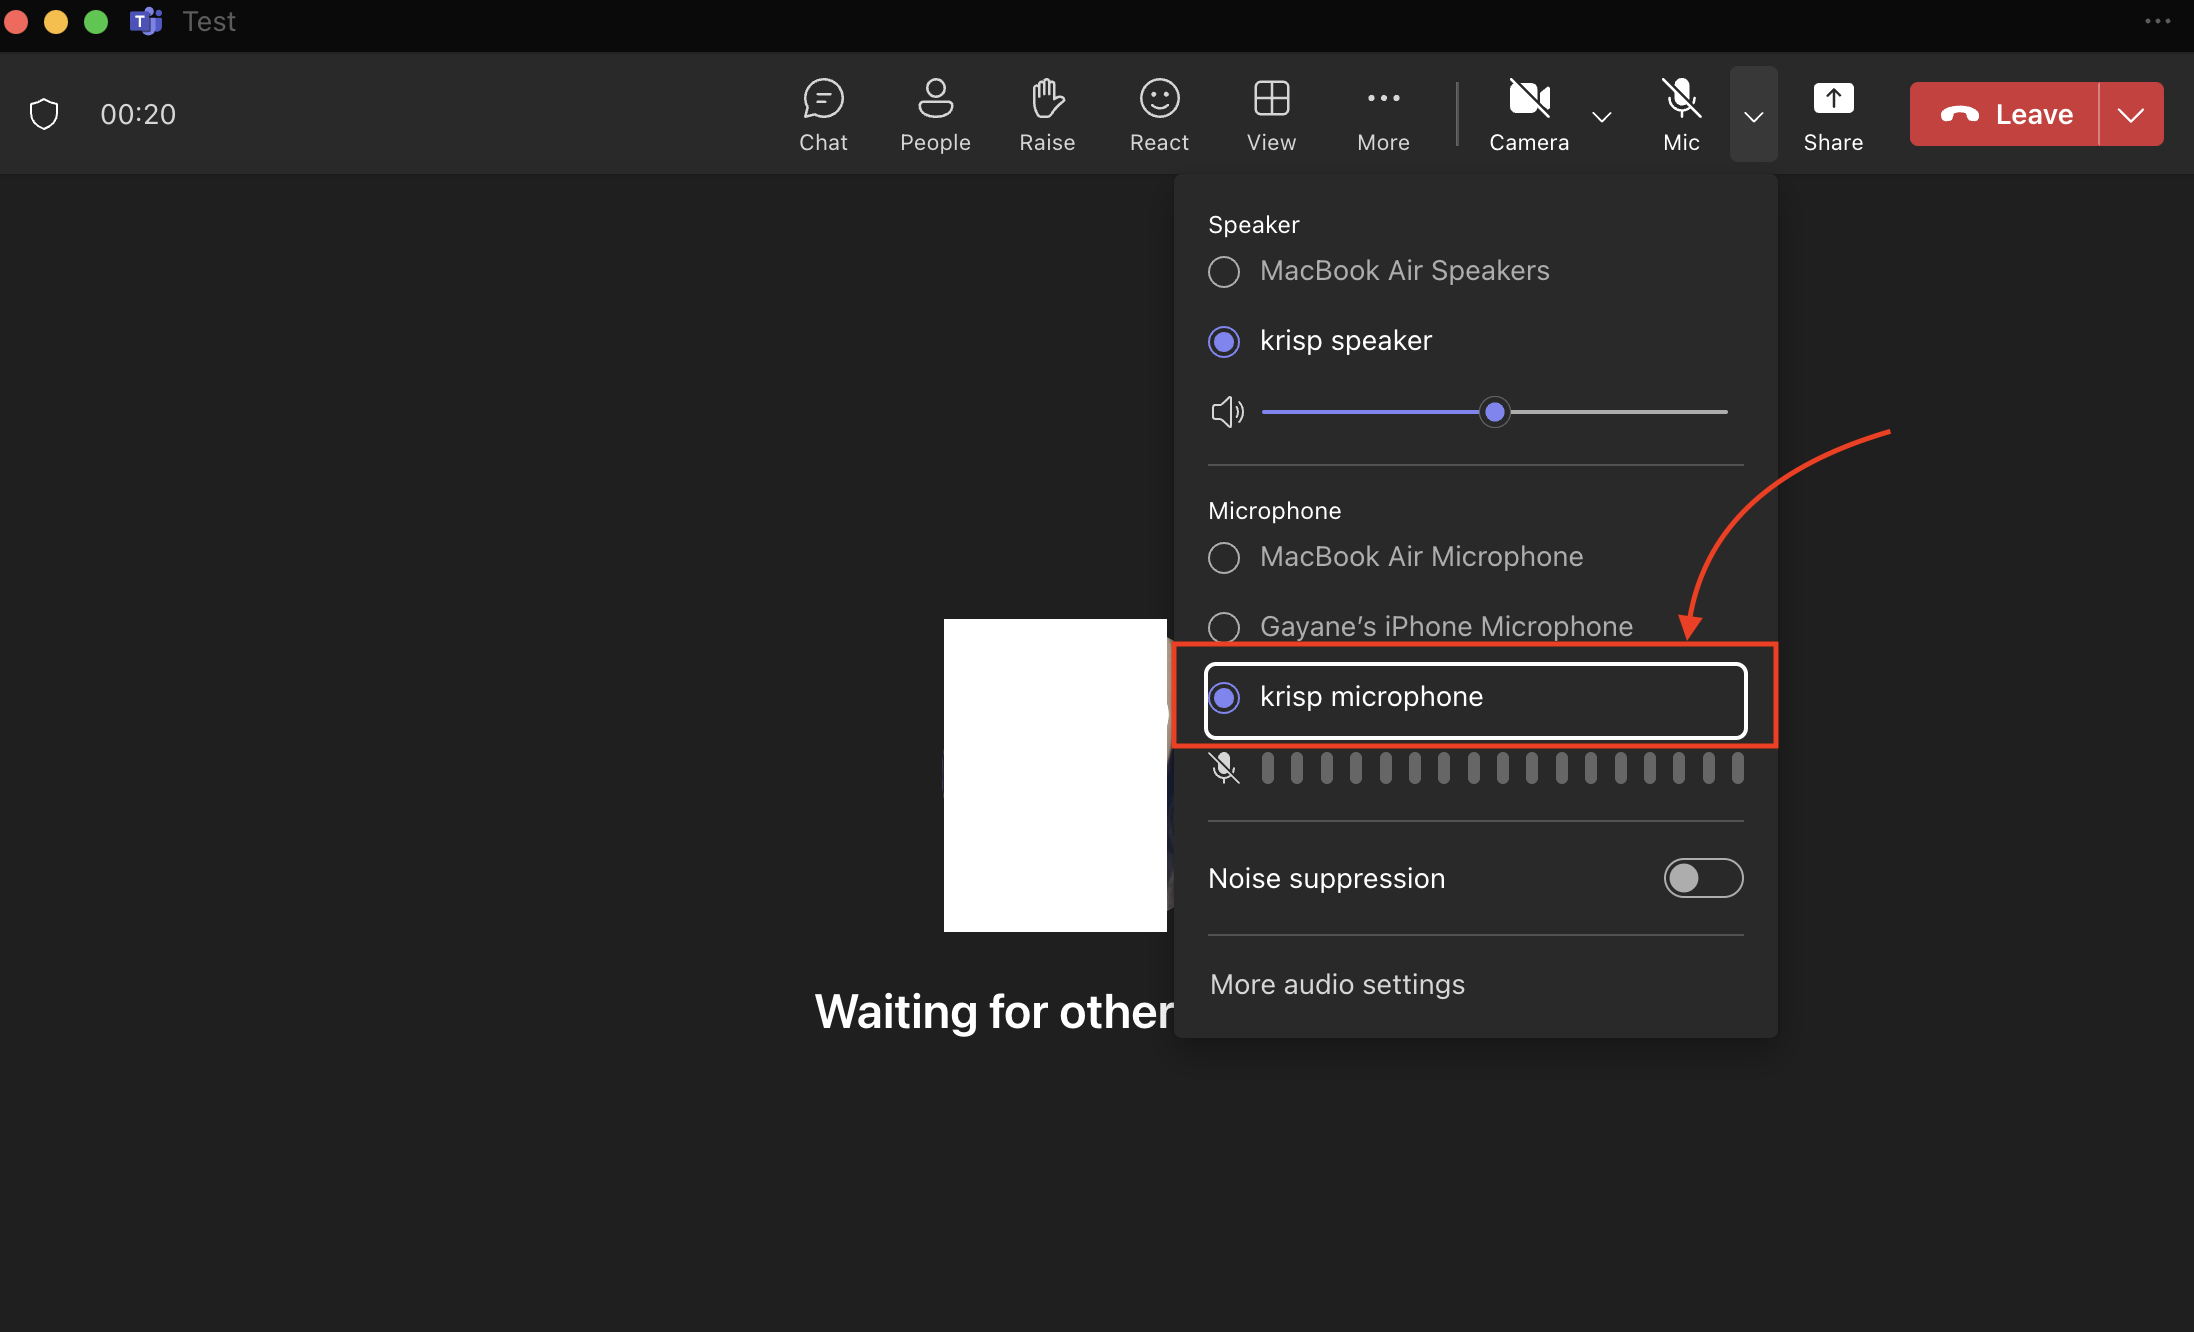
4. Choose Krisp’s Speaker’s for Your Meeting
5. Enable Krisp Transcription:
- In the Krisp app, select the ‘Transcription’ option.
- Click ‘Start Transcription’ to begin recording and transcribing your meeting audio.

6. View and Save Transcripts: Once your meeting is over, you can view and save the transcript directly from Krisp.
Pros and Cons of Using Krisp for Transcription
| Pros 😊 |
Cons 😕 |
| High Accuracy: Advanced AI provides more accurate transcripts, even in noisy environments. |
Requires Separate App: You’ll need to download and set up Krisp alongside Teams. |
| Noise Cancellation: Removes background noise, making it easier to understand and transcribe conversations. |
Subscription Costs: Some advanced features require a paid subscription. |
| Supports Multiple Languages: Great for international teams. |
Not Built-In: You have to switch between Krisp and Teams to manage transcriptions. |
| Extra Features: Offers speaker recognition and meeting notes with action items. |
Dependent on Internet: Requires a stable internet connection for the best results. |
Best Practices for Transcription in Teams Meetings
To get the most out of transcription during your Teams meetings, here are some best practices to keep in mind:
- Notify Participants: Always let everyone know that you’re recording and transcribing the meeting. It’s polite and helps avoid any misunderstandings.
- Use High-Quality Audio Equipment: A good microphone can make a big difference in transcription accuracy. Avoid relying on built-in laptop mics if you can.
- Minimize Background Noise: Whether you’re using Teams or Krisp, a quiet environment will lead to better transcription quality. Mute yourself if you’re not speaking and ask participants to do the same.
- Speak Clearly: It sounds obvious, but clear, steady speech is easier to transcribe. Avoid talking over others, and try to articulate as best as possible.
- Review and Edit Transcripts: After the meeting, take a few minutes to go through the transcript. Correct any errors, especially for names or technical terms that might not have been captured accurately.
- Save and Share Transcripts: Once you’ve reviewed the transcript, save it and share it with your team for future reference.
Choosing the Right Transcription Method for Your Needs
| Use Teams’ Built-In Transcription If: ✔️ |
Use Krisp for Transcription If: 💡 |
| You need a quick, no-fuss solution within the Teams app. |
You want higher accuracy, especially in noisy environments or with multiple speakers. |
| You’re working with smaller teams or internal meetings. |
You need advanced features like noise cancellation and speaker recognition, and meeting recording. |
| You’re using an Office 365 Enterprise plan. |
You work with international teams and need support for multiple languages and accents. |
| You prefer to keep everything within the Teams ecosystem. |
You want to use AI tools for meeting summaries and productivity enhancements. |
FAQ
How to turn on transcription in Teams?
Go to your meeting controls, click on “More actions” (three dots), and select “Start transcription.
How to turn on transcription in Teams for Copilot?
Ensure that Copilot is enabled and configured by your IT admin, then use the Copilot interface during meetings to start transcription.
How to start transcription in Teams?
Join a meeting, click on the “More actions” button (three dots) in the toolbar, and choose “Start transcription” from the dropdown menu.
How to turn on transcription in Teams Admin Center?
In the Teams Admin Center, go to “Meeting policies,” select the policy you want to modify, and toggle on the “Allow transcription” option under the Recording & transcription settings.