Ever struggled to remember key details from a Zoom meeting? Or needed an accurate transcript of a recorded session for later reference? Transcribing Zoom meetings and recordings helps capture important discussions, improve documentation, and ensure nothing gets lost in conversation.
Zoom offers built-in transcription features, but they come with accuracy limitations and restricted access based on plan type. If you need precise, AI-powered transcriptions with real-time captions and smart summaries, Krisp provides a more efficient alternative.
In this guide, we’ll explore:
- How to enable Zoom’s native transcription
- How to transcribe live meetings and recordings using Krisp
- A comparison of Krisp vs. Zoom transcription features
- Best practices for more accurate transcripts
What is Zoom Transcription?
Zoom transcription is the process of converting spoken words from a Zoom meeting into text, either in real-time or after the meeting ends. It helps participants capture discussions, review key points, and create accurate meeting records.
Zoom offers two types of transcription:
- Live transcription – Displays captions in real-time during a meeting.
- Post-meeting transcription – Generates a transcript after the meeting from a recorded session.
Both transcription methods are available within Zoom, but they come with limitations in accuracy, availability, and usability. AI-powered tools like Krisp provide a more reliable and efficient alternative.
How to Enable Zoom Native Transcription?
If you’re using a Zoom Pro, Business, or Enterprise plan, you can turn on Zoom’s built-in live transcription with just a few clicks. Here’s how:
- Sign in to your Zoom account at zoom.us.
- Go to Settings > Meeting > In Meeting (Advanced).
- Scroll down and find “Automated captions” – toggle it on.
- (Optional) Enable “Full transcript” if you want a running transcript alongside the captions.
- When you start a meeting, click “Live Transcript” in the toolbar and select “Enable”.
How to Transcribe a Zoom Meeting for Free with Krisp
Transcribing a Zoom meeting with Krisp’s AI Meeting Assistant is a simple and efficient way to capture accurate meeting notes. Follow these steps to enable real-time transcription and post-meeting summaries effortlessly.
Step 1: Set Up Krisp for Zoom
- Download and install Krisp on your computer.
- Sign in to your Krisp account.
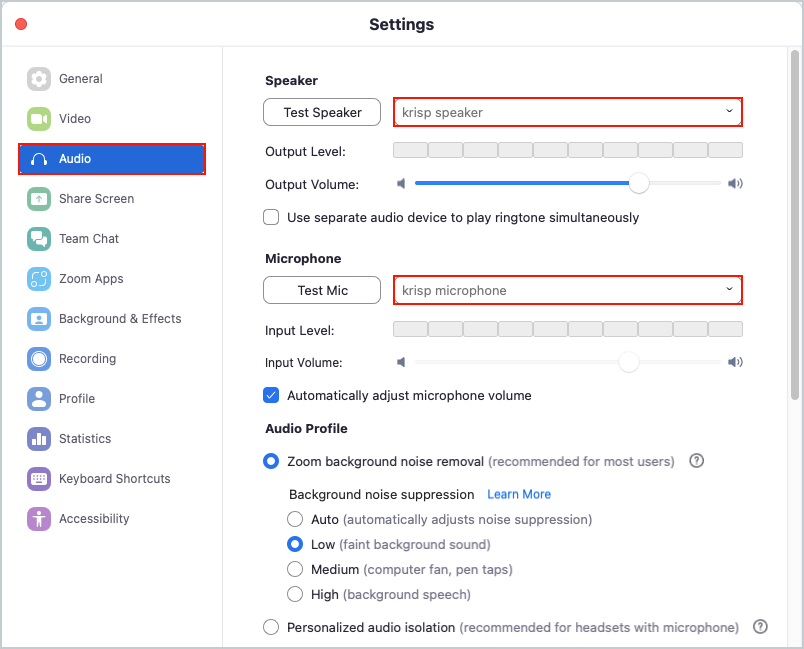
- In Zoom’s audio settings, set Krisp as the microphone and speaker to enable noise cancellation and clear transcription.

Step 2: Start a Zoom Meeting with Krisp Transcription
- Open Zoom and start your meeting as usual.
- In Krisp, click on the Transcript feature to enable it before or during the meeting.
- Once enabled, Krisp will start transcribing the meeting in real-time and capturing important details.
Step 3: View and Access Transcription
- As the meeting progresses, Krisp will generate real-time text transcripts available for review after the meeting.
- Transcriptions are automatically organized and saved for post-meeting review.
- You can view the transcript after the meeting ends.

Step 4: Get an AI-generated Summary
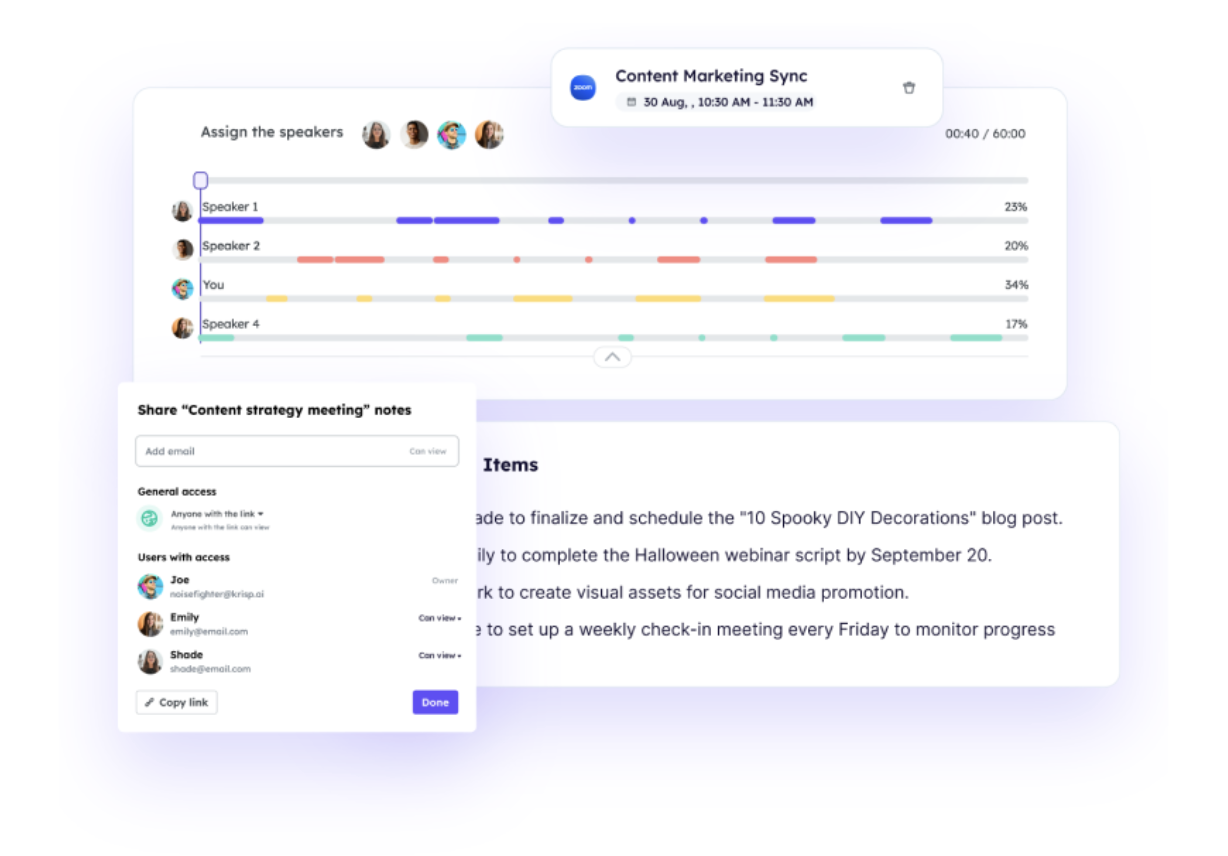
- After the meeting, Krisp can generate a meeting summary highlighting key discussion points.
- The summary includes action items, decisions, and main topics, making it easy to review.
- You can edit and refine the transcript if needed.
Step 5: Save, Share, and Export the Transcript
- Download or export the transcript in text format for documentation.
- Share the transcript with your team or use it for reference.
- Search and highlight key moments within the text.
How to Transcribe Zoom Recordings
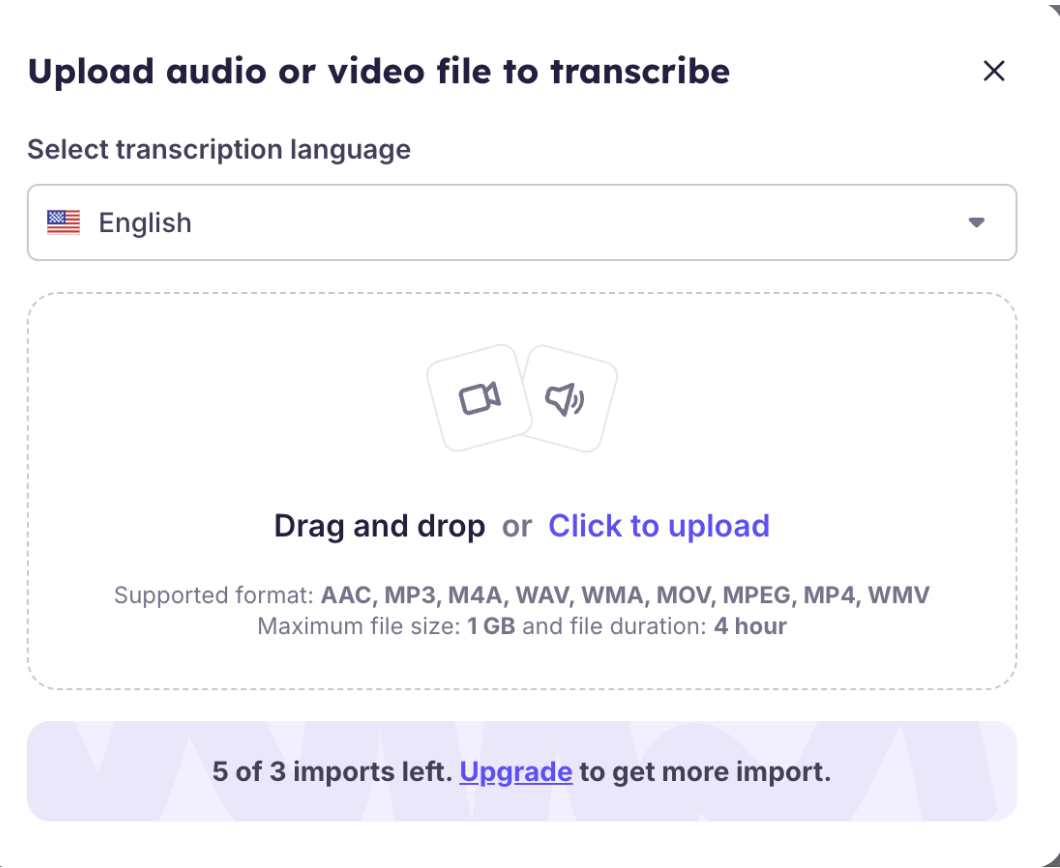
Transcribing a Zoom recording can help you extract key points, review discussions, or share meeting notes with others. With Krisp, you can upload your audio or video file and get a full transcript in just a few steps.

- Log in to Krisp and go to the AI Meeting Assistant section.
- Click “Upload recording” and choose your Zoom audio or video file (supports MP4, M4A, and MP3).
- Krisp will process the file and generate a full transcript using AI.
- Once the transcription is ready, you’ll see speaker labels and an optional summary.
- You can then edit, search, and export the transcript as needed.
This method works well for any recorded Zoom meeting, even if Krisp wasn’t active during the live session and you were not the host.
Krisp Transcription vs. Zoom Native Transcription
| Feature | Zoom Built-in Transcription | Krisp AI Transcription |
|---|---|---|
| Live transcription | ✅ Yes (Paid Plans) | ✅ Yes (Higher Accuracy) |
| Post-meeting transcripts | ✅ Requires Cloud Recording | ✅ Works for live & recorded meetings |
| Speaker identification | ❌ No | ✅ Yes |
| Noise cancellation | ❌ No | ✅ Yes |
| Automatic summaries | ❌ No | ✅ Yes |
How Krisp Enhances Your Zoom Meeting Experience
Zoom meetings are essential for remote work, but they often come with challenges like background noise, unclear audio, and the need for accurate transcription. Krisp’s AI Meeting Assistant enhances your Zoom experience by providing crystal-clear audio, real-time transcription, and AI-generated meeting summaries—helping you stay focused and productive.
Here’s how Krisp takes your Zoom meetings to the next level:
1. AI-Powered Noise Cancellation for Clearer Communication
One of the biggest distractions in virtual meetings is background noise—whether it’s keyboard typing, barking dogs, or street traffic. Krisp eliminates unwanted noise in real time, ensuring that only your voice is heard clearly.
In addition to standard noise cancellation, Krisp also includes background voice cancellation—a feature that filters out other people speaking around you, even if they’re close by. This is especially useful in shared spaces, busy homes, or open offices.
- Removes background noise from your microphone and incoming audio
- Cancels background voices with Krisp Pro and Free plans
- Works with any headset, microphone, or speaker
- No additional hardware needed—just enable Krisp and start speaking
2. Real-Time Transcription for Effortless Meeting Notes
Instead of struggling to take notes while participating in a discussion, Krisp’s AI Meeting Assistant automatically transcribes your Zoom meetings with high accuracy.
- Speaker identification to clarify who said what
- Editable transcripts for easy review and correction
- Searchable text to find key points quickly
3. AI-Generated Summaries to Save Time
After a long meeting, reviewing the full transcript can be overwhelming. Krisp AI Note Taker summarizes key takeaways, action items, and decisions so you don’t have to.
- Automatic summaries after every Zoom meeting
- Concise action items to streamline follow-ups
- Saves time by providing quick insights without reading the entire transcript
4. Screen Recording for Meetings (Audio & Video)
With Krisp’s built-in recording feature, you can capture both audio and video of your Zoom meetings and transcribe them later. This is perfect for reviewing discussions, training sessions, and documentation.
- Records audio and video in high quality
- Automatically syncs with Krisp’s transcription feature
- No need for third-party recording tools
5. Seamless Integration with Zoom and Other Tools
Krisp works alongside Zoom without extra setup, making it an effortless addition to your workflow.
- No need to install additional Zoom plugins
- Meeting transcription works with Google Meet, Microsoft Teams, Slack, and more
- Lightweight and doesn’t slow down your computer
| Feature | Without Krisp | With Krisp |
|---|---|---|
| Background noise | ❌ Present | ✅ Removed |
| Transcription accuracy | ❌ Basic (Zoom’s built-in) | ✅ AI-enhanced |
| Meeting summaries | ❌ Manual note-taking | ✅ Automated summaries |
| Screen recording | ❌ Requires third-party tools | ✅ Built-in with Krisp |
| Speaker identification | ❌ No | ✅ Yes |
| Data privacy | ❌ Cloud-based storage | ✅ On-device processing |


