Do you need a quick and easy way and tips on how to schedule a Teams meeting? Whether you’re planning a small team huddle or a large conference call, Microsoft Teams offers a simple yet powerful platform for organizing and managing your meetings.
In this guide, we’ll walk you through the steps of scheduling a meeting using Teams on desktop, mobile, and through Outlook integration. Plus, we’ll share tips on enhancing your Teams meetings with Krisp’s noise cancellation and AI meeting assistant for a seamless virtual experience. Ready to get started? Let’s dive into the details!
How to Schedule a Teams Meeting via the Microsoft Teams App
Follow these steps to schedule a Microsoft Teams meeting using the Teams desktop app:
Step 1: Open the Microsoft Teams App
Launch the Teams desktop app on your computer and sign in with your account.
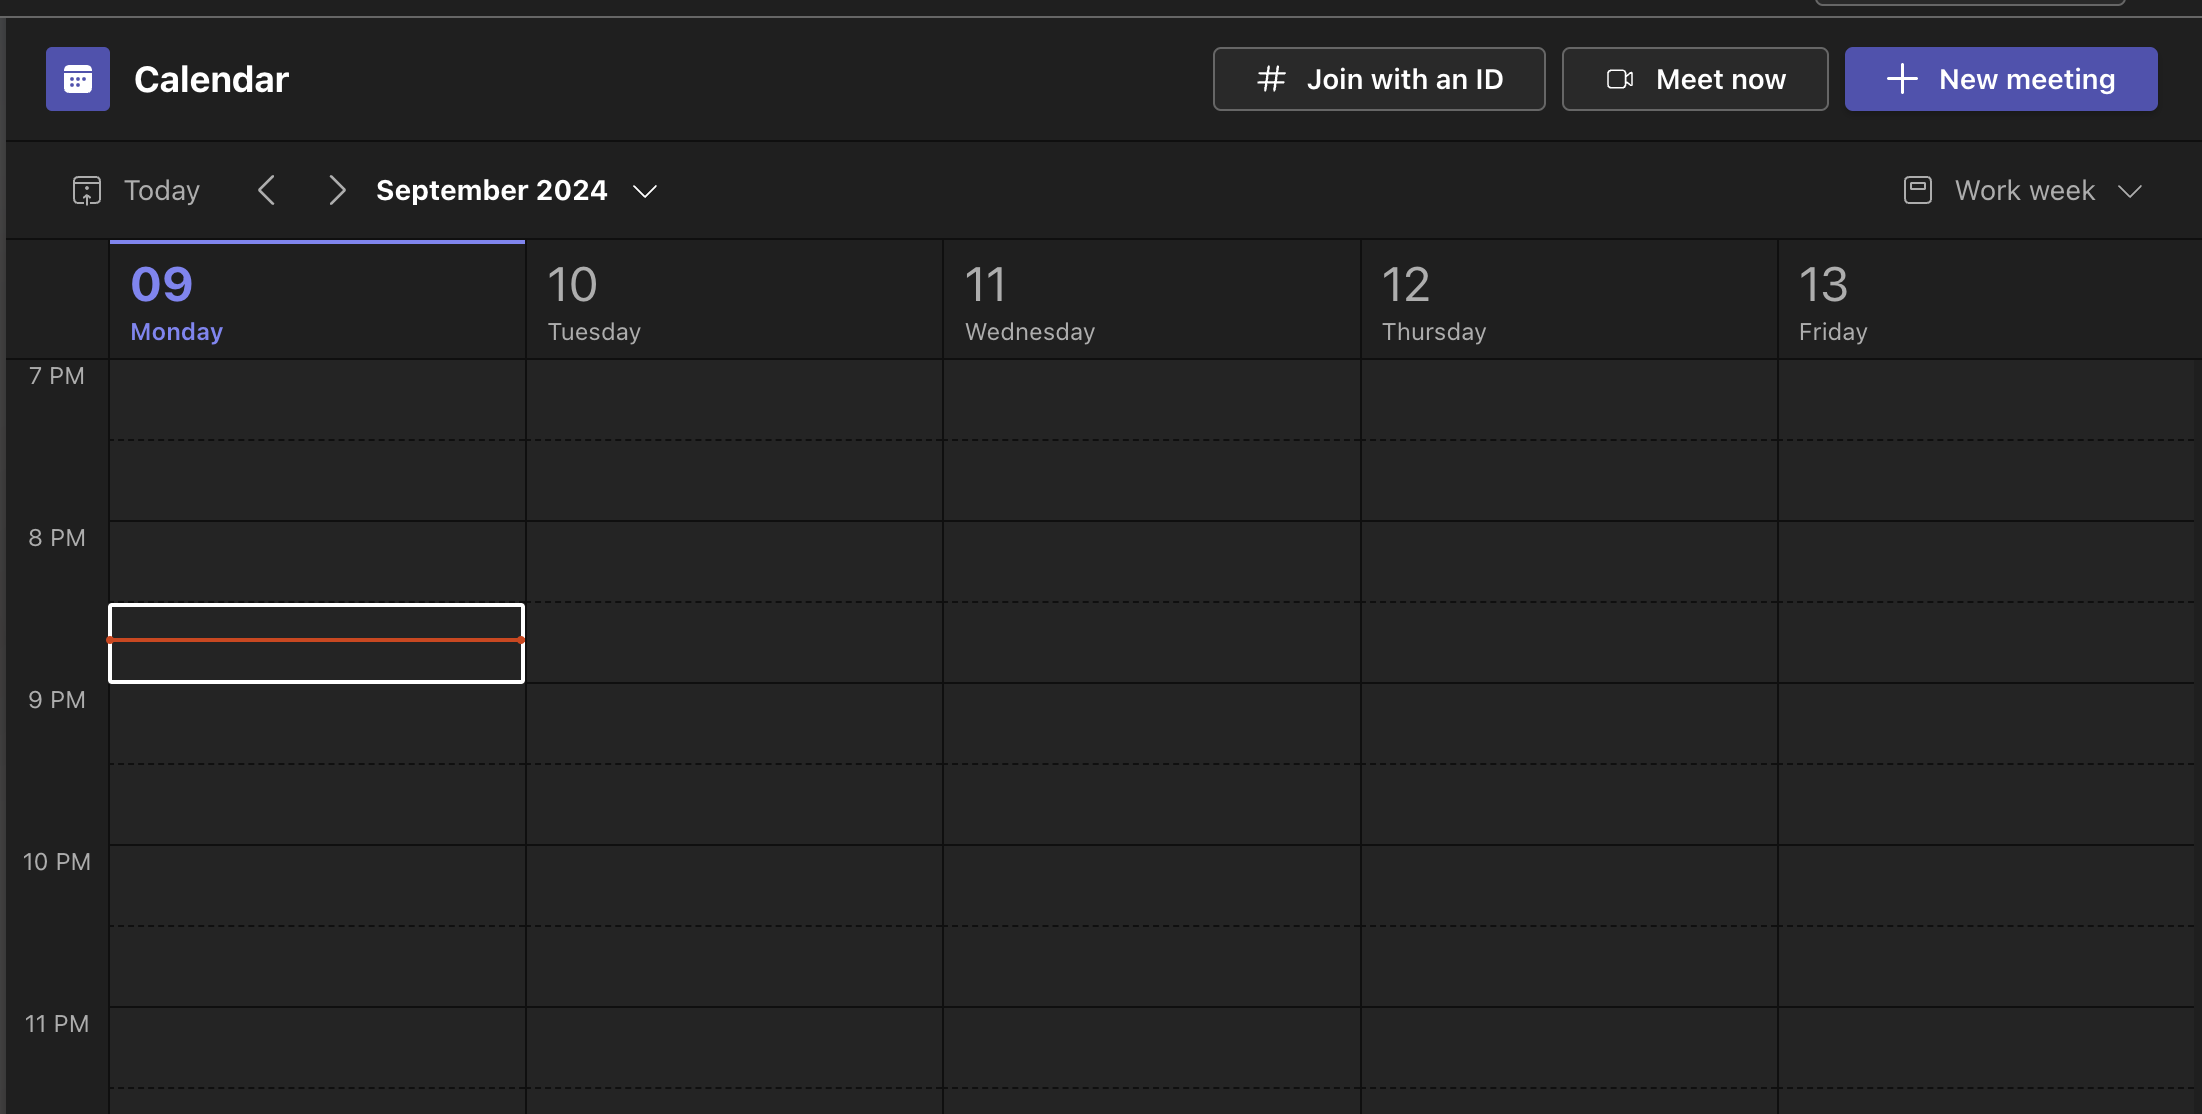
Step 2: Navigate to the Calendar
On the left-hand sidebar, click on the calendar icon to access your Teams calendar.
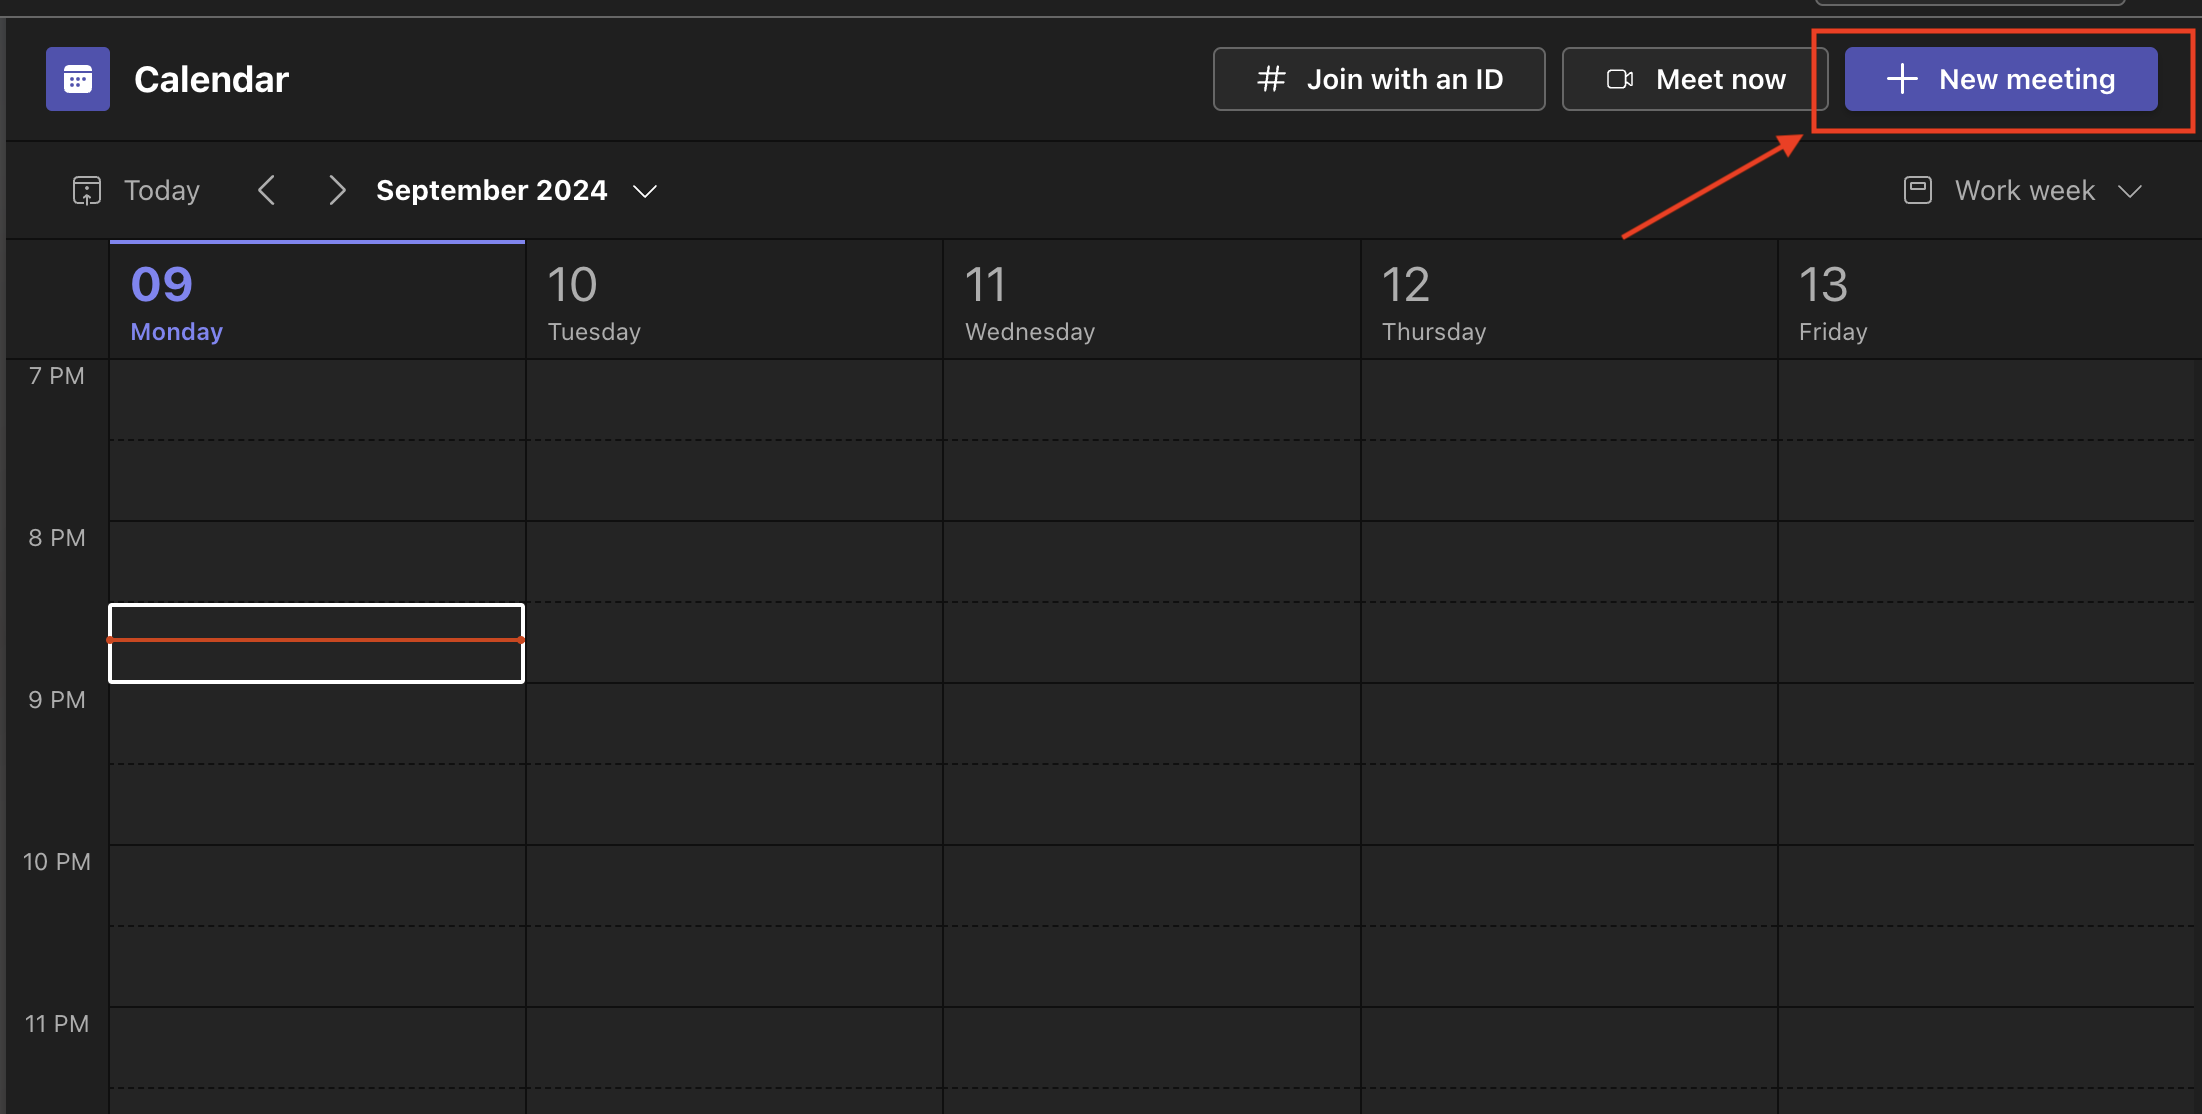
Step 3: Click “New Meeting”
In the upper-right corner of the calendar view, click the “New Meeting” button.
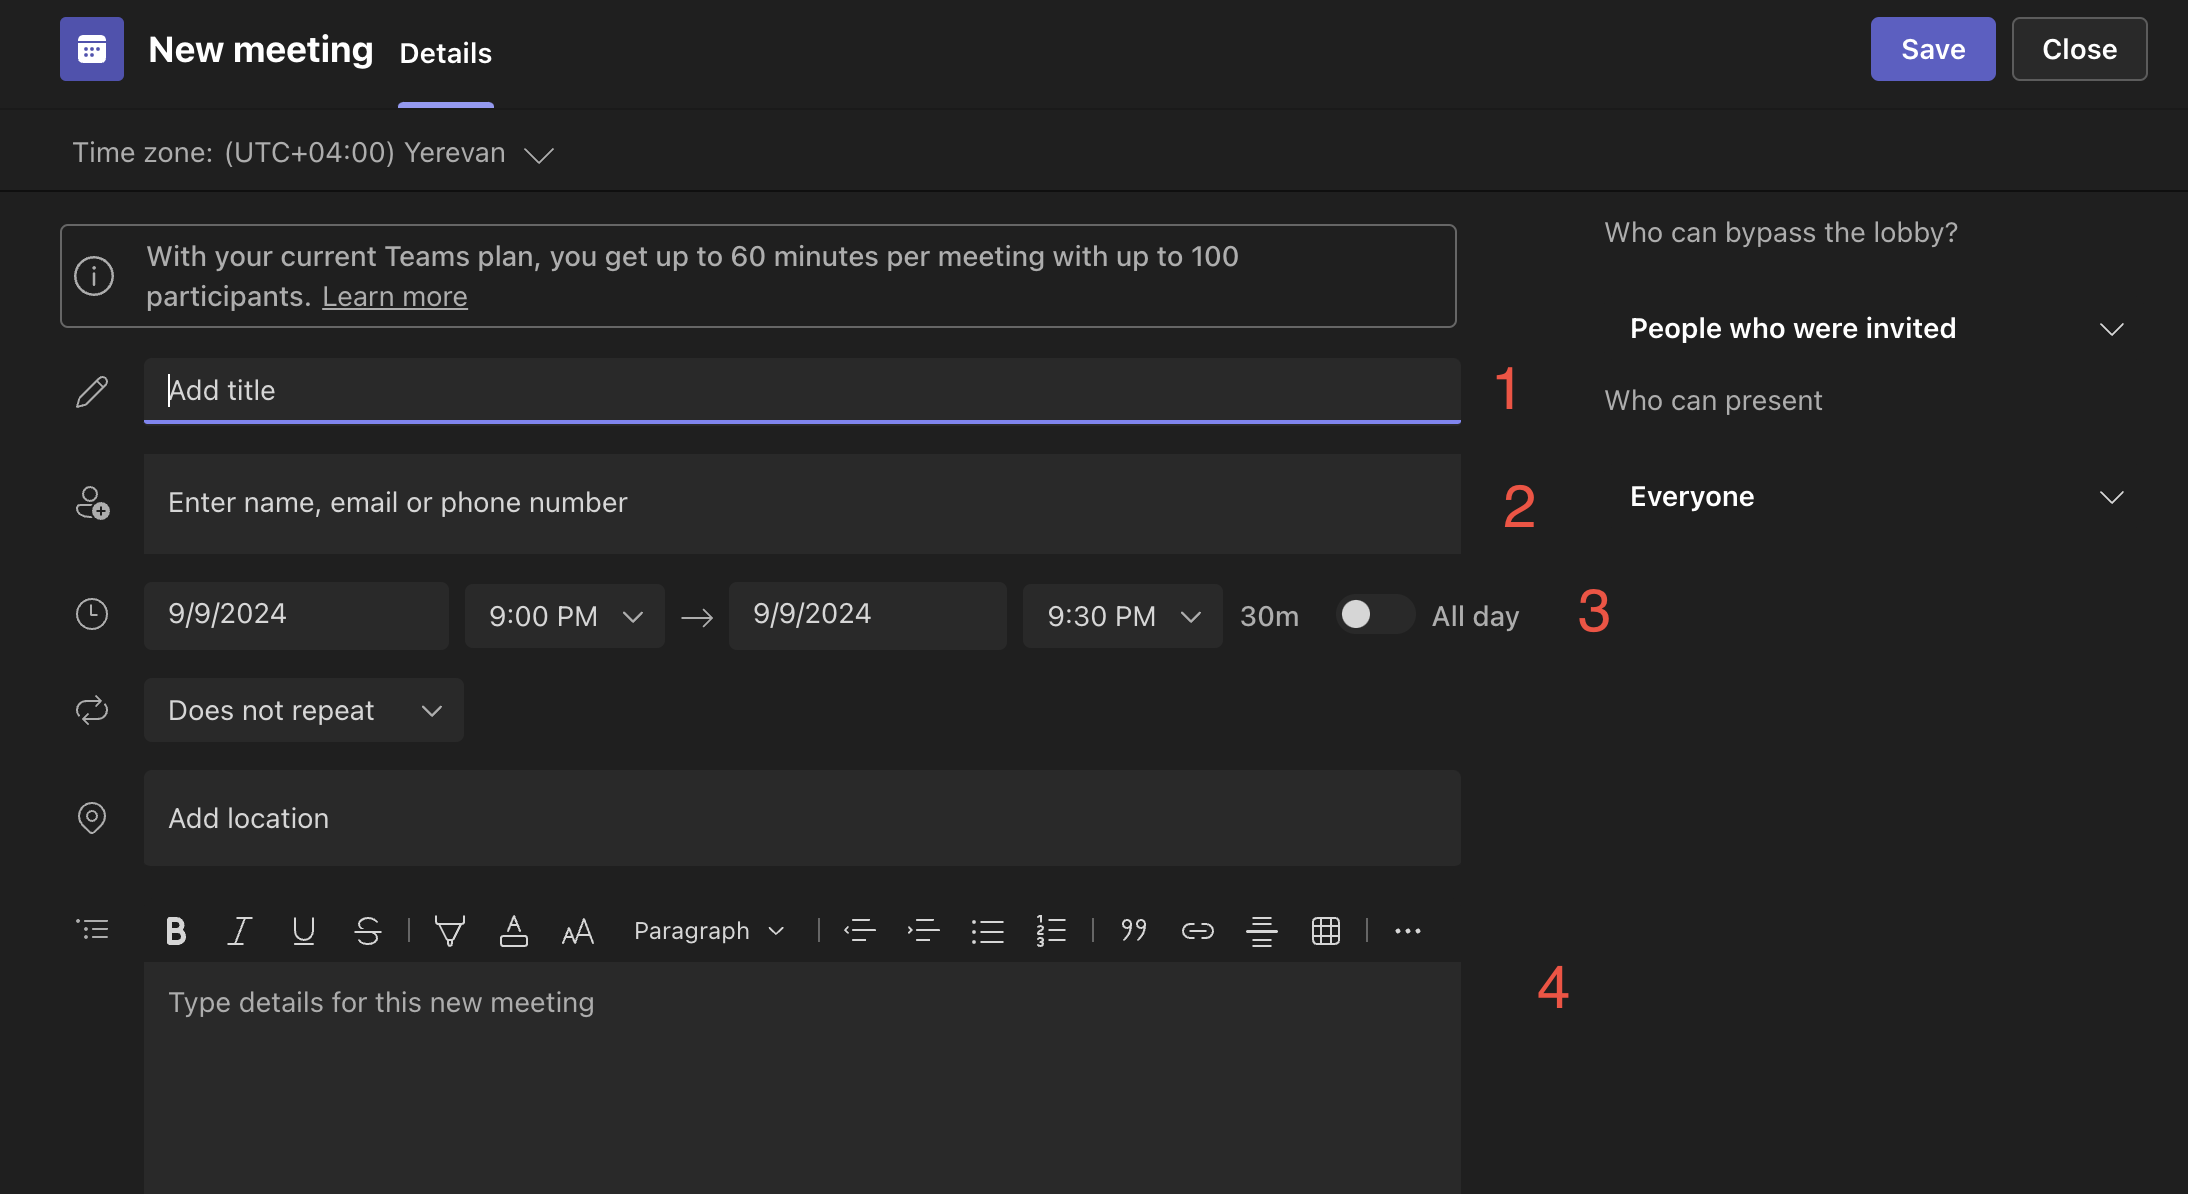
Step 4: Add Meeting Details
A form will appear where you can fill out all the necessary information:
- Title: Give your meeting a name.
- Participants: Add the names or emails of attendees.
- Date & Time: Set the meeting date and time.
- Description: Optionally, add an agenda or notes.
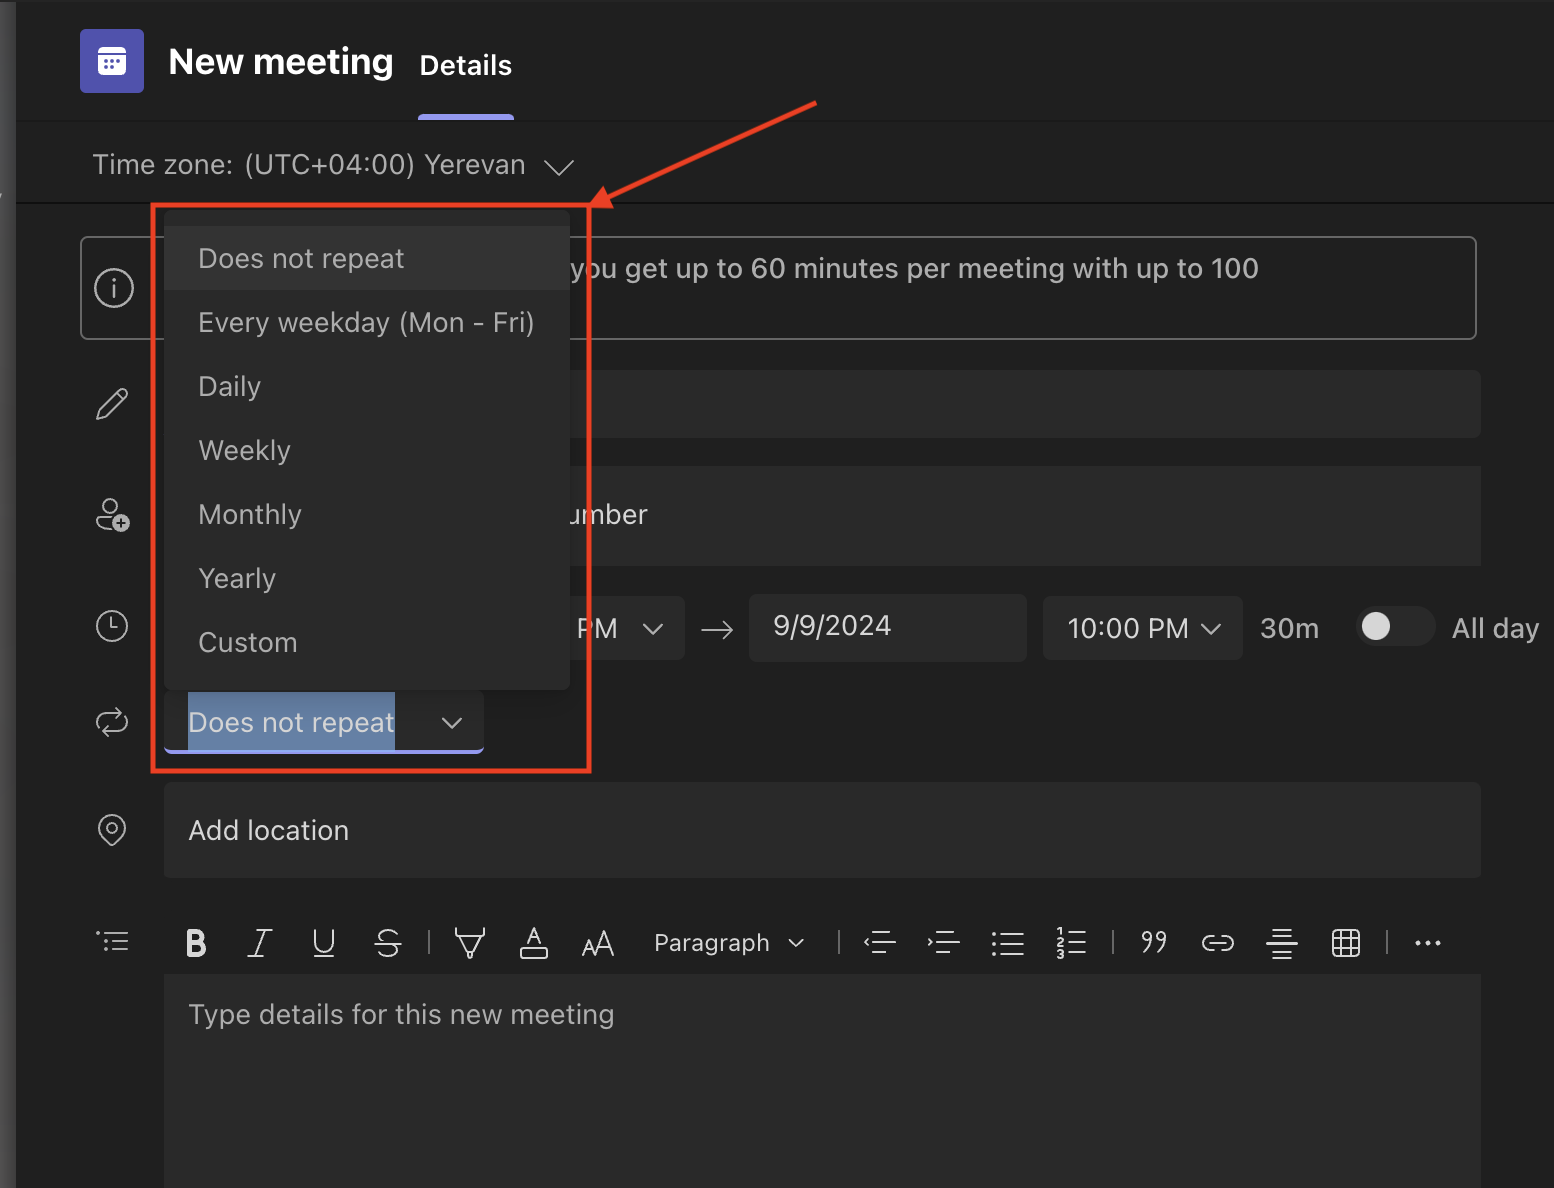
Step 5: Set Recurrence (Optional)
If this is a recurring meeting, click on “Does not repeat” and choose the appropriate recurrence settings (e.g., daily, weekly, monthly).
Step 6: Add a Location (Optional)
If it’s a hybrid meeting, you can specify a physical location; otherwise, leave this blank for a virtual-only meeting.
Step 7: Send Invitations
Once you’ve entered all details, click “Send” at the top right. The meeting invite will be sent to all participants with the link to join via Teams.
How to Schedule a Teams Meeting via Outlook Calendar Integration
Step 1: Open Outlook
Launch your Outlook desktop app or use the web version.
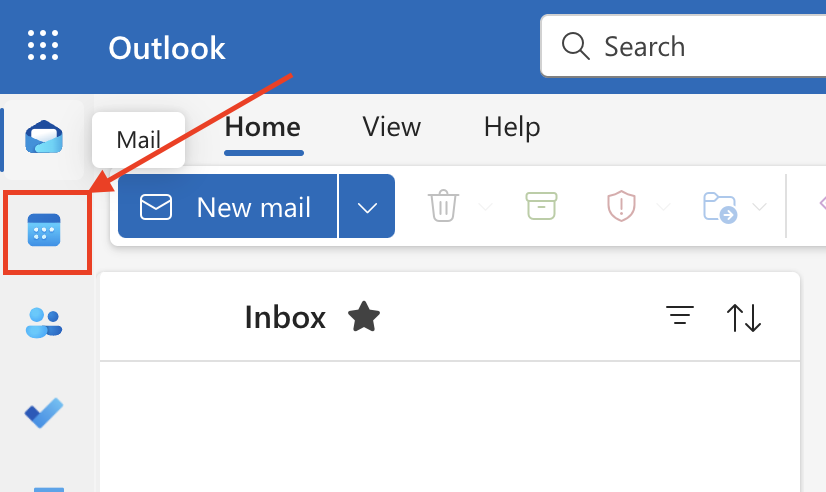
Step 2: Access the Calendar
Click on the calendar icon on the left-hand side to switch to the calendar view.
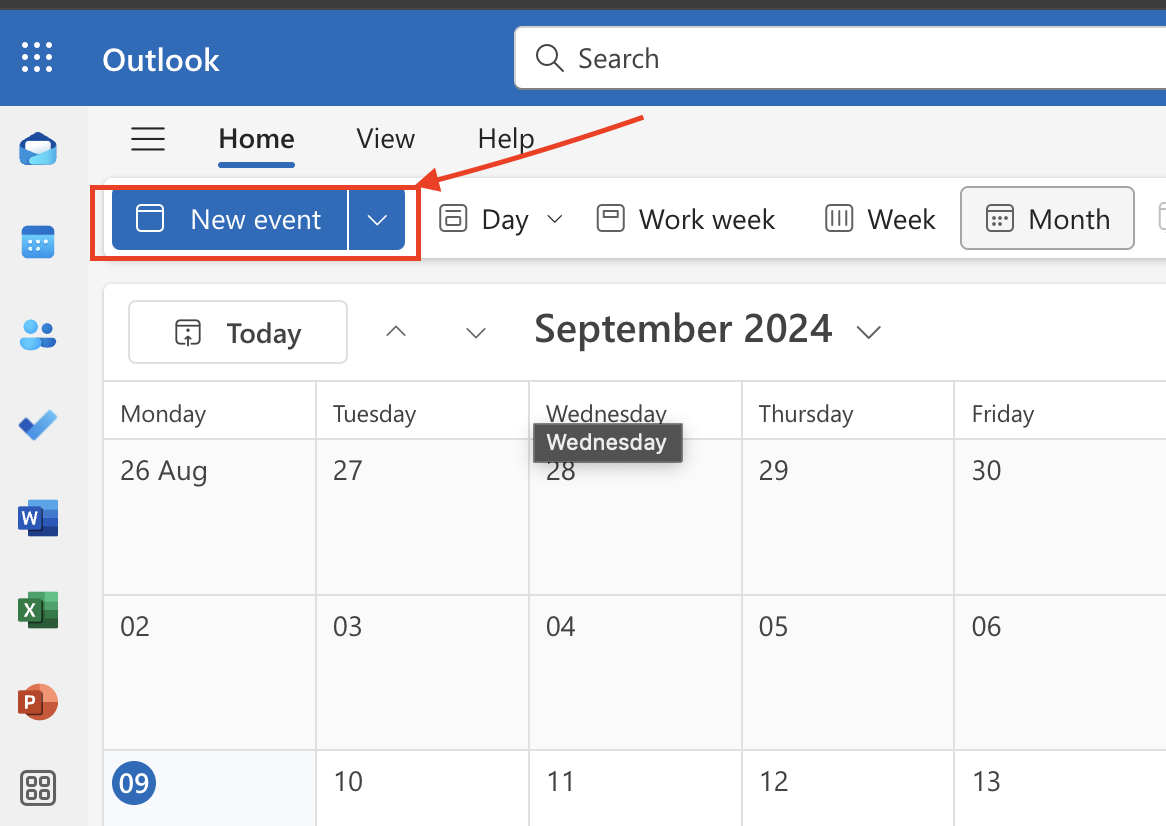
Step 3: Create a New Event
In the top navigation bar, click “New Meeting” or “New Appointment.”
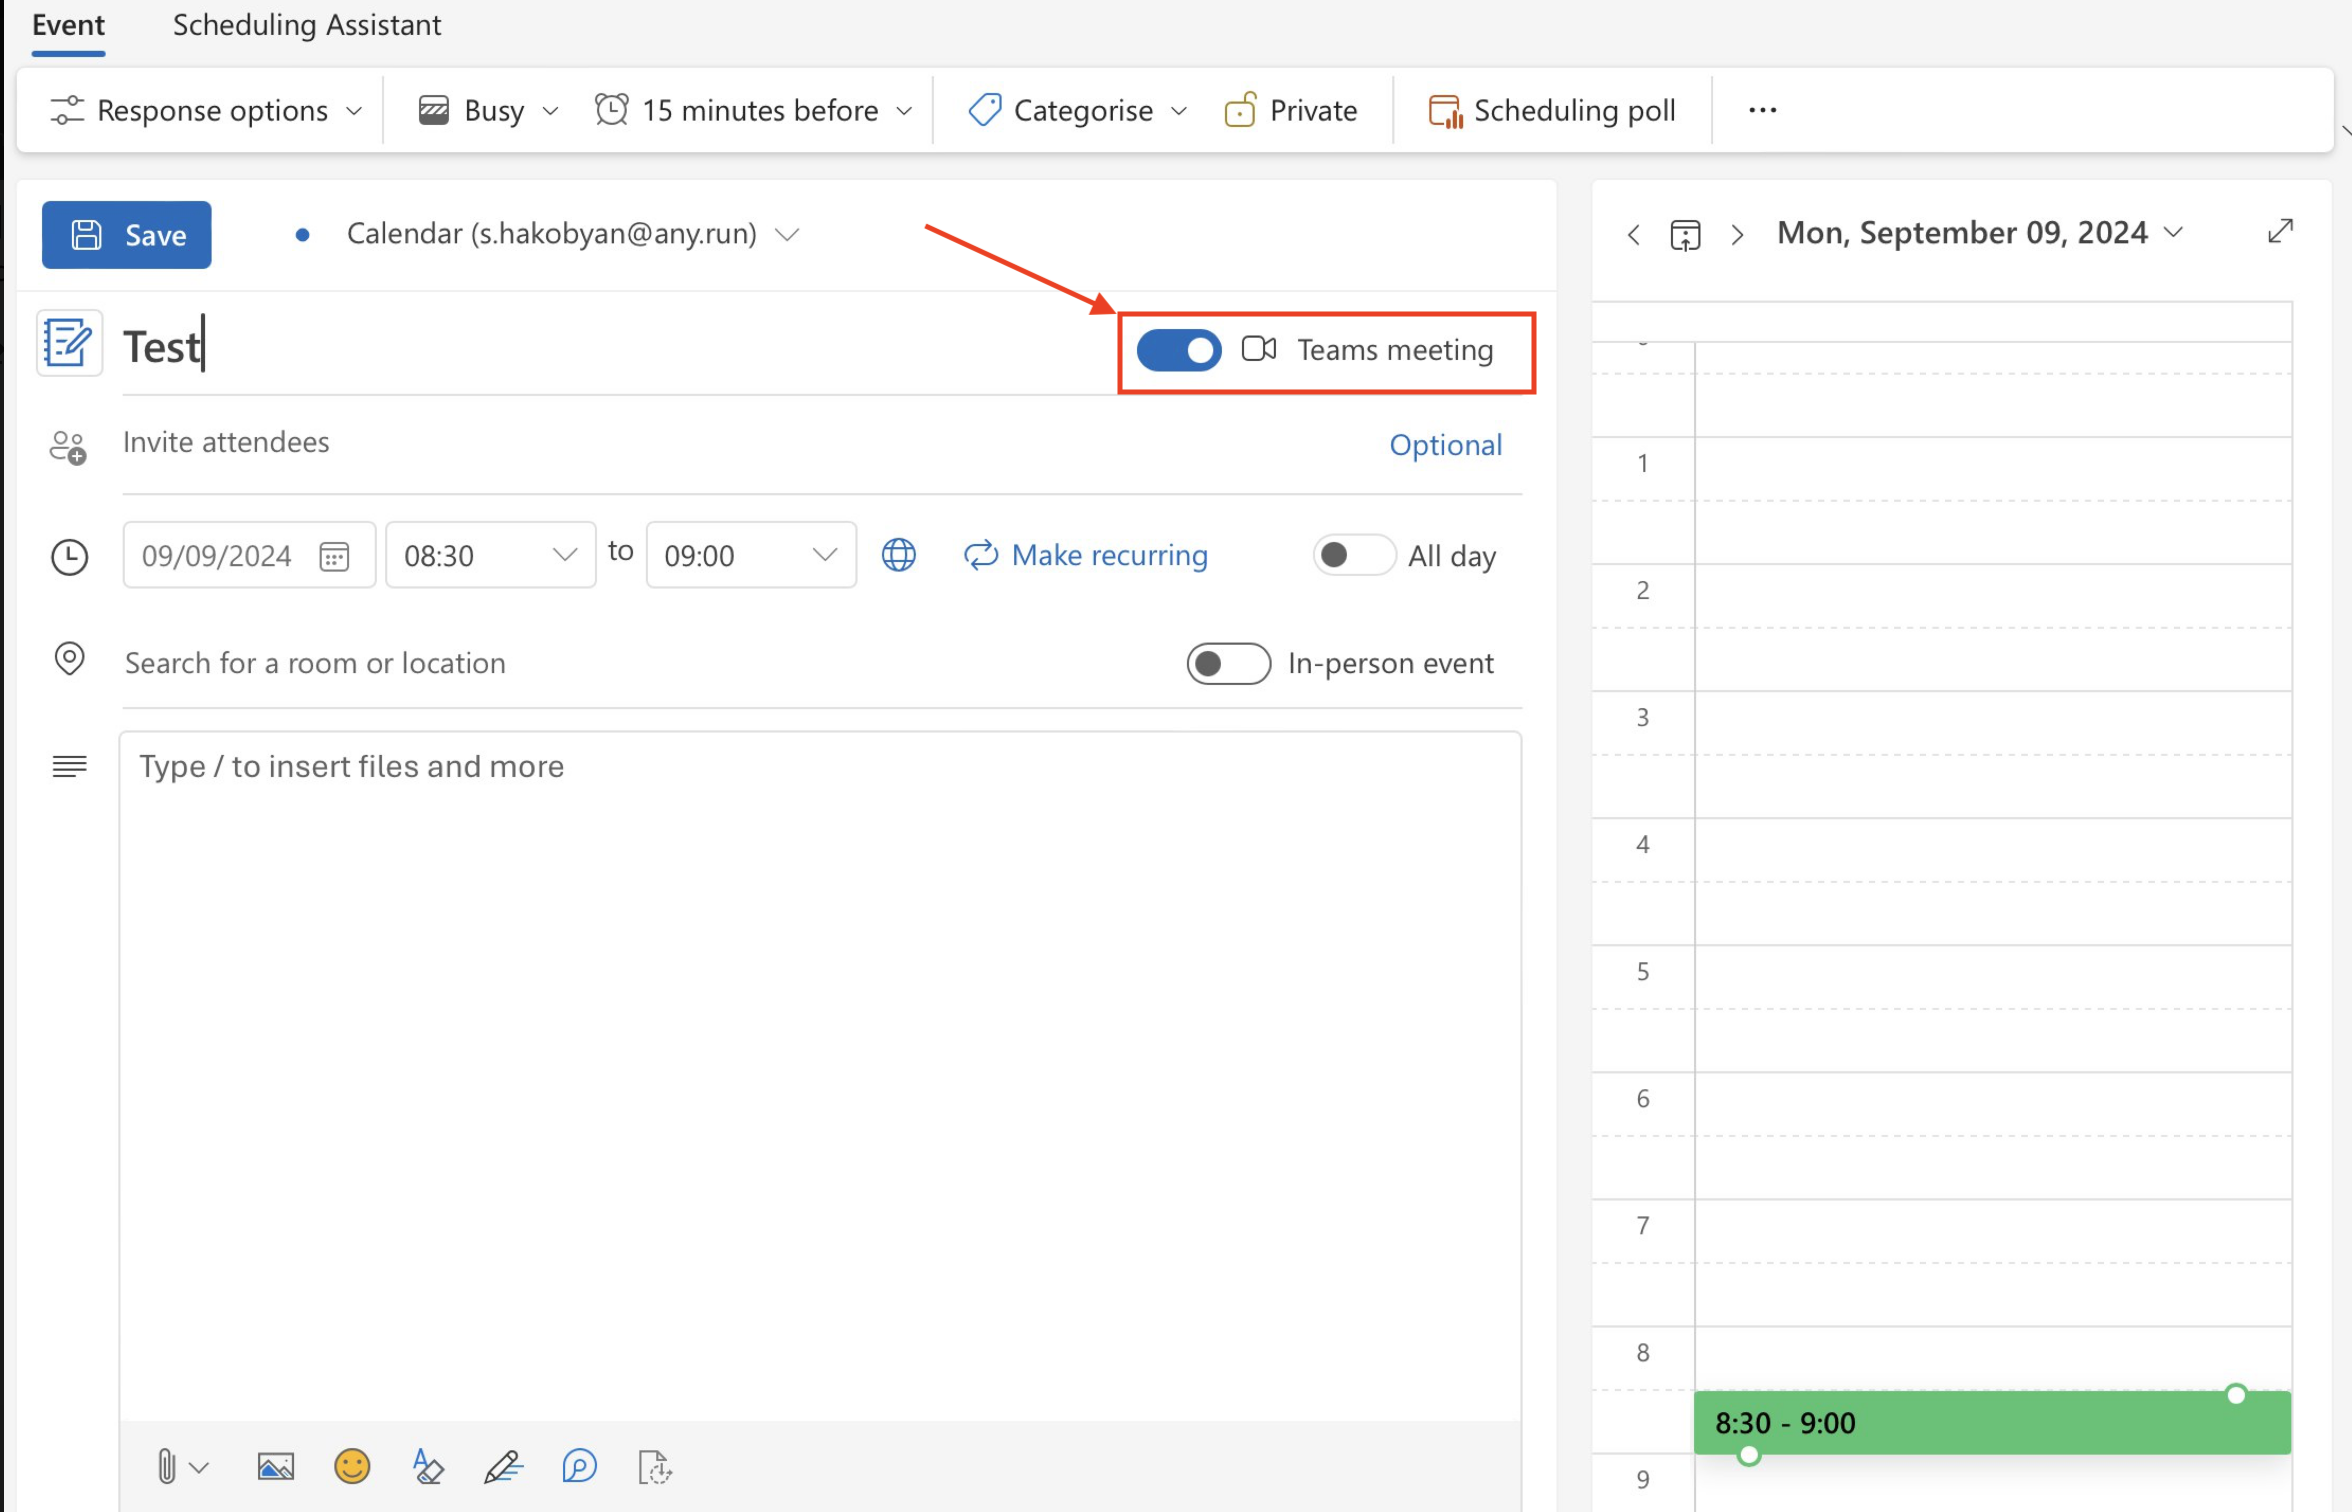
Step 4: Add Teams Meeting Option
In the meeting window, click the “Teams Meeting” button in the toolbar. This will automatically add the meeting link.
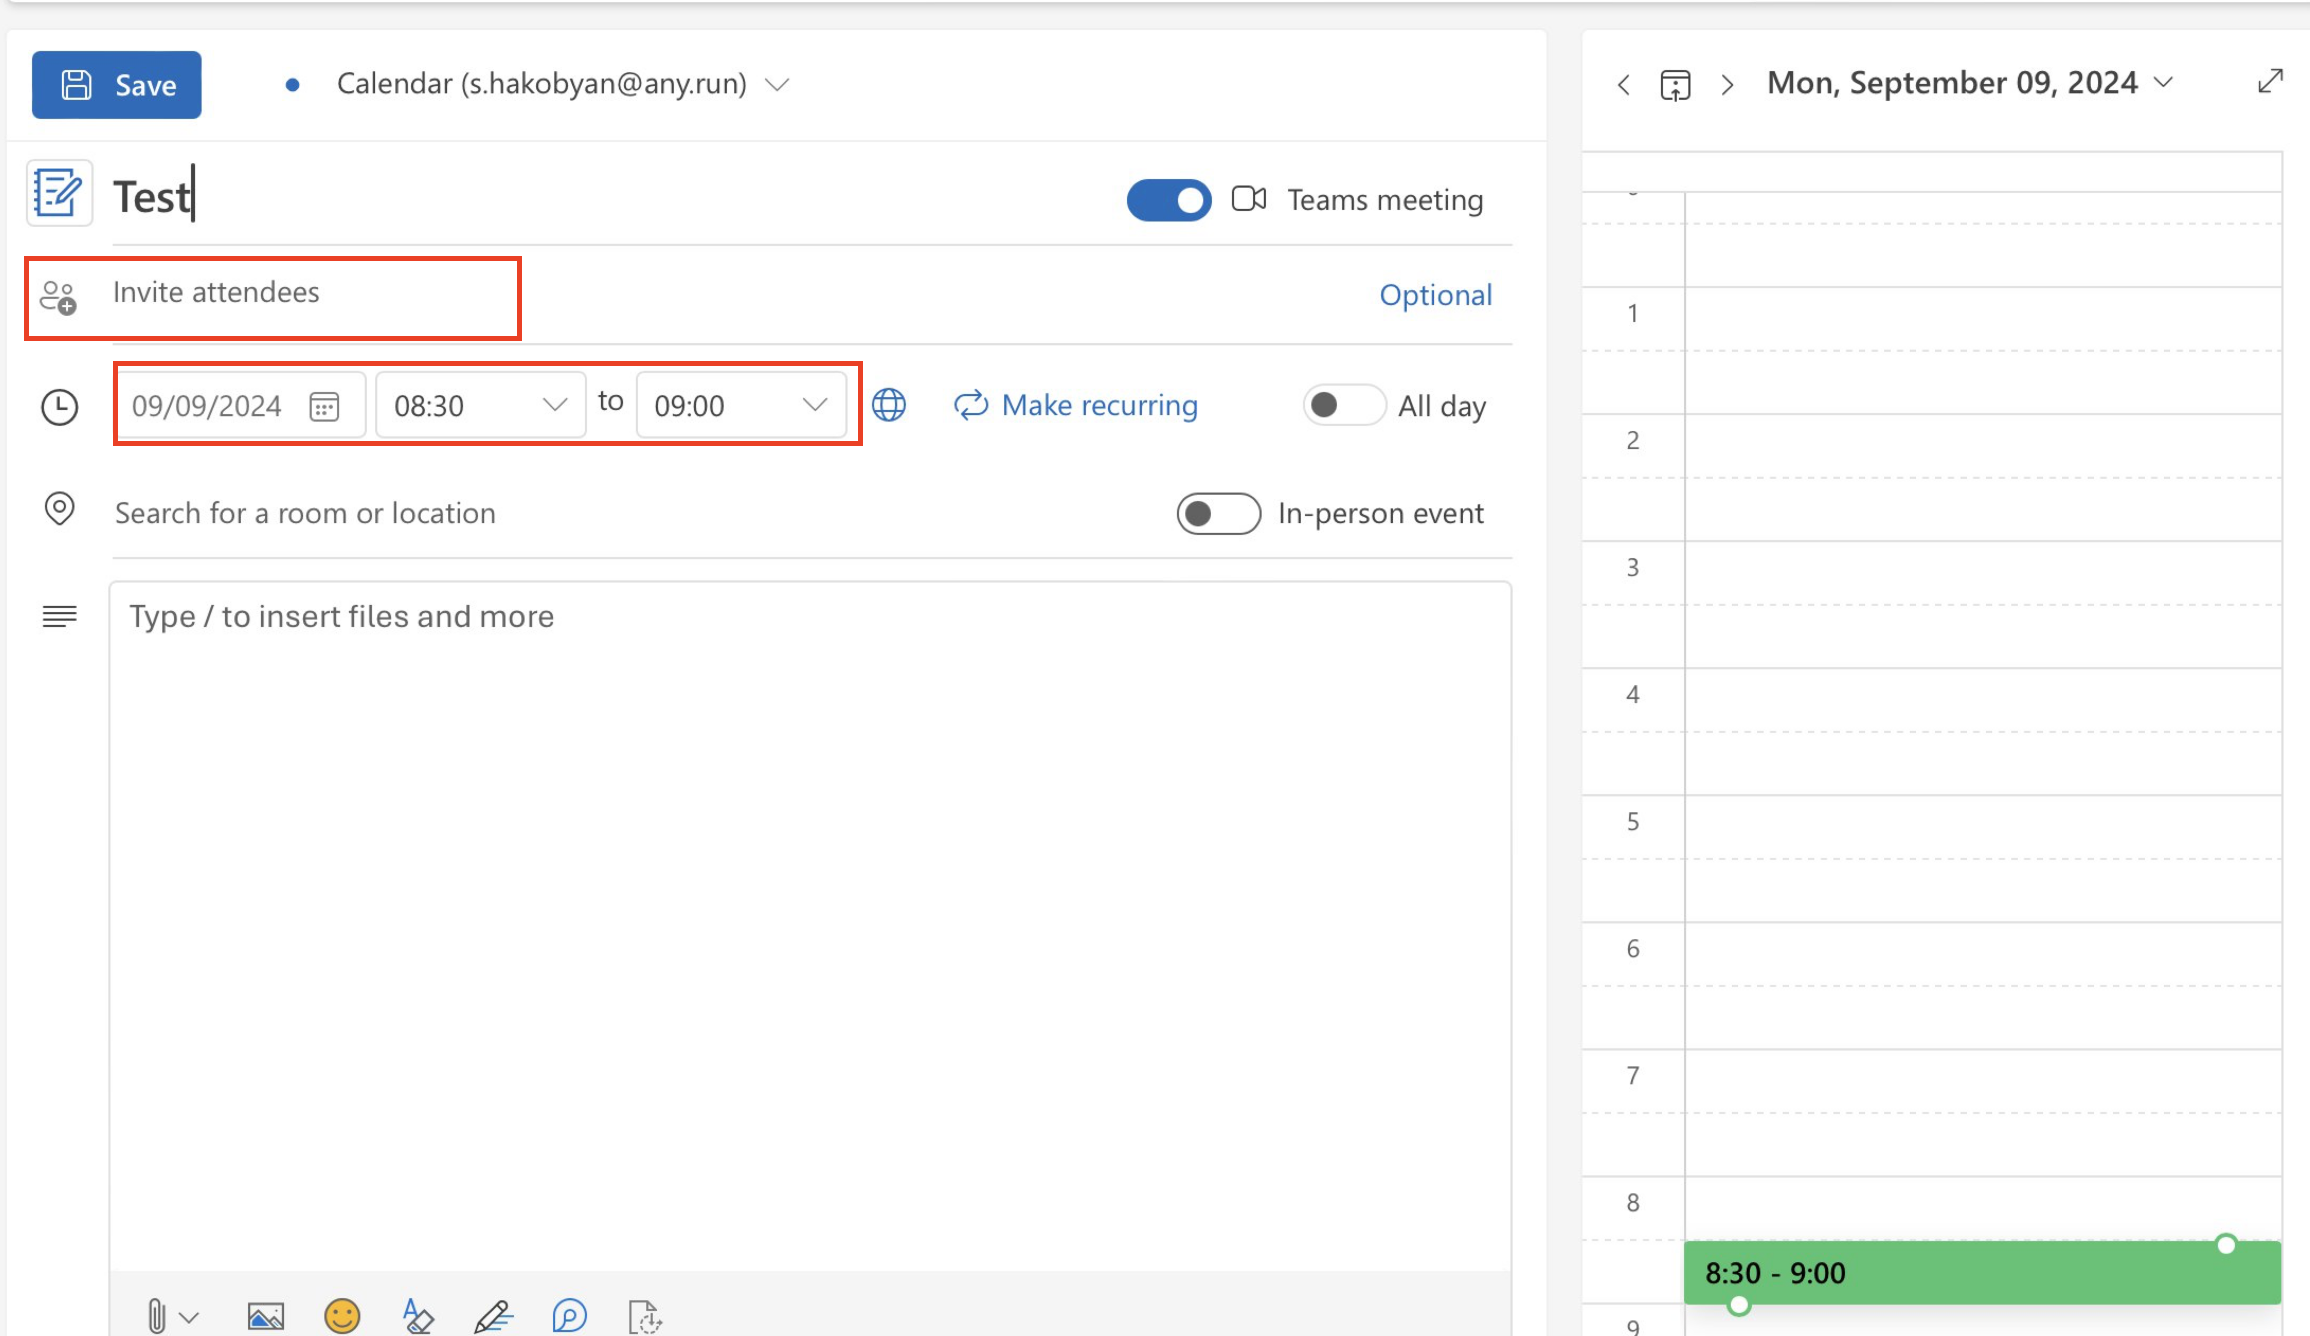
Step 5: Enter Meeting Details
Fill in the meeting title, attendees, date, time, and any additional information, such as the agenda.
Step 6: Send Invitations
Click “Send” to distribute the meeting invite. Attendees will receive a link to join the meeting via Microsoft Teams.
How to Schedule a Teams Meeting on Mobile
Here’s a step-by-step guide on how to schedule a Microsoft Teams meeting using the mobile app:
Step 1: Open the Microsoft Teams App
Launch the Teams app on your mobile device (available on both iOS and Android).
Step 2: Navigate to the Calendar
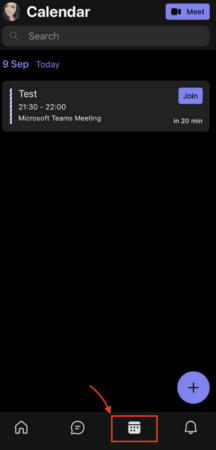
Tap the calendar icon at the bottom of the app screen to access your calendar.
Step 3: Create a New Meeting
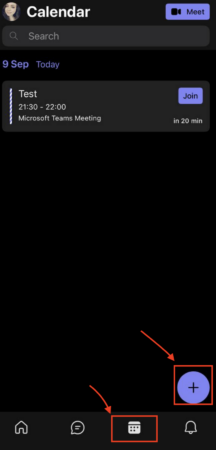
In the bottom-right corner, tap the “+” button to start scheduling a new meeting.
Step 4: Add Meeting Details
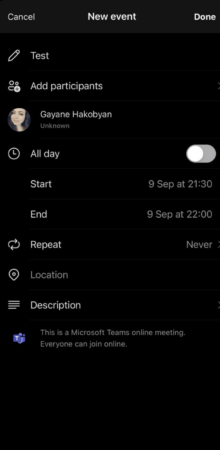
Enter the meeting title, add participants, and set the date and time. You can also include a description or agenda.
Step 5: Set Location (Optional)
If needed, you can specify a physical location for hybrid meetings or leave this section blank for a virtual-only meeting.
Step 6: Choose Meeting Settings
Customize meeting options such as participant permissions and who can bypass the lobby.
Step 7: Send the Invite
Once all details are filled in, tap “Done” or “Send” to distribute the meeting invite to participants.
Using Meeting Options: Managing Permissions and Participants
Here’s how you can manage permissions and participants for your Microsoft Teams meetings using the “Meeting Options”:
Step 1: Schedule the Meeting
First, schedule your meeting either through Teams or Outlook as usual.
Step 2: Access Meeting Options
After scheduling, open the event in Teams or Outlook and click on the “Meeting Options” link in the meeting details. This link can also be found in the confirmation email or calendar invite.
Step 3: Manage Who Can Bypass the Lobby
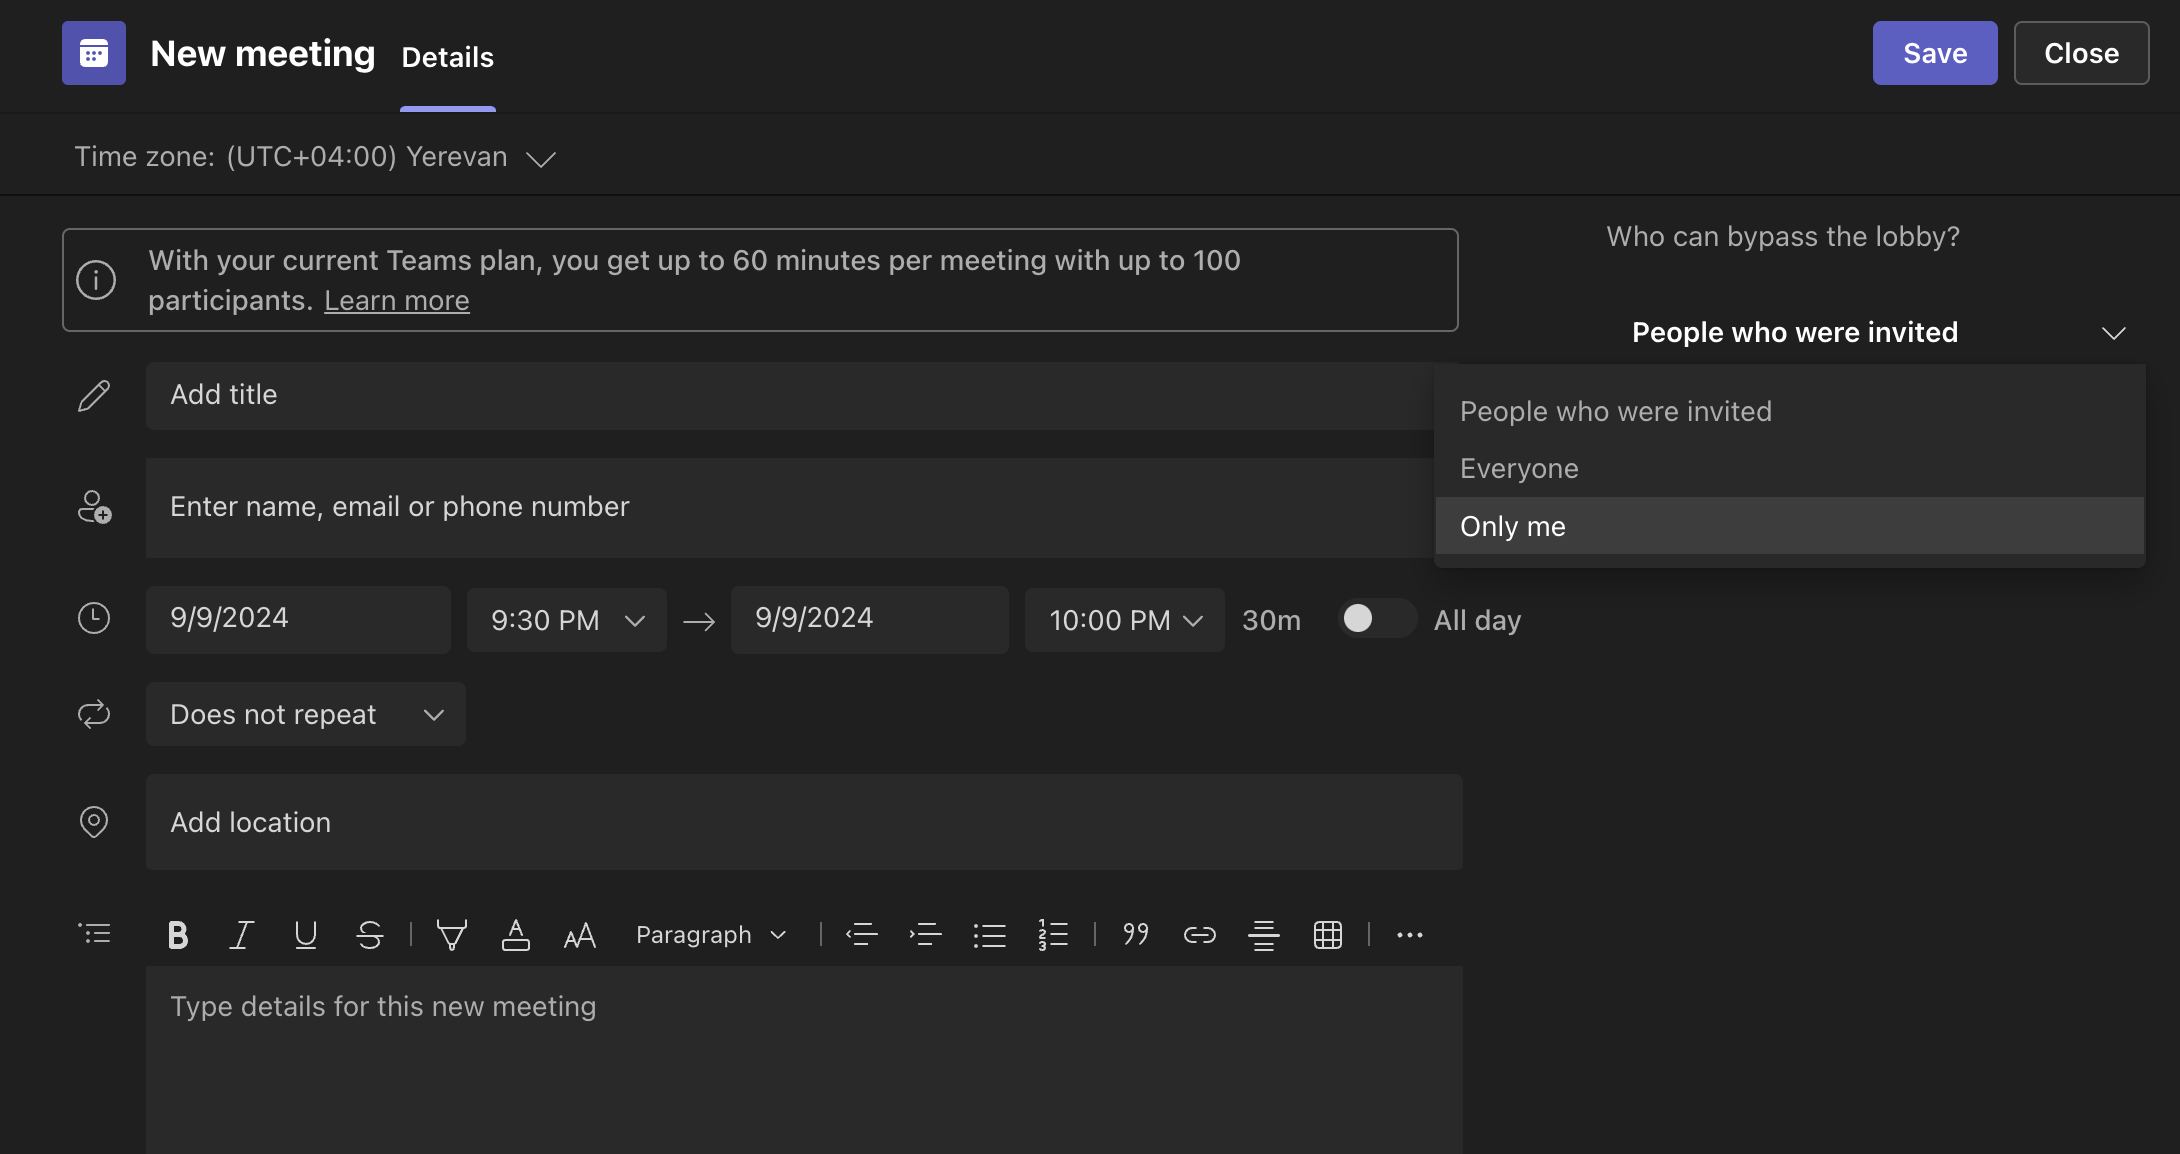
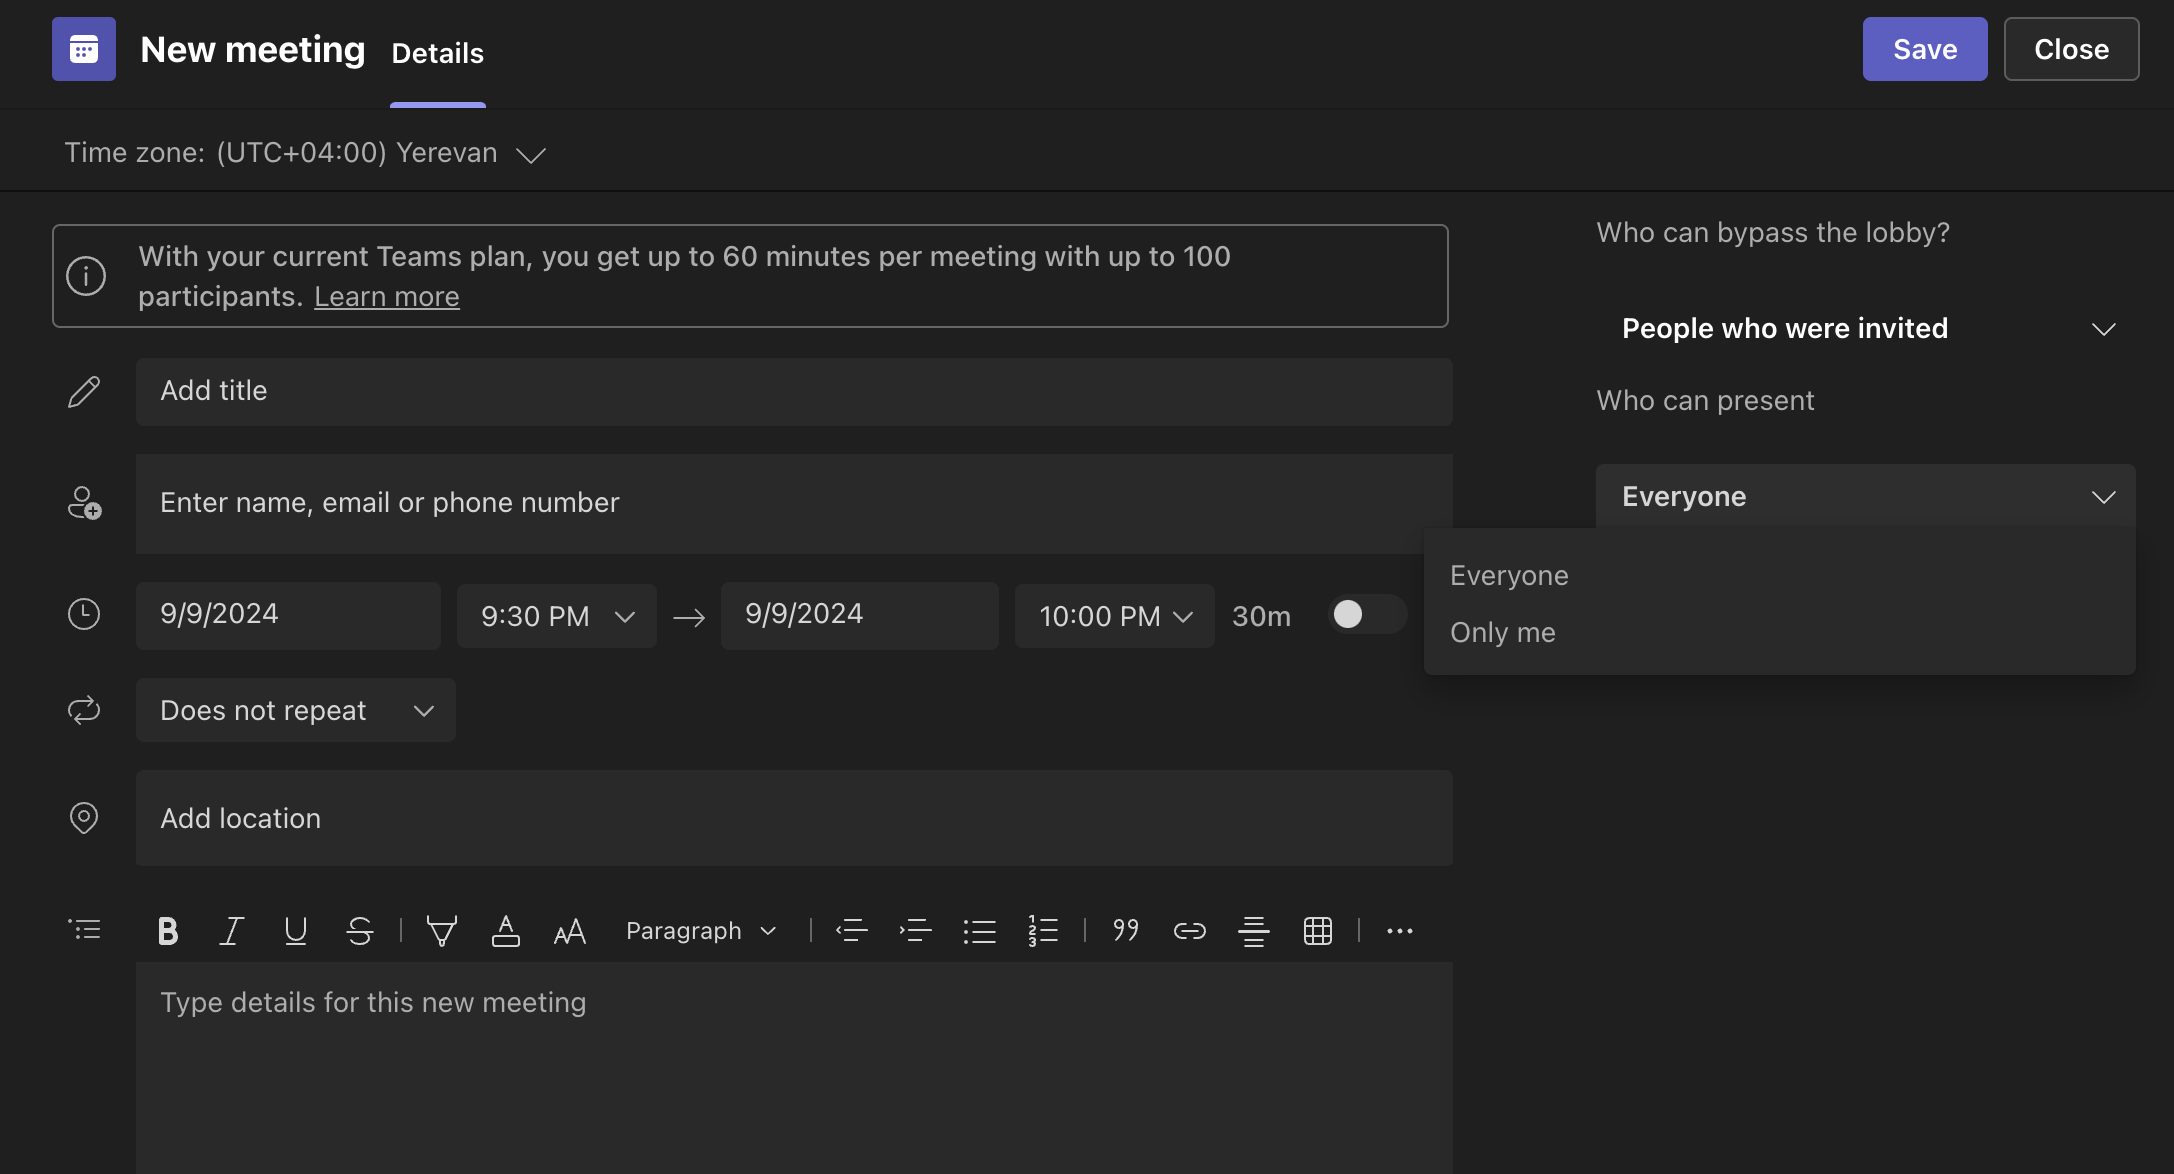
In the “Meeting Options” menu, you’ll find the option to control who can bypass the lobby. Choose from:
- Everyone
- People in my organization
- Only me
- Specific people
Step 4: Set Presenter Permissions
Determine who can present during the meeting by adjusting the “Who can present?” option. You can choose between:
- Everyone
- Specific people
- Only me
Step 5: Control Meeting Chat and Recording
You can enable or disable meeting chat and control whether participants can start the meeting recording.
Step 6: Save Your Settings
Once you’ve set the desired permissions, click “Save.” These options will now apply to the meeting.
Enhancing Your Teams Meetings with Krisp’s AI Meeting Assistant
As virtual meetings become a vital part of daily workflows, ensuring that your Microsoft Teams meetings are productive, efficient, and free of distractions is essential. This is where Krisp’s AI Meeting Assistant comes in.
Krisp’s AI Meeting Assistant is a powerful tool designed to enhance your Microsoft Teams meetings by optimizing both audio quality and meeting productivity. Here’s how it can transform your virtual meetings:
Step 1: Noise Cancellation for Clearer Communication
Krisp’s advanced noise cancellation filters out background noise from your environment and that of other participants. Whether in a busy office or working from home, Krisp ensures that only your voice is heard clearly during Teams meetings, creating a distraction-free experience.
Step 2: AI Meeting Transcriptions
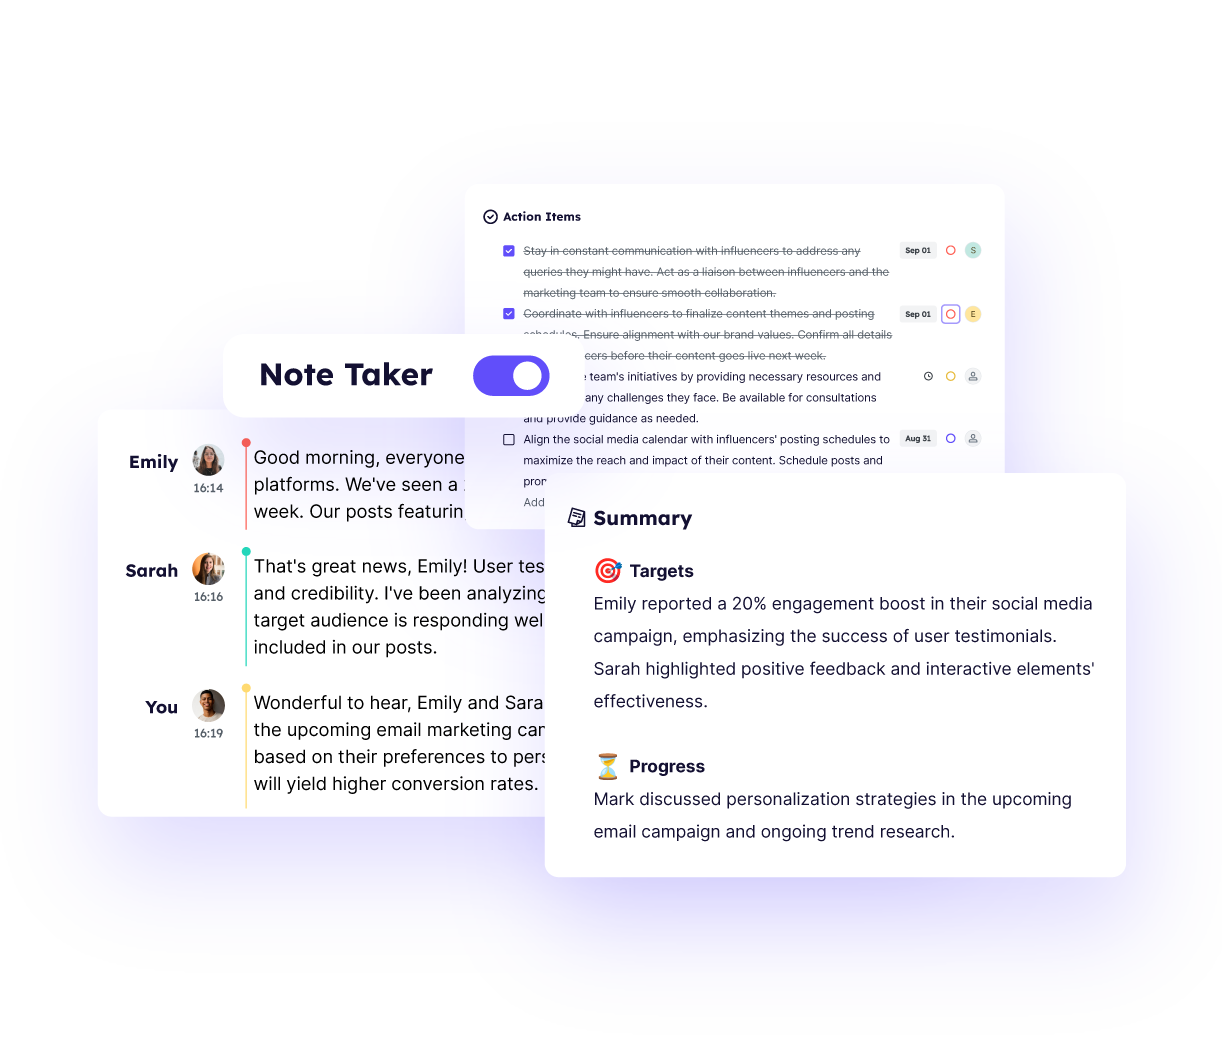
With Krisp’s AI Meeting Assistant, you can get Teams meeting transcriptions. This feature is perfect for keeping track of conversations and ensuring that nothing is missed, especially during fast-paced discussions.
Step 3: Smart Meeting Summaries
Krisp can generate concise meeting summaries after your Teams call, saving you the effort of manual note-taking. These summaries capture key points and action items, making follow-ups more efficient.
Step 4: Seamless Integration with Teams
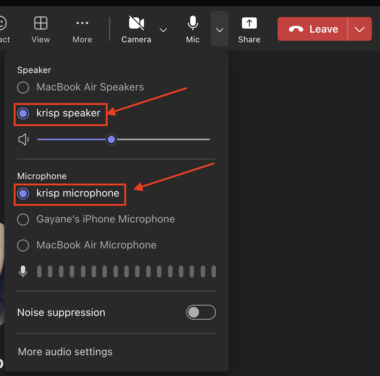
Krisp integrates easily with Microsoft Teams, allowing you to activate noise cancellation and meeting assistant features with just a few clicks. It works in the background to enhance your meetings without interrupting your workflow.
By using Krisp’s AI Meeting Assistant, you can improve the quality and productivity of your Teams meetings, ensuring clearer communication and more efficient meeting outcomes. Try Krisp today to elevate your virtual meetings!
Troubleshooting Common Issues When Scheduling Teams Meetings
Here’s a table that summarizes common issues when scheduling Teams meetings and their solutions:
| Common Issue | The Solution |
|---|---|
| Missing the “Teams Meeting” Button in Outlook | Ensure the Teams add-in is installed and enabled. Go to Outlook > File > Options > Add-ins, and check the Teams add-in. |
| Calendar Sync Issues | Verify your calendar is synced with Office 365. Try logging out and back in or manually refresh the calendar. |
| Time Zone Discrepancies | Confirm your system time zone matches the meeting time. Set the time zone explicitly in the meeting options if necessary. |
| Unable to Add Attendees | Ensure attendees have a valid email address and that their domain permits Teams meeting invites. Check organizational policies. |
| Recurring Meeting Fails to Send | Check that all meeting details are correct. Set recurrence manually if default options cause issues. |
| Error Message When Scheduling a Meeting | Check your internet connection, update Teams or Outlook, clear your cache, or reinstall the app if necessary. |
Frequently Asked Questions


