- How To Change the Name of Your AirPods on an iPhone or iPad
- How to Change the Name of Your AirPods on Mac
- How to Change the Name of Your AirPods on Android
- Why Can’t I Rename My AirPods?
- Enhance Your Audio Quality with Krisp on Your AirPods
- Why Krisp is a Good Choice For You
- Extra Features and Benefits of Krisp
- Why It’s Important to Rename Your AirPods
- Wrapping Up

Having numerous devices connected to your Bluetooth can be quite confusing, especially when many of them have similar or identical names. With Bluetooth supporting up to 7 connections at any one time, it’s easy to accidentally connect to the wrong device. To avoid this hassle, giving each of your devices a unique name is helpful. This way, you can quickly identify your AirPods without any mix-ups.
For example, you might have your phone, tablet, laptop, and a couple of Bluetooth speakers all showing up as “Device” or “Unknown.” Imagine trying to connect your AirPods while in a rush, only to find that you’ve linked to the wrong gadget. Renaming your devices can save you time and frustration.
Here’s a quick and easy guide on how to rename your AirPods in just a few steps.
How To Change the Name of Your AirPods on an iPhone or iPad
Changing the name of your AirPods on an iPhone or iPad is really easy. Just follow these simple steps. The renaming process is the same whether you have AirPods Pro, AirPods Max, or AirPods (1st and 2nd generation).
Changing the name of your AirPods on an iPhone or iPad is really easy. Just follow these simple steps. The renaming process is the same whether you have AirPods Pro, AirPods Max, or AirPods (1st and 2nd generation).
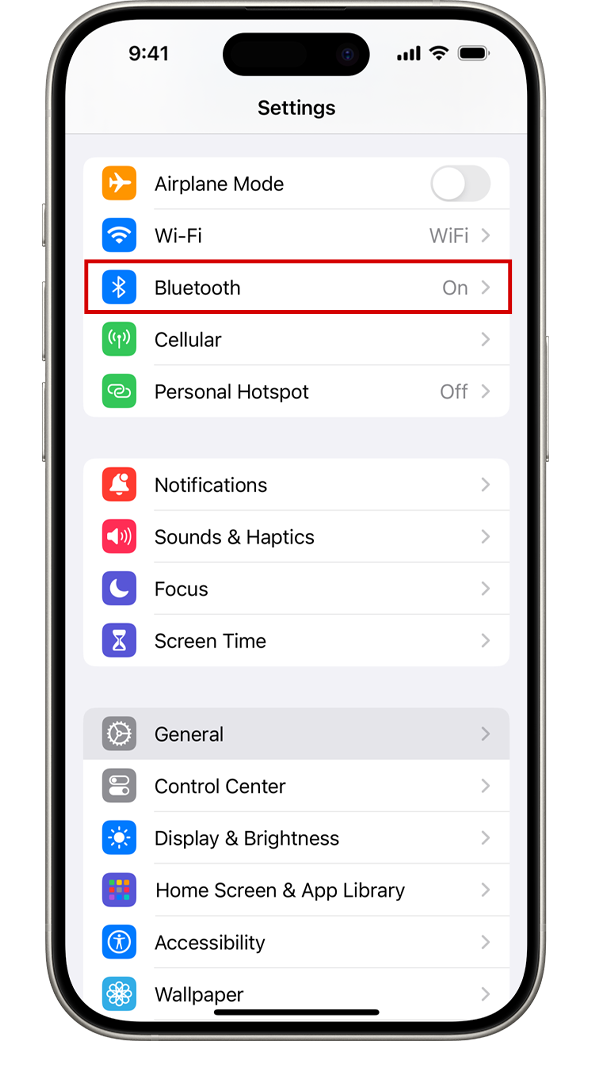
1. Open Settings
- Open the Settings on your iPhone or iPad.
2. Go to Bluetooth
- In the Settings menu, tap on “Bluetooth.” This will take you to a list of all the Bluetooth devices paired with your iPhone or iPad.
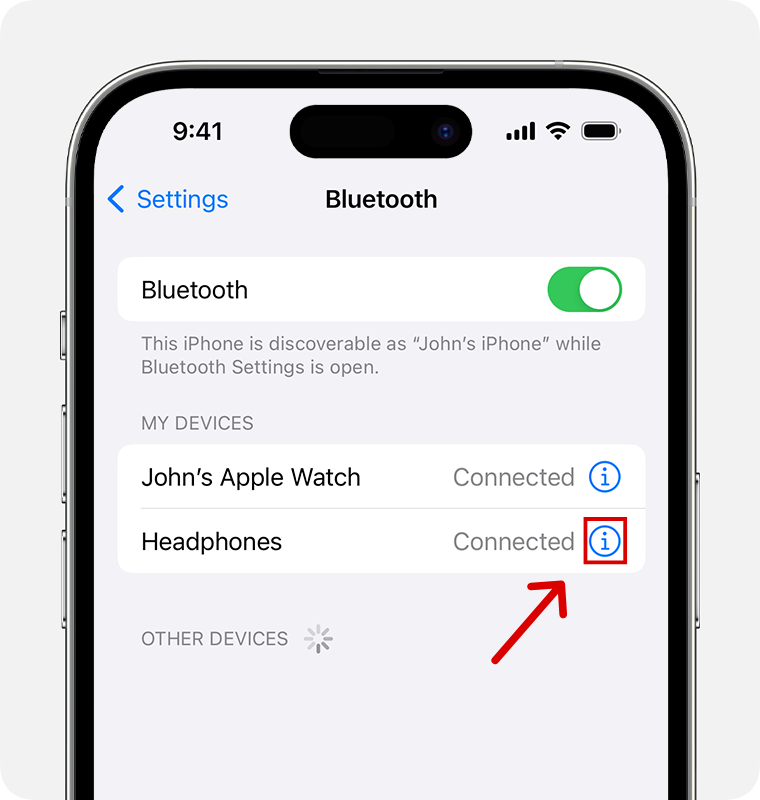
3. Find Your AirPods
- Look for your AirPods in the list of devices. They should be listed by their current name, such as “AirPods.”
4. Tap the ‘i’ Icon
- Next to your AirPods’ name, you’ll see an ‘i’ icon in a circle. Tap on this icon to open the information screen for your AirPods.
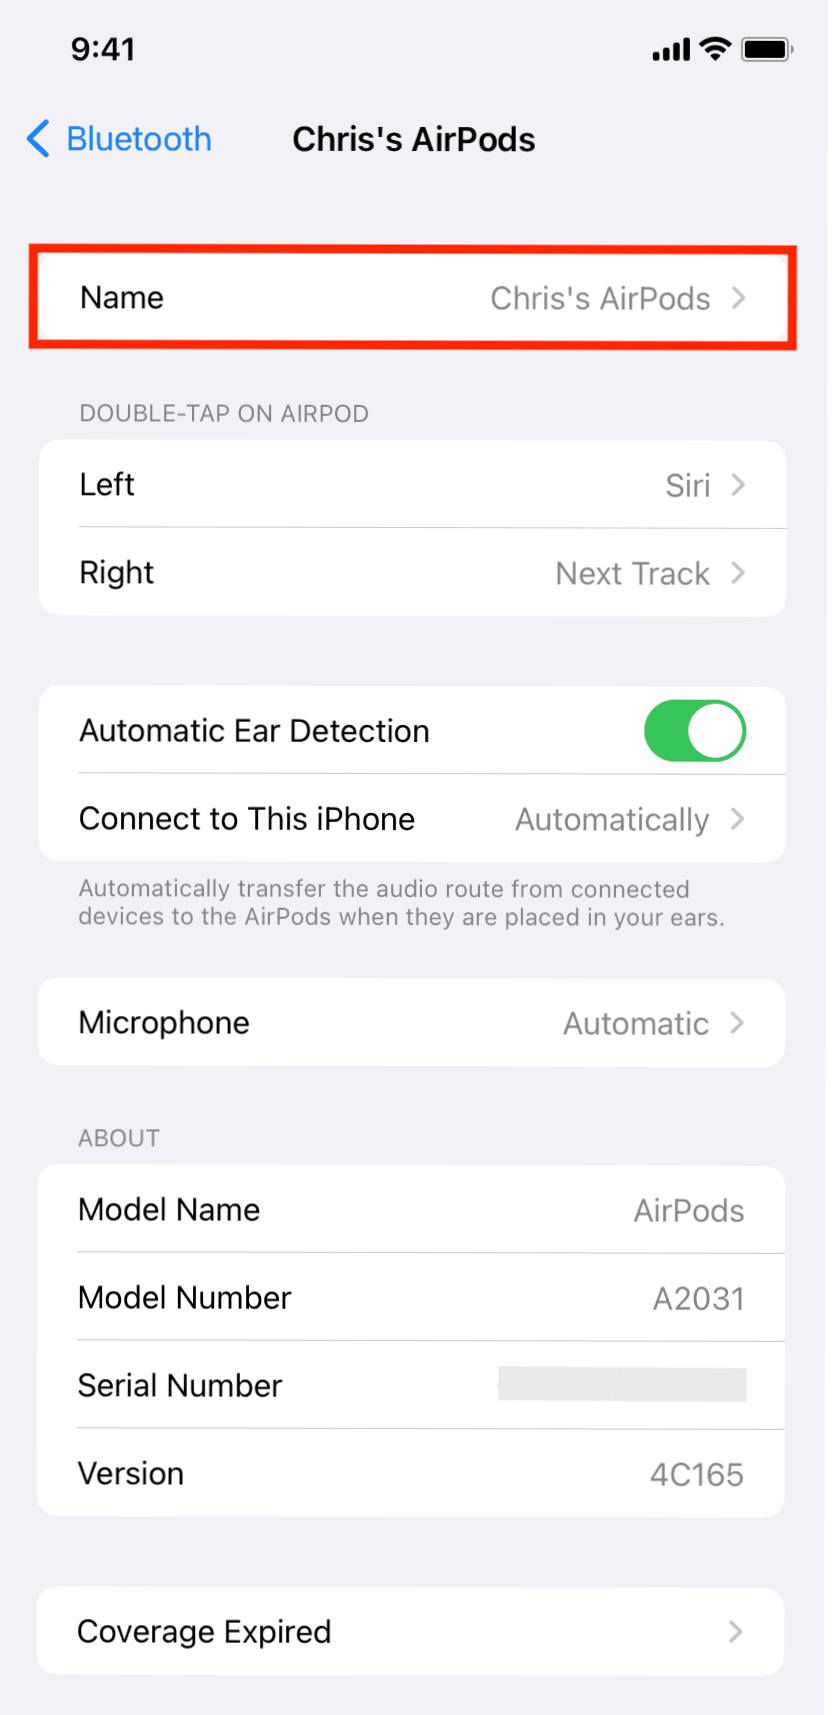
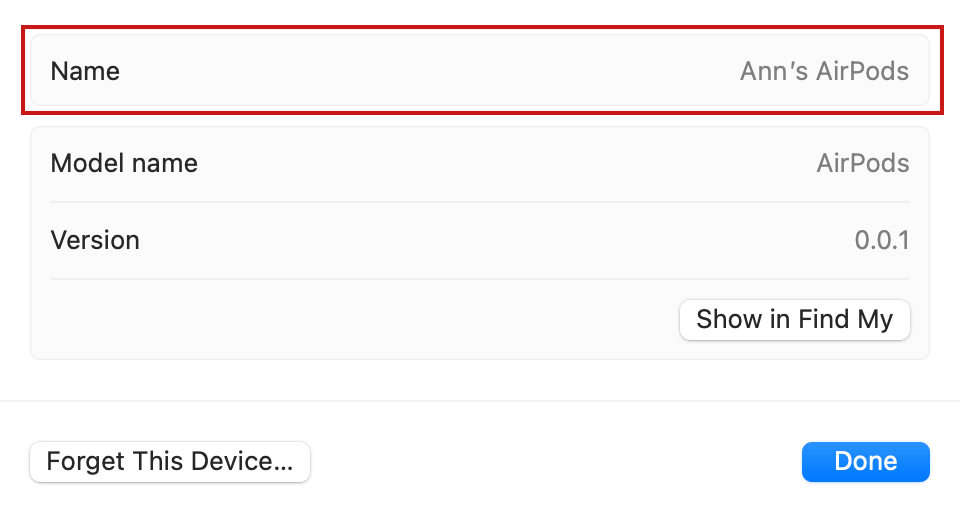
5. Select ‘Name’
- On the information screen, tap on the “Name” field. This will allow you to edit the current name of your AirPods.
6. Enter a New Name
- Type in your desired new name for your AirPods. You might choose something distinctive like “John’s AirPods Pro” or “Workout AirPods” to make them easily recognizable.
7. Tap ‘Done’
- After entering the new name, tap “Done” on your keyboard. Your AirPods will now be listed under this new name in your Bluetooth devices list.
8. Reconnect Your AirPods
- Sometimes, you might need to disconnect and reconnect your AirPods for the name change to take effect. Simply place them back in the case, close the lid, and then take them out to reconnect.
How to Change the Name of Your AirPods on Mac
If your Mac is also overwhelmed with different devices connected to it, renaming your AirPods can be a lifesaver. Here’s how to do it:
1. Make Sure Your AirPods Are Connected
- First, ensure that your AirPods are connected to your Mac. Place them in your ears and check that they’re listed as connected in your Bluetooth settings.
2. Open System Settings
- Click on the Apple menu in the top-left corner of your screen and select “System Settings” from the dropdown menu.
3. Go to Bluetooth Settings
- In the System Settings window, find and click on “Bluetooth” in the sidebar. This will show you a list of all the Bluetooth devices paired with your Mac.
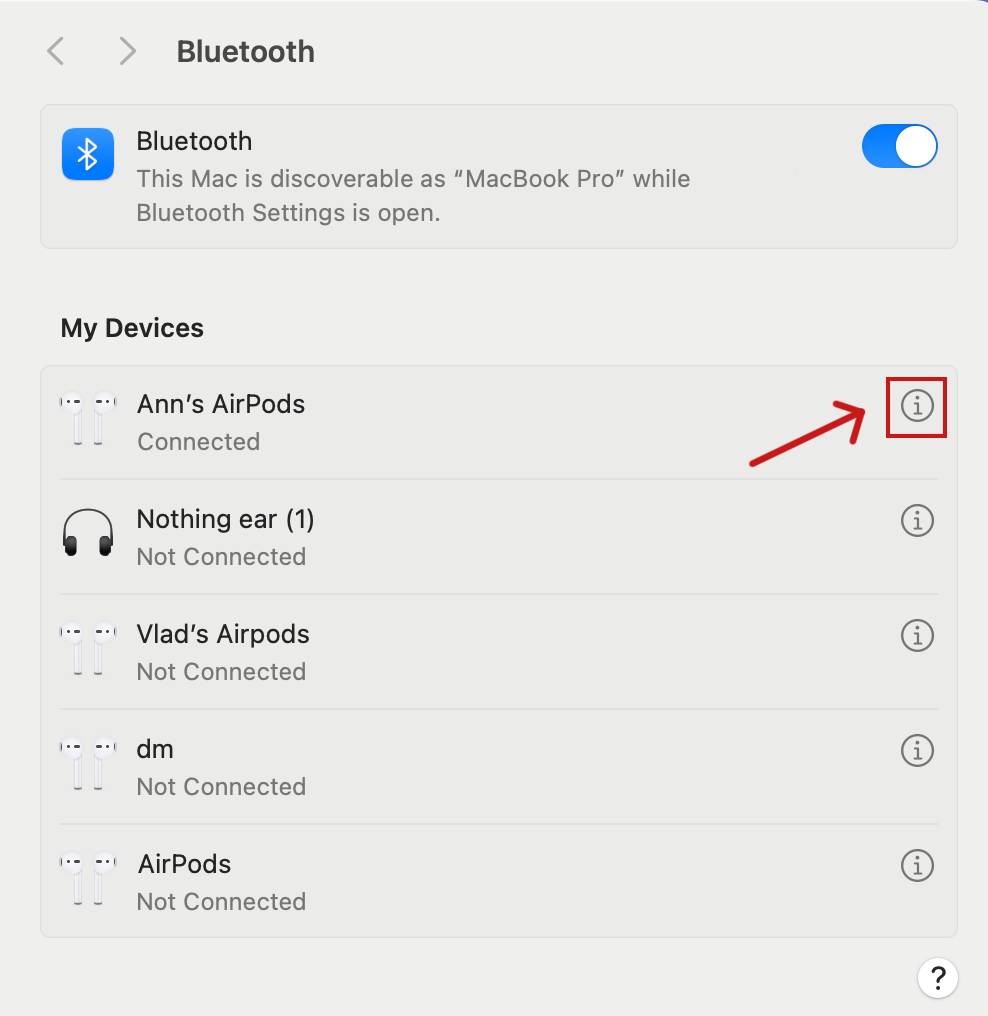
4. Find Your AirPods
- Look through the list for your AirPods. They will be listed by their current name.
5. Click On The ‘i’ Icon
- Once you’ve found your AirPods in the list, click on the ‘i’ icon next to their name. This will open the device settings.
6. Select ‘Rename’
- In the context menu, click on “Rename.” This will open a text field where you can enter a new name for your AirPods.
7. Enter a New Name
- Type in the new name. Consider something distinctive and easy to remember.
8. Click ‘Rename’ to Save
- After entering the new name, click the “Rename” button to save your changes. Your AirPods will now appear under this new name in your Bluetooth list.
How to Change the Name of Your AirPods on Android
As you might already know, AirPods can connect to more than just Apple devices—they work with nearly any Bluetooth-enabled gadget, including your Android phone or tablet. Renaming your AirPods on Android can make it easier to find them among your other devices. Here’s a quick guide on how to do it:
1. Connect Your AirPods
- First, make sure your AirPods are connected to your Android device. Pop them in your ears and check your Bluetooth settings to see if they’re connected.
2. Open Bluetooth Settings
- Head to “Settings” on your Android device, then tap on “Connections” or “Bluetooth,” depending on your phone model.
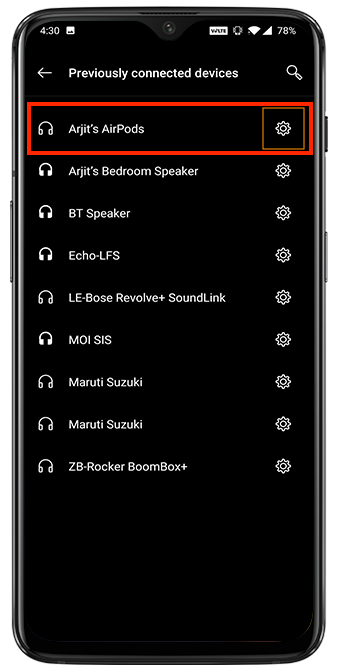
3. Locate Your AirPods
- Scroll through the list of paired devices until you find your AirPods, listed by their current name.
4. Tap the Gear Icon
- Next to your AirPods’ name, tap the little gear icon (or “Settings” icon) to open up the device settings.
5. Select ‘Rename’
- You should see an option to rename your device. Tap on “Rename” or the pencil icon to bring up the text field.
6. Enter a New Name
- Type in the new name you want for your AirPods. Pick something unique and memorable, like “John’s AirPods” or “Work AirPods.”
7. Save the New Name
- After you’ve entered the new name, tap “Rename” or “Save” to lock it in. Your AirPods will now show up with this new name in your Bluetooth list.
Why Can’t I Rename My AirPods?
If you’re having trouble renaming your AirPods, don’t worry—you’re not alone! There are a few common reasons why this might be happening, and luckily, most of them are easy to fix. Here are some tips to help you out:
1. Check Your Connection
- Make Sure They’re Connected: Ensure that your AirPods are connected to your device. Sometimes, they might not be fully connected, even if they appear in the Bluetooth settings.
- Reconnect Your AirPods: Try disconnecting and reconnecting your AirPods. Go to your Bluetooth settings, forget the device, and then pair them again.
2. Update Your Device
- Software Update: Make sure your iPhone, iPad, Mac, or Android device is running the latest software version. Sometimes, older software can cause connectivity issues or limit certain features.
- AirPods Firmware: Ensure that your AirPods have the latest firmware. This usually updates automatically when your AirPods are connected to your iPhone or iPad.
3. Check if AirPods are Charged
- Battery Levels: Make sure your AirPods have enough battery life. Low battery levels can sometimes cause connectivity issues. Place them in their charging case and check the battery status on your device.
4. Restart Your Device
- Simple Restart: Restarting your device can solve many connectivity issues. Turn off your phone or tablet and turn it back on, then try renaming your AirPods again.
5. Reset Your AirPods
- Resetting Steps: If all else fails, try resetting your AirPods. Place them in their charging case, open the lid, and press and hold the setup button on the back of the case until the status light flashes amber, then white. After resetting, pair them with your device again and attempt to rename them.
6. Check for Restrictions
- Restrictions on Device: Sometimes, restrictions or parental controls on your device can limit certain functions. Check your device’s settings to ensure there are no restrictions in place.
7. Compatibility Issues
- Device Compatibility: Ensure that your device is compatible with the AirPods model you are using. While most devices support basic Bluetooth functions, some advanced features might not be available on older devices.
8. Bluetooth Interference
- Interference Issues: Other Bluetooth devices or heavy Wi-Fi traffic can sometimes cause interference. Try turning off other Bluetooth devices and moving closer to your device when renaming your AirPods.
If you’ve tried all these steps and still can’t rename your AirPods, it might be time to reach out to Apple Support or visit an Apple Store for further assistance. They can help solve any deeper issues that might be preventing you from renaming your AirPods.
Enhance Your Audio Quality with Krisp on Your AirPods
Have you ever had trouble speaking clearly during an important online meeting because of background noise? Whether it’s the neighbor’s dog barking, kids playing in the next room, or street traffic rumbling outside, these distractions can make it hard for others to hear you.
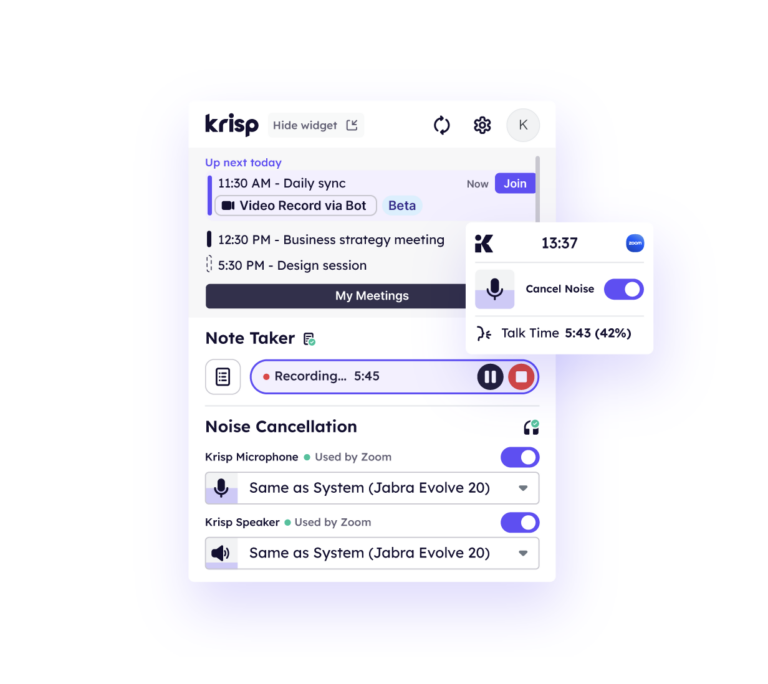
With its AI noise cancellation tool, Krisp takes away the stress of background noise during your online calls. It’s like having a personal virtual assistant that quiets down the chaos around you, allowing you to focus on the conversation and stay relaxed.
Why Krisp is a Good Choice For You
Krisp’s AI noise cancellation helps you avoid awkward moments during important calls. Imagine you’re about to speak, but your kids start yelling in the background. With Krisp, background noises are filtered out in real-time, so you can focus on your conversation without distractions.
Krisp uses AI-powered background noise cancellation technology to ensure only the active voices on your calls are heard. It removes background noises, voices, and echoes from your calls and meetings. This technology works in real-time, analyzing the audio stream and distinguishing between your voice and any unwanted sounds. By filtering out background noise, Krisp improves your audio quality and ensures that your voice comes through clearly.
Extra Features and Benefits of Krisp
Krisp is more than just an AI noise-cancellation tool. It comes with additional features that offer many benefits and add convenience to our daily work. Here are some of these amazing features:
Free Multilingual Transcription And Note-Taking
Krisp offers free multilingual transcription and note-taking features. This means your online meetings and calls can be automatically transcribed into text in various languages. For example, if you’re in a lengthy meeting and need to focus on the discussion without taking notes, Krisp will transcribe everything for you, making it easier to review and share important points later. Basically, after your call, you will get the whole conversation transcribed, and it can even create action items based on what was discussed.

Integration with Multiple Conferencing Platforms
Krisp works with many different conferencing platforms, making it very flexible. Whether you use Zoom, Skype, Microsoft Teams, Google Meet, or any other popular conferencing tool, Krisp will enhance your audio quality and provide transcriptions and notes of your discussions.
Tips for Choosing a Name for Your AirPods
Choosing a name for your AirPods can be a fun and personalized way to identify your device. Here are some tips to help you pick the perfect name:
- Keep It Simple and Recognizable
- Choose a name that is easy to recognize and remember. Simple names are quick to identify in a list of Bluetooth devices. Here are some examples of simple names:
- “My AirPods”
- “Primary AirPods”
- “Secondary AirPods”
- Reflect Your Personality
- Personalize the name to reflect your interests, hobbies, or personality. Think about what makes you unique or what you’re passionate about. For example:
- “Gamer AirPods”
- “Runner’s AirPods”
- “Podcast Listener”
- Use Humor
- Adding a touch of humor can make your AirPods name memorable and fun. Consider playful names like:
- “EarBuddies”
- “PodSquad”
- Include Your Name
- Adding your name or initials can help distinguish your AirPods from others, especially in a household with multiple sets. For example:
- “John’s AirPods”
- “Emily’s AirPods Pro”
- “Mike’s AirPods Max”
- Indicate Purpose
- If you use your AirPods for specific activities, consider naming them accordingly. For example:
- “Work AirPods”
- “Gym AirPods”
- “Travel AirPods”
- Include Model Type
- If you want to make it clear which AirPods you’re using, consider including the model type in the name. For example,
- “AirPods Pro Gen 2”
- “AirPods Max – Office”
- “AirPods 2 – Home”
- Be Creative
- Don’t be afraid to get creative with wordplay or puns. Clever names can make your AirPods stand out and bring a smile to your face every time you connect them. For example:
- “SoundWaves”
- “PodMaster”
- “HearPods”
- Avoid Special Characters
- Stick to letters and numbers to ensure compatibility with all devices and systems. Avoid using special characters or emojis, which might not display correctly on all devices.
- Think Ahead
- Choose a name that you won’t easily get bored with and that will remain relevant to you in the long term.
- Consider Privacy
- Avoid using sensitive information in the name, such as your full name or location, especially if you often use your AirPods in public or shared environments.
- Test It Out
- Once you’ve chosen a name, test it by connecting to your device and seeing how it appears in the Bluetooth settings. Make sure it’s easily identifiable and looks good.
Why It’s Important to Rename Your AirPods
1. Easy Identification
Renaming your AirPods helps you easily identify them among other Bluetooth devices, especially if you use multiple Apple devices or live in a household where others have AirPods. This can prevent confusion and ensure you’re connecting to the correct pair.
2. Personalization
Giving your AirPods a unique name adds a personal touch to your tech gadgets. It’s a simple way to make your device feel more like your own and can reflect your personality or preferences.
3. Distinguish Multiple Devices
If you own more than one pair of AirPods (e.g., AirPods and AirPods Pro), renaming them can help distinguish between the different models and cases, making it easier to switch between them.
4. Security
In case your AirPods get lost or stolen, having a unique name can make it easier to identify them when scanning for Bluetooth devices. This can be helpful when you’re trying to locate your AirPods in a public place.
5. Troubleshooting and Support
When seeking technical support or troubleshooting issues with your AirPods, having a unique name can make it simpler for both you and support personnel to identify the correct device, especially if there are multiple Bluetooth devices involved.
Wrapping Up
Renaming your AirPods can help you easily and quickly differentiate between all your devices connected to Bluetooth. Knowing how to rename your AirPods properly is important because it keeps everything organized. Now, when you open your Bluetooth settings, you won’t see a list of similar names but clearly labeled devices. This way, you won’t spend 10 minutes trying to figure out which one your AirPods are. Instead, you’ll connect to the right device in just a few seconds.
Another productivity booster is Krisp, an AI-powered tool that eliminates background noise during online meetings and also offers transcription and note-taking features. This ensures clear and focused communication, making your online calls smoother and less stressful.