Nowadays, companies and individuals alike rely on Zoom as a platform for both professional and personal meetings. Zoom offers a variety of useful features that enhance the overall experience and make conversations more productive. While some meetings may feel like casual conversations, others can involve so many details that it’s impossible to remember everything.
That’s why recording important meetings has become essential. How to record Zoom meetings as a participant is a question with several possible solutions. One of the top options is integrating Krisp. Krisp’s innovative tools not only allow you to record the meeting but also provide features such as note-taking, summarizing, and transcription. In addition to these features, Krisp also offers noise cancellation, ensuring meetings are free from background noise, echo, or any unwanted sounds, making the experience even more enjoyable.
Can You Record a Zoom Meeting as a Participant?
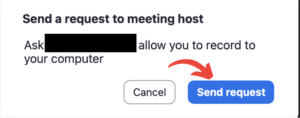
To be short, recording a Zoom meeting as a participant is possible. However, it is common for the host to record the meeting if needed, as only the host has the ability unless he gives permission to participants. In order to record a meeting, you should ask permission from the host of the meeting. Once granted permission, participants can record the meeting directly through Zoom from different devices.
How to Record Zoom Meetings as a Participant
Here’s a step-by-step guide on how to record Zoom meetings as a participant:
- Join the Zoom Meeting: Click on the invitation link and join Zoom the meeting.
- Request Permission from the Host: The host must allow you to do so before recording. You can ask the host to click on “Manage Participants,” find your name, and click the “More” button next to it. They should then select “Allow Record” from the dropdown menu.
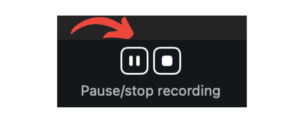
- Start Recording: Once the host has granted permission, a “Record” button will appear on the Zoom toolbar. Click it to begin recording the meeting.
- Stop Recording: Simply click the “Stop Recording” button to stop recording. Once the meeting ends, Zoom will automatically process and save the recording.


How to Record Zoom Meeting In Mobile
Sometimes, when you’re away from your PC or laptop, you may need to join a Zoom meeting from your mobile. In this case, recording the meeting differs slightly from other devices. Here’s how to record a Zoom meeting on your phone with audio as a participant:
- Ask for Permission: As with a desktop, you need the host’s permission to record the meeting. You can do this through the “Participants” panel on the host’s Zoom dashboard.
- Open the Zoom App: Ensure you’re using the latest version of the Zoom app on your mobile device.
- Start Recording: Once you have permission, you will see a “Record” button at the bottom of your screen. Tap it to start recording the meeting.
- Ensure Audio is Recorded: Zoom on mobile automatically records audio and video. To capture audio, ensure you have allowed the Zoom app to access your microphone in your device’s settings.
- Stop Recording: When you’re finished, tap the “Stop Recording” button. The recorded file will be saved to the Zoom cloud or your mobile device depending on your settings.
Can You Record Zoom Meetings Without Permission?
Zoom does not allow participants to record a meeting without the host’s permission—that’s a fact. However, there are always those who go against the grain. Some may use third-party apps or screen recording, of course. Keep in mind, though, that this is not a good way to record a meeting, as it can violate Zoom’s terms of service. It’s easier and better to always ask for permission from the host.
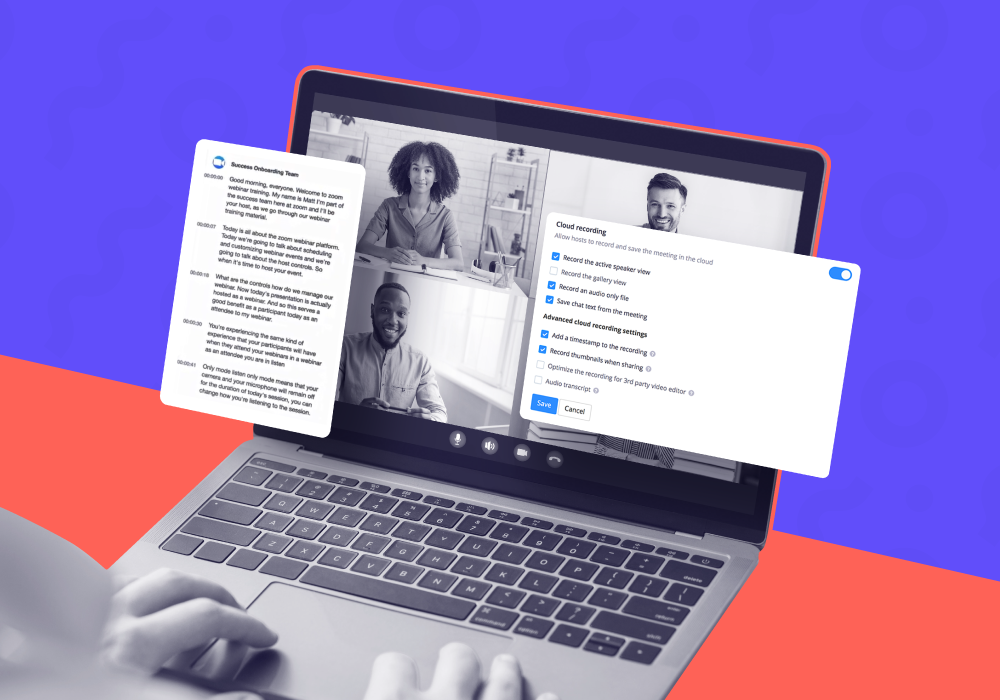
Cloud Recording vs. Local Recording
Zoom offers two types of recording options: cloud recording and local recording.
- Cloud Recording: This one is a paid version of recording. Cloud recording is available to paid Zoom users, and it allows you to save your recorded meeting to Zoom’s cloud storage. This is especially useful if you want to access your recording from different devices or share it easily with others. It is easy to access also, as you can access your cloud recordings through your Zoom account dashboard.
- Local Recording: This option is available to free and paid Zoom users. Local recording saves the video and audio files directly to your device, allowing you to store the file wherever you prefer, such as on your computer, an external hard drive, or cloud storage services like Google Drive or Dropbox.
Recording Zoom Meetings With Krisp
As we’ve already discussed, the easiest way to record a Zoom meeting is by asking the host for permission. However, if that option isn’t available, there are other ways to record your meetings. Integrating Krisp with Zoom can work wonders.
Krisp offers a recording feature that makes it incredibly easy to review meetings whenever you need. This gives you the confidence that you’re on top of every detail discussed. When working on tasks based on meeting information, you can simply refer back to the recording without needing to ask your boss or coworkers for details you might have missed. You also have the flexibility to join the recording with or without the Bot feature.
The screen recording feature without a bot is a fantastic update for Krisp. This feature operates directly within the app, allowing you to record without the need for a bot, making the experience both easy and seamless.
The process is simple:
- First, activate either the Transcribe or Record Audio mode in the app.
- Next, start the screen recording—without the bot, of course.
- Finally, you can pause and resume the recording as needed, without losing continuity.

This streamlined process enhances productivity and makes recording more efficient.
Recording isn’t the only feature Krisp offers. Free, unlimited transcriptions make reviewing your meetings even easier. You don’t have to listen through the entire recording, which can be time-consuming. Simply skim through the transcription to find the details you need—no plugins or extensions required.
If you’re really short on time, you can take advantage of Krisp’s AI-powered meeting summary and note-taking tools. For instance, if your boss is expecting a presentation based on a meeting you promised but forgot about, and you only have an hour to prepare, Krisp has you covered. Just open the meeting notes and quickly turn those notes into a presentation.
Additionally, Krisp ensures your Zoom meetings run smoothly without any noise or distractions. Its powerful AI noise cancellation feature takes care of eliminating background noise, ensuring a distraction-free meeting experience.
Conclusion
To be more productive, organized, and avoid overlooking important details, it is essential to record your meetings. Zoom provides the ability to record meetings, but while the host can easily record the session, participants must ask for the host’s permission to do so. This is the easiest way, but if that option isn’t available to you, it’s time to explore other alternatives. One such option is integrating tools like Krisp, which can elevate your Zoom experience. Krisp not only allows you to record meetings but also offers additional features such as unlimited transcriptions, AI-powered meeting summaries, and noise cancellation, all of which improve the overall quality of your meetings.
Reviewing your discussions is crucial for future productivity. Whether it’s for business meetings, lectures, or important conversations about event planning, being aware of every detail is key. Krisp’s advanced features give you the flexibility to focus on the conversation while it handles the technical aspects of recording and transcribing. With this seamless integration, you can ensure your meetings are not only productive but also free from distractions, keeping you more organized and efficient.
FAQ
How to record a Zoom meeting as a participant?
To record a Zoom meeting as a participant, you need to request permission from the host. The host must enable recording for participants by selecting your name in the “Participants” panel and clicking “Allow Record.” Once permission is granted, a “Record” button will appear on your Zoom toolbar, allowing you to record the meeting.
How to record a Zoom meeting on phone with audio as a participant?
To record a Zoom meeting on your phone with audio as a participant, you must first request the host’s permission. Once granted, the “Record” button will appear at the bottom of your screen. Tap it to start recording both audio and video. Ensure that your phone’s microphone settings allow Zoom to access your audio. The recording will be saved either to the Zoom cloud or your device, depending on your settings.
How to record a Zoom meeting as a participant without permission?
Recording a Zoom meeting without the host’s permission is not possible within the Zoom app and may violate Zoom’s terms of service. Although third-party apps or screen recording tools can be used, it’s not recommended as it can be against the rules of the meeting and Zoom’s policies. Always ask the host for permission to record.
How to record a Zoom meeting on iPad as a participant?
To record a Zoom meeting on your iPad as a participant, you need the host’s permission. Once permission is granted, the “Record” button will appear in the meeting controls. Tap the button to begin recording both audio and video. After the meeting ends, the recording will be saved to either the Zoom cloud or your iPad, depending on your settings.
How to record a Zoom meeting as a participant on a laptop?
To record a Zoom meeting as a participant on a laptop, request the host’s permission to enable recording. Once approved, the “Record” button will appear on your Zoom toolbar. Click it to start recording the meeting. When the meeting is over, the recording will be processed and saved either locally on your laptop or in the Zoom cloud, depending on your settings.