- Who Can Use Screen Sharing on Zoom
- How to Enable Screen Sharing on Zoom
- How to Share Screen in Zoom on Windows/Mac
- How to Share Your Screen on Zoom on iOS
- How to Share Screen on Zoom on Android
- How to Share Your iOS Screen from Zoom Desktop Client
- Why Can’t I Share My Screen on Zoom: Resolving Common Issues
- Zoom Screen Sharing Tips from Krisp
- Frequently Asked Questions

Have you ever found yourself in a Zoom meeting, needing to present your screen but unsure where to start? Knowing how to share your screen on Zoom is crucial for effective virtual communication, whether you’re leading a business presentation or collaborating with a remote team.
We have curated this guide to walk you through the process step-by-step, showing the details on sharing your Zoom screen on both desktop and mobile devices. You will also find best practices and troubleshooting tips on common Zoom screen-sharing issues. Let’s get into it!
Who Can Use Screen Sharing on Zoom
Screen sharing is a powerful feature in Zoom that allows participants to present their screens to others in the meeting. However, not everyone in a Zoom meeting can share their screen by default. The ability to share your screen depends on the permissions set by the meeting host. Here’s a breakdown of how screen sharing permissions work and how to enable or disable this feature.
How to Enable Screen Sharing on Zoom
In a Zoom meeting, the host controls who can share their screen. By default, only the host has the ability to share their screen, but this can be adjusted to allow all participants to share.
Step 1: Log in to the Zoom web portal (https://zoom.us) with your account credentials.
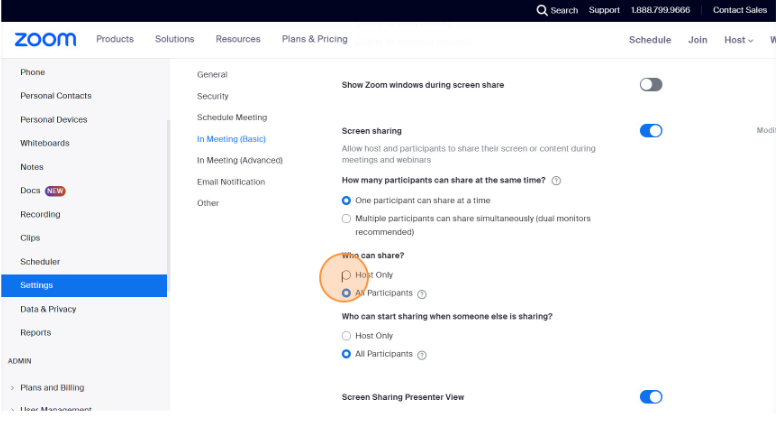
Step 2: Navigate to “Settings” in the left sidebar.
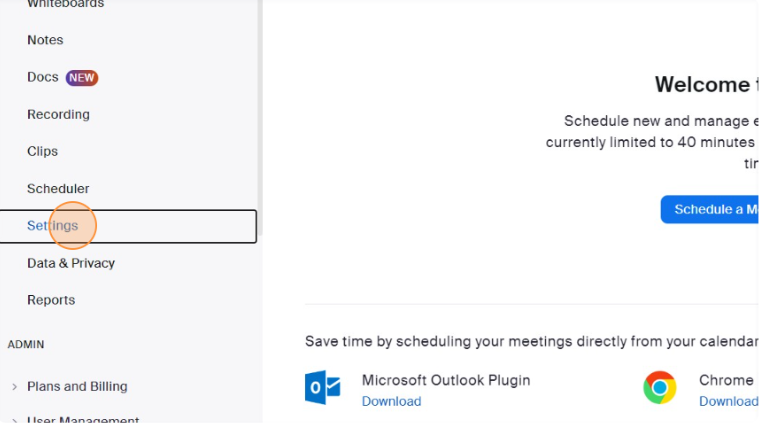
Step 3: Scroll down to the “In Meeting (Basic)” section.
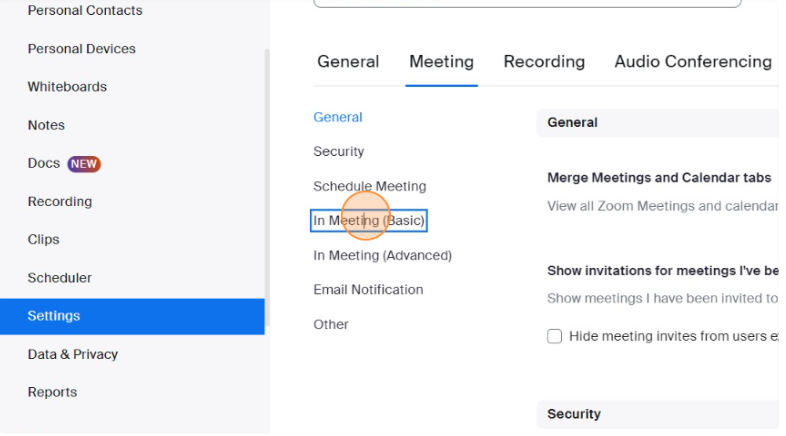
Step 4: Locate the “Screen sharing” option and enable it.
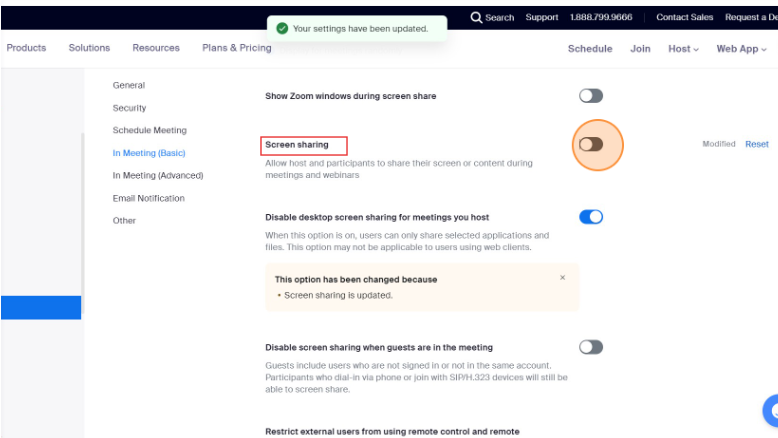
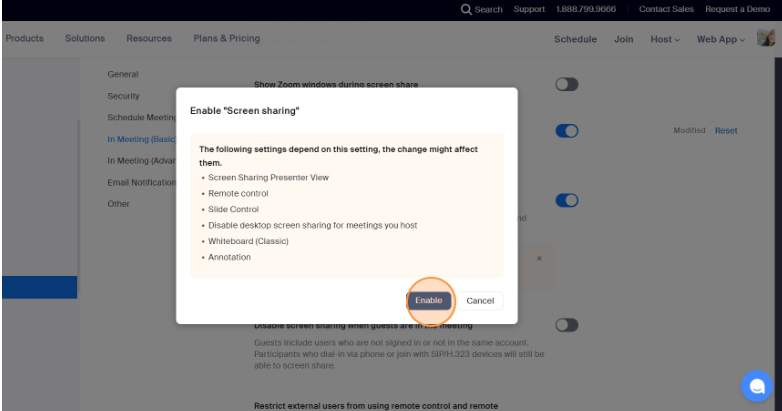
Step 5: When the “Screen sharing” is enabled, you can choose who can share their screen during a meeting:
- Host Only: Only the host can share their screen.
- All Participants: Anyone in the meeting can share their screen.
Adjusting Screen Sharing Settings in a Meeting
While in an ongoing meeting, the host can quickly change the screen-sharing settings by clicking on the small arrow next to the “Share Screen” button in the meeting controls.
- Select “Advanced Sharing Options” from the dropdown menu.
- A pop-up window will appear where you can adjust who can share their screen (Host Only or All Participants) and whether multiple participants can share simultaneously.
How to Disable Screen Sharing for Specific Participants
If you need to prevent a specific participant from sharing their screen during a meeting, you can do so by hovering over their name in the Participants panel, clicking “More”, and selecting “Disable Screen Sharing”.
Zoom Screen Sharing Prerequisites
You can share your desktop or phone screen, a specific screen, a whiteboard, content from a second camera, or a video or audio file in a Zoom meeting. However, some prerequisites are required to access the Zoom screen-sharing feature.
- Zoom software: Ensure that you have the latest version of the Zoom desktop client (Windows, macOS, Linux) or mobile app (iOS, Android).
- Hardware: Both desktop and mobile devices should meet the global minimum version requirements.
- Linux devices with Wayland let you share only an entire desktop or whiteboard. You should launch your Linux session with Xorg if you want to share a specific application.
How to Share Screen in Zoom on Windows/Mac
Sharing your screen on Zoom is straightforward and can greatly enhance your virtual meetings and presentations. The steps are quite similar whether you’re using Windows or macOS. Below is a step-by-step guide on how to share your screen on Zoom for both platforms.
Step 1: Start or Join a Zoom Meeting
- Launch the Zoom app on your Windows or macOS device.
- Start a new meeting by clicking “New Meeting” or join an existing meeting by selecting “Join” and entering the meeting ID.
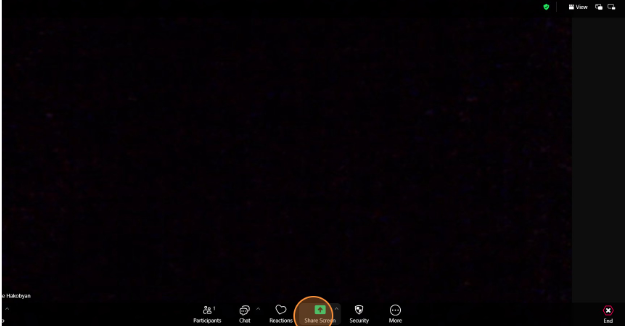
Step 2: Access the Screen Sharing Option
- Once you are in the meeting, look for the meeting controls at the bottom of the Zoom window.
Click on the “Share Screen” button, which is usually represented by a green icon with an arrow pointing upwards.
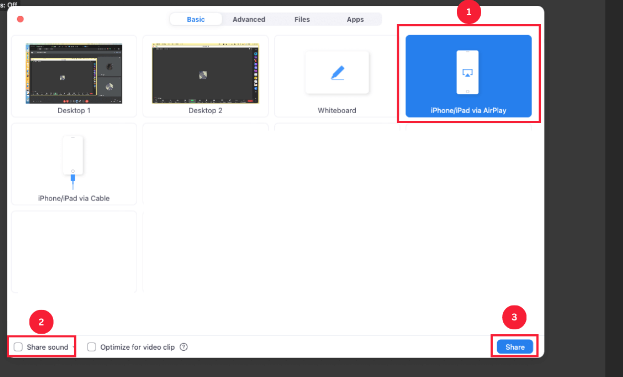
Step 3: Choose What to Share
- After clicking the “Share Screen” button, a new window will appear displaying various options for what you can share:
- Entire Screen/Desktop: Share everything that is visible on your screen.
- Specific Application Window: Select and share only a particular application that is open on your desktop.
- Portion of Screen: Share a specific area of your screen by dragging a frame around the desired portion.
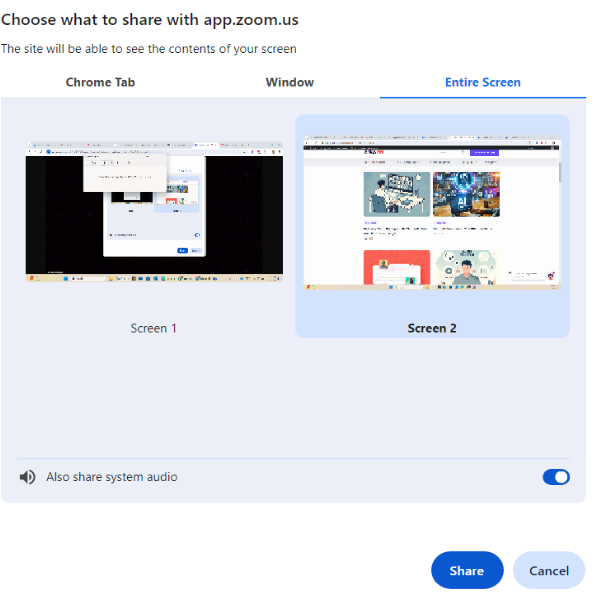
2. Select the desired option by clicking on it.
If you are sharing a video or any content with sound, make sure to check the “Share sound” box at the bottom-left corner of the screen sharing window. Additionally, if you are sharing a video, enabling “Optimize for video clip” can improve the viewing experience for participants.
3. Once you’ve made your selection, click “Share” at the bottom-right corner of the window.
Step 4: Managing Screen Sharing
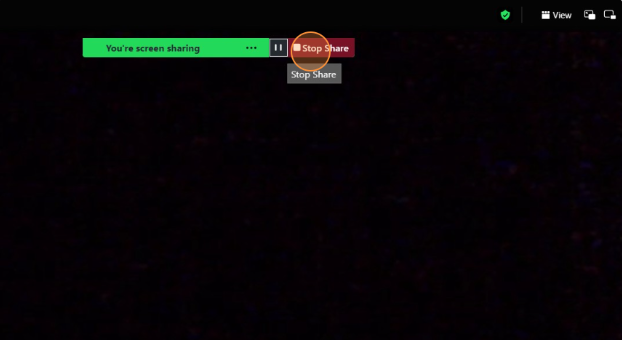
While sharing your screen, you can pause or stop sharing at any time:
- Pause Share: Click on “Pause Share” if you need to temporarily halt what you are showing without stopping the share completely.
Stop Share: To end screen sharing, click on the “Stop Share” button in the meeting controls at the top of the screen.

Step 5: Switching Between Shared Content
- If you need to switch between different content during your screen share, click on “New Share” in the meeting controls.
- This will allow you to select a new application or part of your screen to share without stopping the current share.
How to Share Your Screen on Zoom on iOS
Step 1: Start or Join a Zoom Meeting
- Open the Zoom app on your iOS device.
- Start a new meeting by tapping “New Meeting” or join an existing meeting by selecting “Join” and entering the meeting ID.
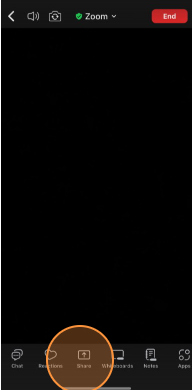
Step 2: Access the Screen Sharing Option
- Once you’re in the meeting, tap anywhere on the screen to bring up the meeting controls.
Tap the “Share Content” button, typically found at the bottom of the screen. This button is represented by an upward-facing arrow inside a square.
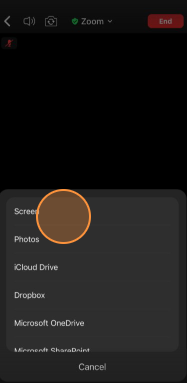
Step 3: Select “Screen” to Share
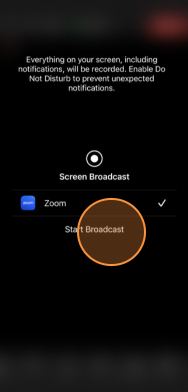
In the menu that appears, tap on “Screen”. This option allows you to share everything that is displayed on your iOS device’s screen. A pop-up window will appear, instructing you to start broadcasting your screen.
Step 4: Start Broadcasting
- Tap “Start Broadcast” in the pop-up window. There will be a 3-second countdown before your screen begins to be shared with meeting participants.
- During the broadcast, anything you do on your iOS device, including opening apps, navigating, or playing videos, will be visible to other participants.
- You’ll know that your screen is being shared when you see a red bar at the top of your screen, indicating that the broadcast is live.
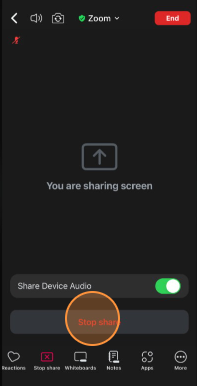
Step 5: Stop Screen Sharing
- To stop sharing your screen, tap the red bar at the top of your screen. This will bring up an option to “Stop Broadcast”.
Alternatively, you can return to the Zoom app and tap the “Stop Share” button to end the screen sharing.
How to Share Screen on Zoom on Android
Step 1: Start or Join a Zoom Meeting
- Open the Zoom app on your Android device.
- Start a new meeting by tapping “New Meeting” or join an existing meeting by selecting “Join” and entering the meeting ID.
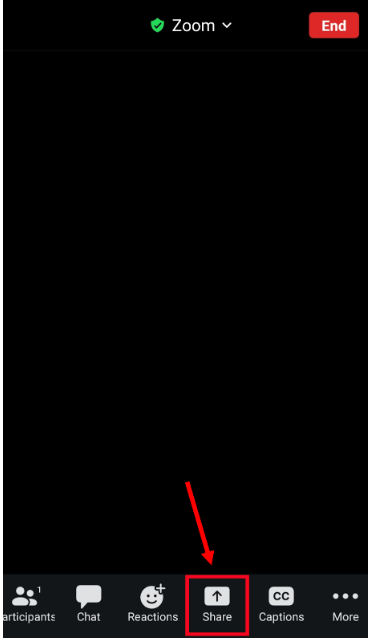
Step 2: Access the Screen Sharing Option
- Once you’re in the meeting, tap anywhere on the screen to reveal the meeting controls.
Tap the “Share” button, which is usually located at the bottom of the screen. This button is represented by an arrow pointing upwards inside a square.
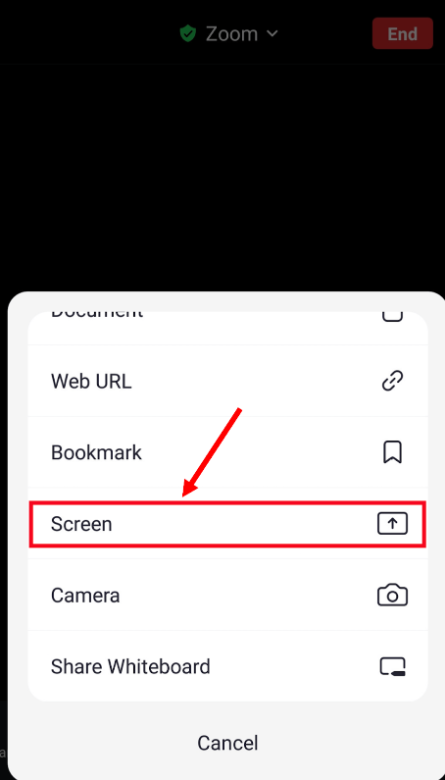
Step 3: Select What to Share
- A menu will appear with various sharing options. Tap on “Screen” to share your entire Android screen.
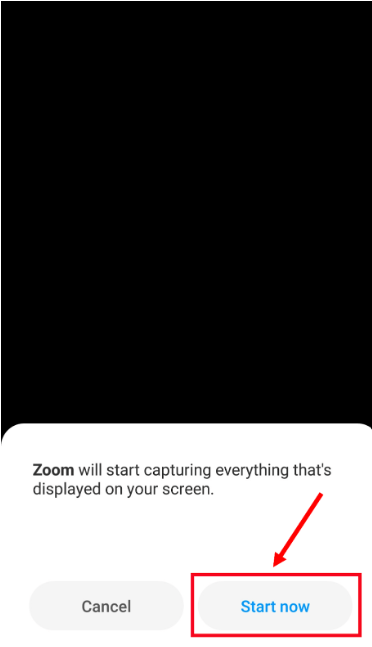
If it’s your first time sharing your screen on Zoom, a pop-up will appear asking for your permission to capture and broadcast your screen. Tap “Start Now” to confirm.
Step 4: Start Sharing Your Screen
- After granting permission, your screen sharing will begin. Anything displayed on your screen, including apps, images, and videos, will be visible to other participants in the meeting.
- A persistent notification bar or floating Zoom icon may appear at the top of your screen, indicating that your screen is being shared.
Step 5: Stop Screen Sharing
- To stop sharing your screen, tap the persistent notification bar or the floating Zoom icon, which will bring you back to the Zoom app.
In the Zoom app, tap “Stop Share” to end the screen sharing.
How to Share Your iOS Screen from Zoom Desktop Client
Step 1: Start or Join a Zoom Meeting on Your Desktop
- Open the Zoom desktop client on your Windows or macOS computer.
- Start a new meeting by clicking on “New Meeting” or join an existing meeting by selecting “Join” and entering the meeting ID.
Step 2: Connect Your iOS Device
- Ensure your iOS device (iPhone or iPad) is connected to the same Wi-Fi network as your desktop computer.
- You can also connect your iOS device to your computer via a USB cable for a more stable connection.
Step 3: Access the Screen Sharing Option on Zoom Desktop
- In your Zoom meeting, locate and click on the “Share Screen” button in the meeting controls at the bottom of the Zoom window.
- A new window will appear with multiple sharing options. Select the “iPhone/iPad” option.
- If it’s your first time sharing an iOS screen, you may be prompted to install a plugin. Follow the on-screen instructions to install the necessary plugin.
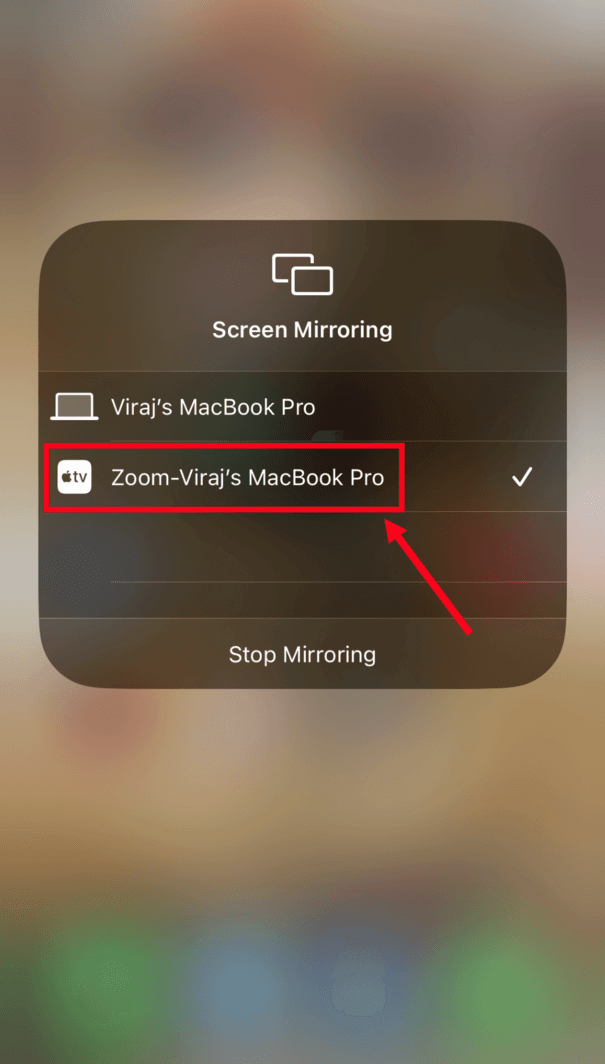
Step 4: Start Screen Sharing from Your iOS Device
- After selecting the “iPhone/iPad” option, a prompt will appear on your Zoom desktop client instructing you on how to connect your iOS device.
- On your iOS device, swipe down from the upper-right corner of the screen to access the Control Center (or swipe up from the bottom on older devices).
- Tap “Screen Mirroring” in the Control Center.
- In the list of available devices, select the one that corresponds to your computer (it will typically display the name of your computer or “Zoom-Your Computer Name”).
- Once selected, your iOS screen will be mirrored and shared in your Zoom meeting.

Step 5: Manage Your Screen Sharing
- While sharing your iOS screen, you can navigate your iPhone or iPad as usual, and everything you do will be visible to the Zoom meeting participants.
- To stop sharing, you can:
- Tap “Stop Share” on the Zoom desktop client.
- Or, disable Screen Mirroring on your iOS device by returning to the Control Center and tapping “Stop Mirroring”.
Why Can’t I Share My Screen on Zoom: Resolving Common Issues
Screen sharing is a crucial feature in Zoom that allows you to present your content to others during a meeting. However, there may be times when you encounter issues that prevent you from sharing your screen.
Below is a table of some common reasons why you might be unable to share your screen on Zoom, along with steps to resolve these issues.
| Issue | Description | Solution |
|---|---|---|
| Insufficient Permissions | You might not have the necessary permissions to share your screen. | – Ask the host to enable screen sharing for participants.
– If you are the host, go to “Share Screen” > “Advanced Sharing Options” and select “All Participants.” |
| Outdated Zoom Application | Running an outdated version of Zoom can cause compatibility issues with screen sharing. | – Update Zoom to the latest version:
– Desktop: Click on your profile picture and select “Check for Updates.” – Mobile: Update through the App Store or Play Store. |
| Operating System Restrictions | Your OS might restrict Zoom from accessing screen sharing functionality. | – macOS Users: Allow Zoom in System Preferences > Security & Privacy > Privacy > Screen Recording.
– Windows Users: Allow Zoom through firewall/antivirus. |
| Conflicting Applications | Other applications may interfere with Zoom’s screen sharing functionality. | – Close unnecessary applications that may be using GPU or conflicting with Zoom, such as video games or other conferencing tools. |
| Low Bandwidth or Poor Internet Connection | A slow or unstable internet connection can prevent successful screen sharing. | – Ensure a stable internet connection.
– Switch to a wired connection or move closer to your Wi-Fi router. – Close other bandwidth-heavy applications or devices. |
| Zoom Settings Issues | Incorrectly configured Zoom settings may prevent screen sharing. | – Reset Zoom screen sharing settings to default.
– Check advanced sharing options to ensure screen sharing is not limited. |
| Device-Specific Issues | Specific devices may have unique problems interfering with screen sharing. | – Restart your device to resolve temporary glitches.
– Try sharing from another device to see if the issue is device-specific. |
| Zoom Account Limitations | Free (Basic) Zoom accounts may have limitations on screen sharing features. | – Upgrade to a Pro or higher plan for advanced screen sharing capabilities, especially in larger meetings or webinars. |
Zoom Screen Sharing Tips from Krisp
Screen sharing is a key component of effective Zoom meetings, allowing you to present information, collaborate in real-time, and engage with your audience. However, ensuring that your screen sharing experience is seamless and professional requires some best practices. Here are some tips from Krisp to help you make the most of your Zoom screen sharing:
Tip 1. Prepare Your Content in Advance
- Organize Your Desktop: Close unnecessary applications and tabs before your meeting. This reduces distractions and ensures that only relevant content is visible when you share your screen.
- Preload Documents and Files: Have all the documents, presentations, and media files you plan to share ready and easily accessible to avoid delays during the meeting.
Tip 2. Test Your Screen Sharing Setup
- Practice Before the Meeting: If you’re unfamiliar with screen sharing or presenting complex content, practice sharing your screen in a Zoom test meeting to ensure everything works as expected.
- Check for Updates: Make sure both your Zoom app and Krisp app are up-to-date to benefit from the latest features and fixes.
Tip 3. Enable Krisp for Background Noise Cancellation
- Activate Krisp: Ensure Krisp is enabled to remove background noise during your Zoom meetings. This feature is particularly useful when you are sharing a screen that includes audio, such as a video or presentation.
- Test Krisp with Zoom: Before your meeting, test Krisp with Zoom to ensure that the audio quality is clear and free from distractions.
Tip 4 . Engage Your Audience
- Use Zoom’s Annotation Tools: Highlight important information and keep your audience engaged by using Zoom’s built-in annotation tools during screen sharing.
- Encourage Interaction: Invite participants to ask questions or provide feedback while you share your screen, fostering a more interactive and collaborative meeting environment.
Tip 5. Manage Your Meeting Environment
- Mute Notifications: Silence notifications on your computer to prevent distractions during your screen share. Enabling Do Not Disturb mode is a good practice.
- Set Up a Professional Background: If you’re sharing your video along with your screen, ensure your background is clean and professional or fun (you choose).
Frequently Asked Questions
– Start or join a Zoom meeting.
– Click on the “Share Screen” button in the meeting controls at the bottom of the Zoom window.
– Select the screen or application window you wish to share.
– Click “Share” to begin sharing your screen.
– Go to System Preferences > Security & Privacy > Privacy tab.
– Select “Screen Recording” from the list on the left.
– Ensure that Zoom is checked to allow screen sharing.
– Restart Zoom for the changes to take effect.
The steps to share your screen on Zoom in 2024 are similar to previous versions:
– Start or join a Zoom meeting.
– Click the “Share Screen” button in the meeting controls.
– Select the content you wish to share (your entire screen, an app, etc.).
– Click “Share” to begin sharing. Be sure to check for any new features or options in the latest version of Zoom.
The host must first allow participants to share their screens. They can do this by clicking the “Security” icon and selecting “Allow participants to share screen.”
Once the host has enabled screen sharing for participants, click the “Share Screen” button and follow the prompts to share your screen.
– To enable multiple screen sharing, the host must allow it in the “Advanced Sharing Options.”
– Participants can then click “New Share” to share an additional screen.