In today’s digital age, Zoom meetings have become a staple in our daily communication, whether for work, education, or personal connections. Sharing a Zoom recording can be essential for those who missed the meeting or for reviewing important discussions. This article will guide you through the process of sharing a Zoom recording, ensuring your information is easily accessible and secure. Plus, discover how Krisp can boost your Zoom meeting productivity, making every virtual interaction clearer and more efficient.
Step-by-Step Guide to Share a Zoom Recording
1. Locating Your Zoom Recording
Before sharing, you need to find your recording. Zoom offers two types of recording options: local and cloud. Local recordings are saved on your device, while cloud recordings are available on your Zoom account.
- Local Recordings: Navigate to the Zoom folder on your device, typically found in the Documents section.
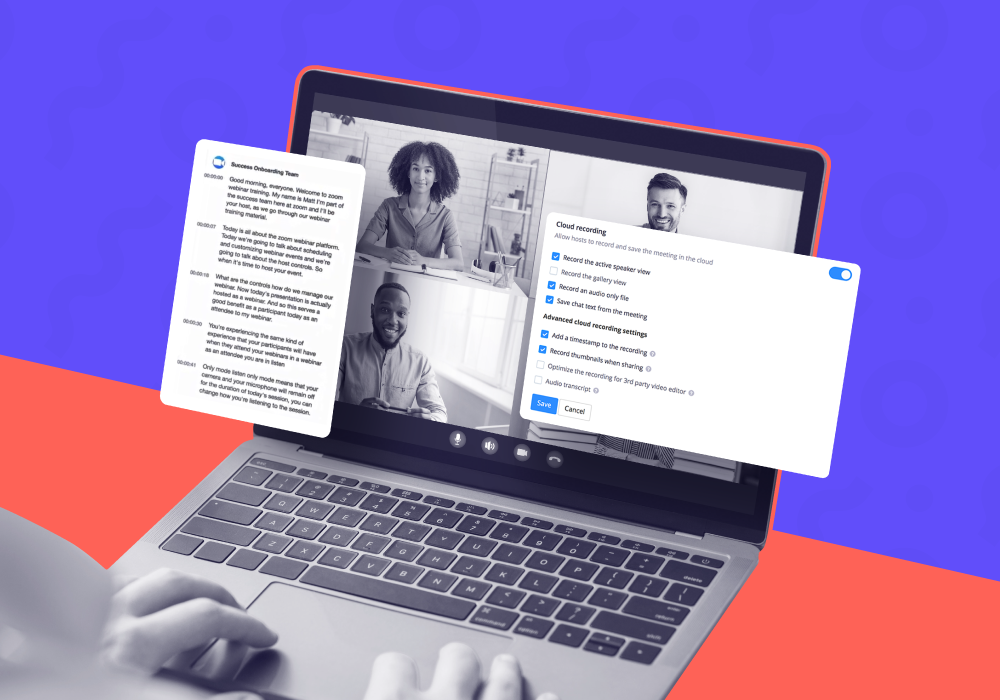
- Cloud Recordings: Sign in to your Zoom account, go to the “Recordings” tab, and select “Cloud Recordings.”
2. Sharing Cloud Recordings
To share a Zoom recording stored in the cloud:
- Access Your Recording: Log into your Zoom account, head to “Recordings,” and choose “Cloud Recordings.”
- Select the Recording: Find the meeting you wish to share and click on it.
- Copy Shareable Link: Click on the “Share” button to get a link to your recording. Here, you can adjust viewing permissions and set a password for added security.
3. Sharing Local Recordings
For local recordings:
- Find the File: Locate the recording file in your Zoom folder.
- Upload to a Cloud Service: Choose a cloud storage service (e.g., Google Drive, Dropbox) and upload your recording file.
- Share the Link: Once uploaded, share the file link directly or via email with your intended recipients.
4. Sharing Via Email
For a more personal touch, you can share recordings via email. Attach the file directly (for local recordings) or include the cloud recording link in your email content, adding a personal message if desired.
Best Practices for Sharing Zoom Recordings
- Set Expiration Dates: For cloud recordings, consider setting an expiration date to manage your storage quota efficiently.
- Use Password Protection: Enhancing security with a password ensures that only intended participants can view the recording.
- Inform Participants: Notify your meeting attendees that the session will be recorded and shared for transparency and consent.
Enhancing Zoom Meetings with Krisp
Integrating Krisp with your Zoom meetings can significantly enhance productivity and ensure crystal-clear audio. Krisp’s noise reduction capabilities remove background noises, making your recordings more professional and easier to understand. Moreover, Krisp offers transcription services, making it easier to follow up on meetings and share the content in different formats.
- Zoom Noise Reduction: Krisp’s AI-driven technology filters out unwanted sounds, delivering high-quality audio.
- Transcribe Zoom Meetings: Convert your meetings into text, making it accessible for everyone and ensuring no detail is missed.
- AI Meeting Notes and Action Items: After transcriptions, Krisp’s AI can automatically generate meeting notes and highlight action items, streamlining the post-meeting workflow and ensuring no task is overlooked.
Incorporating Krisp into your workflow not only elevates the quality of your Zoom meetings but also enhances the overall productivity and effectiveness of your communications.
Conclusion
Sharing a Zoom recording is straightforward, whether you prefer cloud or local storage. By following the steps outlined above and adhering to best practices, you can ensure your recordings are accessible, secure, and of high quality. Moreover, leveraging Krisp’s innovative features can take your Zoom meetings to the next level, providing a seamless, productive, and engaging virtual meeting experience for all participants.
Elevate your Zoom meetings today with Krisp and experience unmatched audio clarity and productivity enhancements. For more information on how Krisp can transform your virtual communications, visit Krisp’s Blog.
Frequently Asked Questions
How do you send a Zoom recording that is too large?
Sending a Zoom recording that exceeds standard size limits becomes straightforward once you determine its storage location. If your recording is saved in the Zoom cloud, leveraging Zoom’s integrated sharing features is the most efficient approach – just ensure the sharing settings are adjusted to your preferences. Alternatively, upload it to a cloud storage service (like Google Drive, Dropbox, or Zoom’s cloud if you have a subscription) and share the download link. This method circumvents size restrictions and ensures your recipients can access the recording at their convenience.
Is it legal to share a Zoom recording?
Sharing a Zoom recording is legal if you have obtained consent from all participants beforehand, especially in jurisdictions with strict privacy laws. It’s important to notify participants at the start of the meeting that it will be recorded and potentially shared, respecting their privacy and adhering to legal requirements
How to share a Zoom recording as a link?
If your recording is stored on Zoom’s cloud:
- Log into your Zoom account.
- Navigate to the “Recordings” section and select the meeting you want to share.
- Click “Share” next to the recording, adjust the sharing settings as desired (like setting a password), and then copy the provided link to share with your intended recipients.
If using external cloud storage, upload the recording file, generate a shareable link from the storage platform, and distribute that link accordingly.