- Sending Google Calendar Invites From a Desktop
- Easily Coordinate Schedules with the "Suggested Times" Feature
- How To Send A Google Calendar Invite from iPhone/Android
- How to Track Responses for Google Meet Invites
- How to Manage A Google Calendar Invitation
- How to Remove Someone From a Google Calendar Invite
- Simplify Your Google Meet Sessions with Krisp
- Conclusion
- Frequently Asked Questions

Google Calendar is an essential and must-have tool for staying organized. With over a billion users worldwide, it is no wonder people rely on it to schedule everything from team meetings to client calls and interviews. One of its most useful features is the ability to send invites, allowing you to easily connect with others and get events on everyone’s calendar.
The good news? It is super easy! All you need is the email or phone number of the person you want to invite, and you’re good to go. And the best part? Google Calendar is free and can be used from your desktop or mobile device.
To make things even easier, we have compiled this detailed guide to show you how to quickly and effortlessly send a Google Calendar invite—whether at your desk or on the go.
Sending Google Calendar Invites From a Desktop
Google Calendar users have three different ways to schedule an invite from a desktop computer or laptop, depending on what feels easiest for you:
Using Google Calendar
This is the classic way to schedule an invite, and probably the one most people are familiar with. Here’s how to do it:
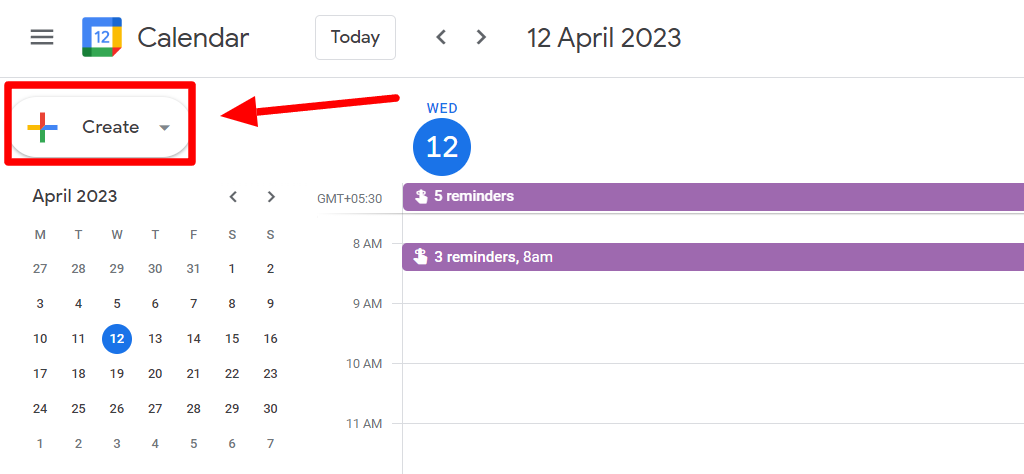
1. Open Google Calendar: Open Google Calendar in your browser. Go to calendar.google.com and make sure you’re signed into your Google account.
2. Create a New Event: Look for the “+ Create” button on your screen’s left side. Click it, and a new event window will pop up where you can start entering details for your meeting or event.
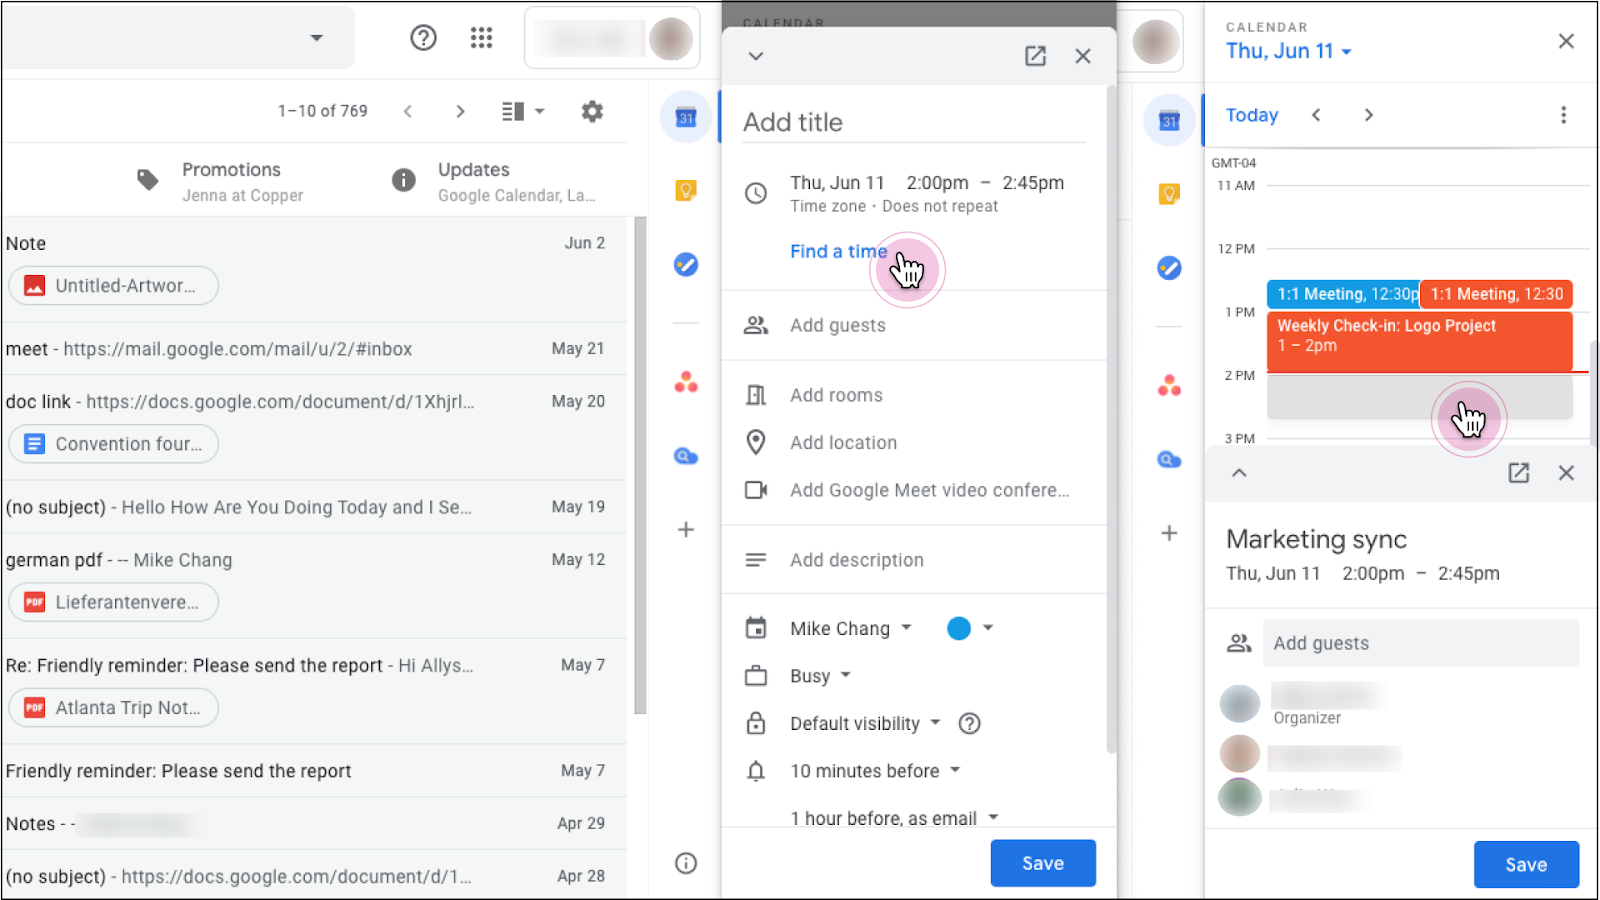
3. Add Event Details: In the pop-up window, fill out all the event information. This includes things like event title, date and time, and location (If it’s an in-person meeting, you can add the location; if it’s virtual, just add a link)

4. Invite Guests: Here’s where the magic happens! To send your invite, click the “Add guests” field on the right. You can add people by typing in their email addresses, and if they’re in your contacts, their names will pop up automatically.
5. Set Up Notifications: You can also choose how and when your guests will be reminded of the event. Google Calendar automatically sets reminders, but you can adjust these based on your preferences (e.g., 10 minutes before, a day before, etc.).
6. Save and Send the Invite: Once you’ve filled in all the details, hit “Save.” A pop-up will appear asking if you want to send invitations to your guests—click “Send.” Your guests will receive an email with all the event details and a link to add the event to their calendars.
Why this is useful: You can manage all of your events in one place, see your full schedule, and invite others with just a few clicks.
Using Google Meet Homepage
You can also schedule your meeting directly through the Google Meet homepage. This option is perfect if your event is virtual and you want to quickly set up a video call:
1. Go to meet.google.com.
2. Click the “New Meeting” button and choose “Schedule in Google Calendar.”
3. This will automatically open Google Calendar with the Google Meet link already included in the event details.
4. Fill in the rest of the event information (title, date, time, etc.), add guests, and send your invite.
Why this is useful: It’s a fast way to create a virtual meeting invite without needing to switch between apps.
Using Gmail Interface
If you’re already in your Gmail inbox, scheduling a Google Calendar invite directly from there is a quick and easy option. You don’t need to open Google Calendar separately—everything can be done from Gmail. Here’s how you can do it:
1. Open Gmail: Open your Gmail account on your desktop or laptop. On the left side of the page, you’ll see a “Meet” section right below your inbox and chat options.
2. Click on the ‘Meet’ Tab: In the “Meet” section, click “New Meeting.” This will generate a Google Meet video meeting link for you to use. A small pop-up will appear, giving you options to join the meeting now or share it with others.
3. Copy the Meeting Invite: After generating the meeting link, click “Copy meeting invite” from the pop-up window. This will copy all the meeting details, including the link, to your clipboard so you can easily share it.
4. Share the Meeting Invite via Email: If you’re already composing an email, simply paste the copied meeting details into the body of your message. Once your recipient gets the email, they’ll see the Google Meet link and can click on it to join at the scheduled time.
5. Extra Tip – Attach a QR Code for Larger Events: If you’re organizing a bigger event, consider attaching a QR code to the invite. This adds an extra layer of convenience for your guests. Scanning the QR code can direct them straight to the RSVP page or the meeting link itself, making it even easier for them to join.
Why this is useful: It’s perfect for when you’re already emailing someone and want to send them a quick meeting invite without opening a separate app.
Easily Coordinate Schedules with the “Suggested Times” Feature
One of Google Calendar’s most helpful tools is the “Suggested Times” feature, which makes scheduling meetings a breeze, especially when trying to find a time that works for everyone. Instead of playing the back-and-forth guessing game of “Are you free at this time?” or “Does this day work?” Google Calendar does the hard work by showing attendees the best available times. Here’s how it works:
1. Add Guests to Your Event: When creating your event, start by adding your guests in the “Add guests” section. Once you’ve added their email addresses, Google Calendar will check their availability if they’ve shared their calendar with you.
2. Click “Suggested Times”: Next to your guest list, you’ll see a small link that says “Suggested times.” Click on that, and Google Calendar will automatically pull up a list of time slots where everyone is available, making it easier to find a time that works for the whole group.
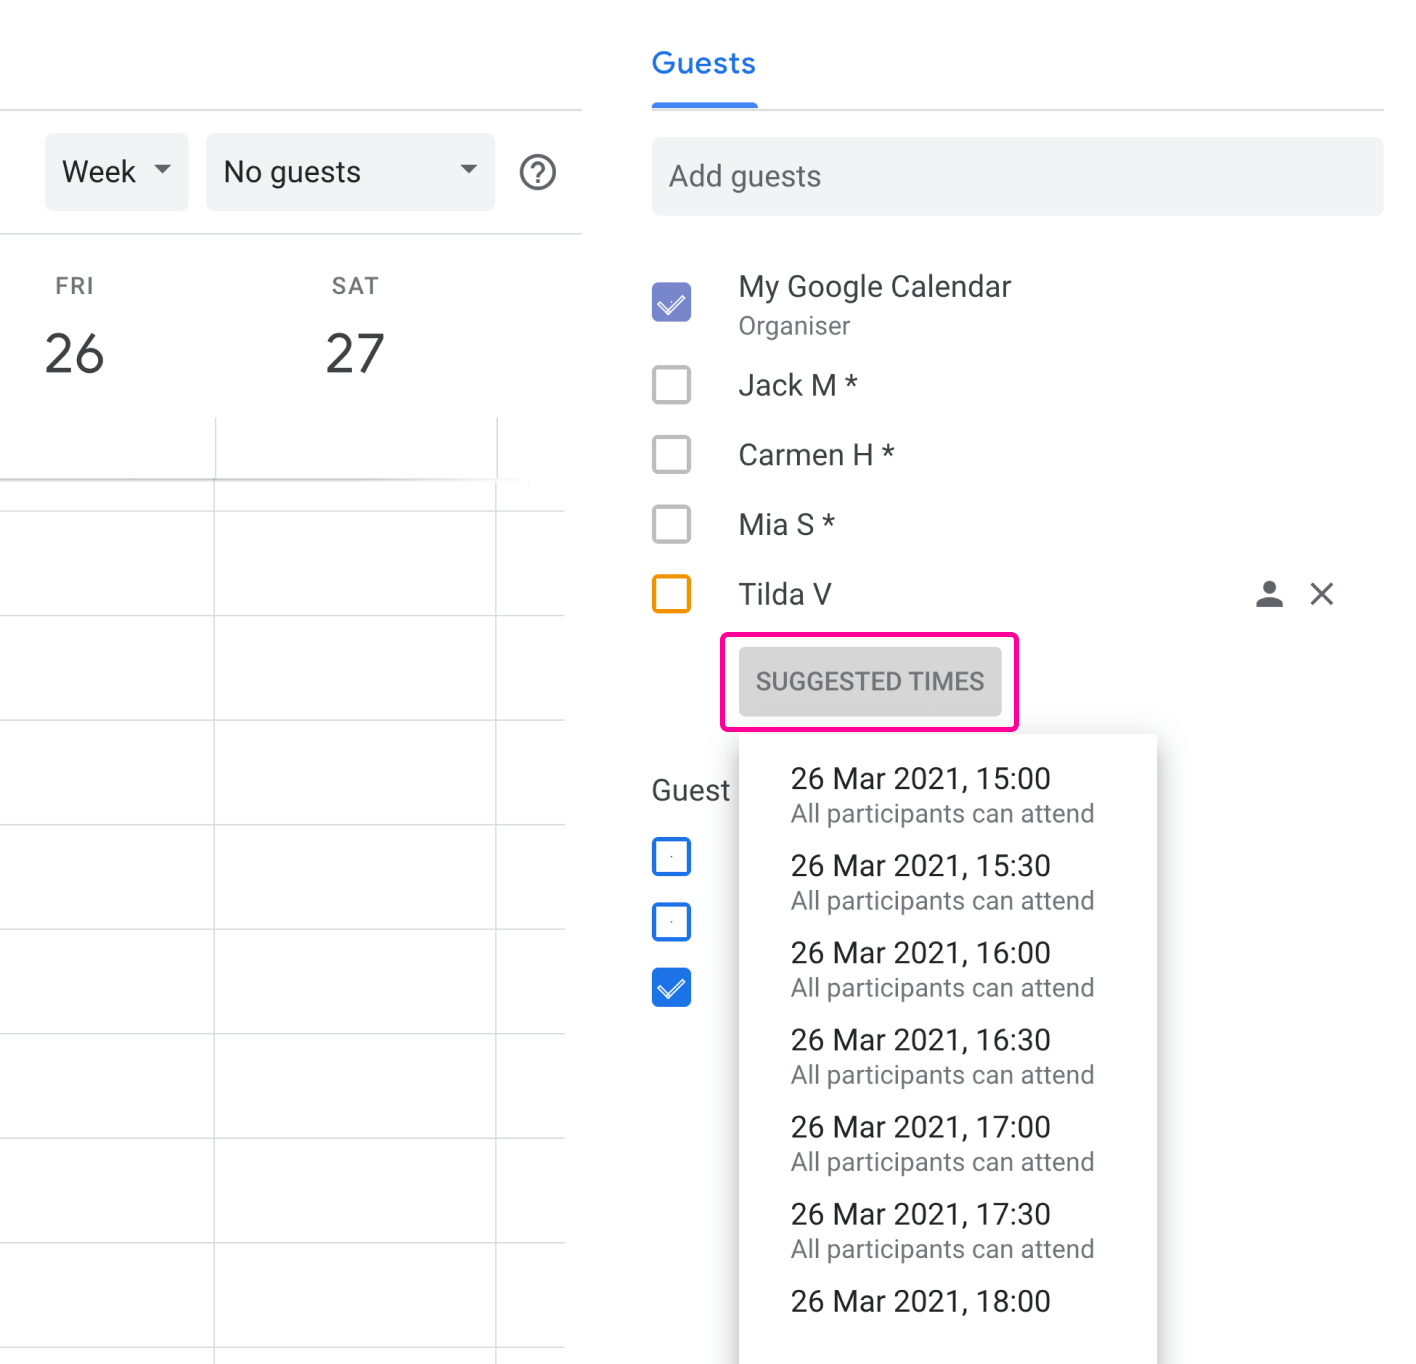
3. Select the Best Time: Browse through the suggested times and pick the one that best suits your meeting. Once you’ve selected it, the event details will automatically update with the chosen time, and you’ll be ready to send out your invites.
4. Adjust as Needed: If none of the suggested times fit your schedule, you can always adjust manually. But this feature will likely save you a ton of time and back-and-forth emails!
Why You’ll Love This Feature
The “Suggested Times” tool is especially helpful for larger teams or busy schedules. It takes the guesswork out of coordinating multiple people’s calendars and ensures your meeting does not overlap with other meetings. With just a few clicks, you’ll have your meeting set up without all the usual scheduling headaches.
How To Send A Google Calendar Invite from iPhone/Android
Need to send a Google Calendar invite while on the go? No problem! Whether using an iPhone or Android, sending invites through the Google Calendar app is super simple. Here’s how you can do it from your mobile device:
1. Open the Google Calendar App: First, make sure you have the Google Calendar app installed. Once you open it, you’ll see your calendar with all your scheduled events.
2. Create a New Event: Tap the “+” button at the bottom-right corner of the screen to create a new event. This will open a window where you can add details like the title, date, time, and location of your meeting or event.
3. Add Guests: Scroll down and find the option labeled “Add guests.” Here, you can enter the email addresses of the people you’d like to invite. The app will even suggest contacts if they are saved in your phone or synced with your Google account.
4. Customize Event Details: You can add a description, set a notification reminder, and add a Google Meet video link if your event is virtual. It’s all customizable, depending on what kind of meeting you’re planning!
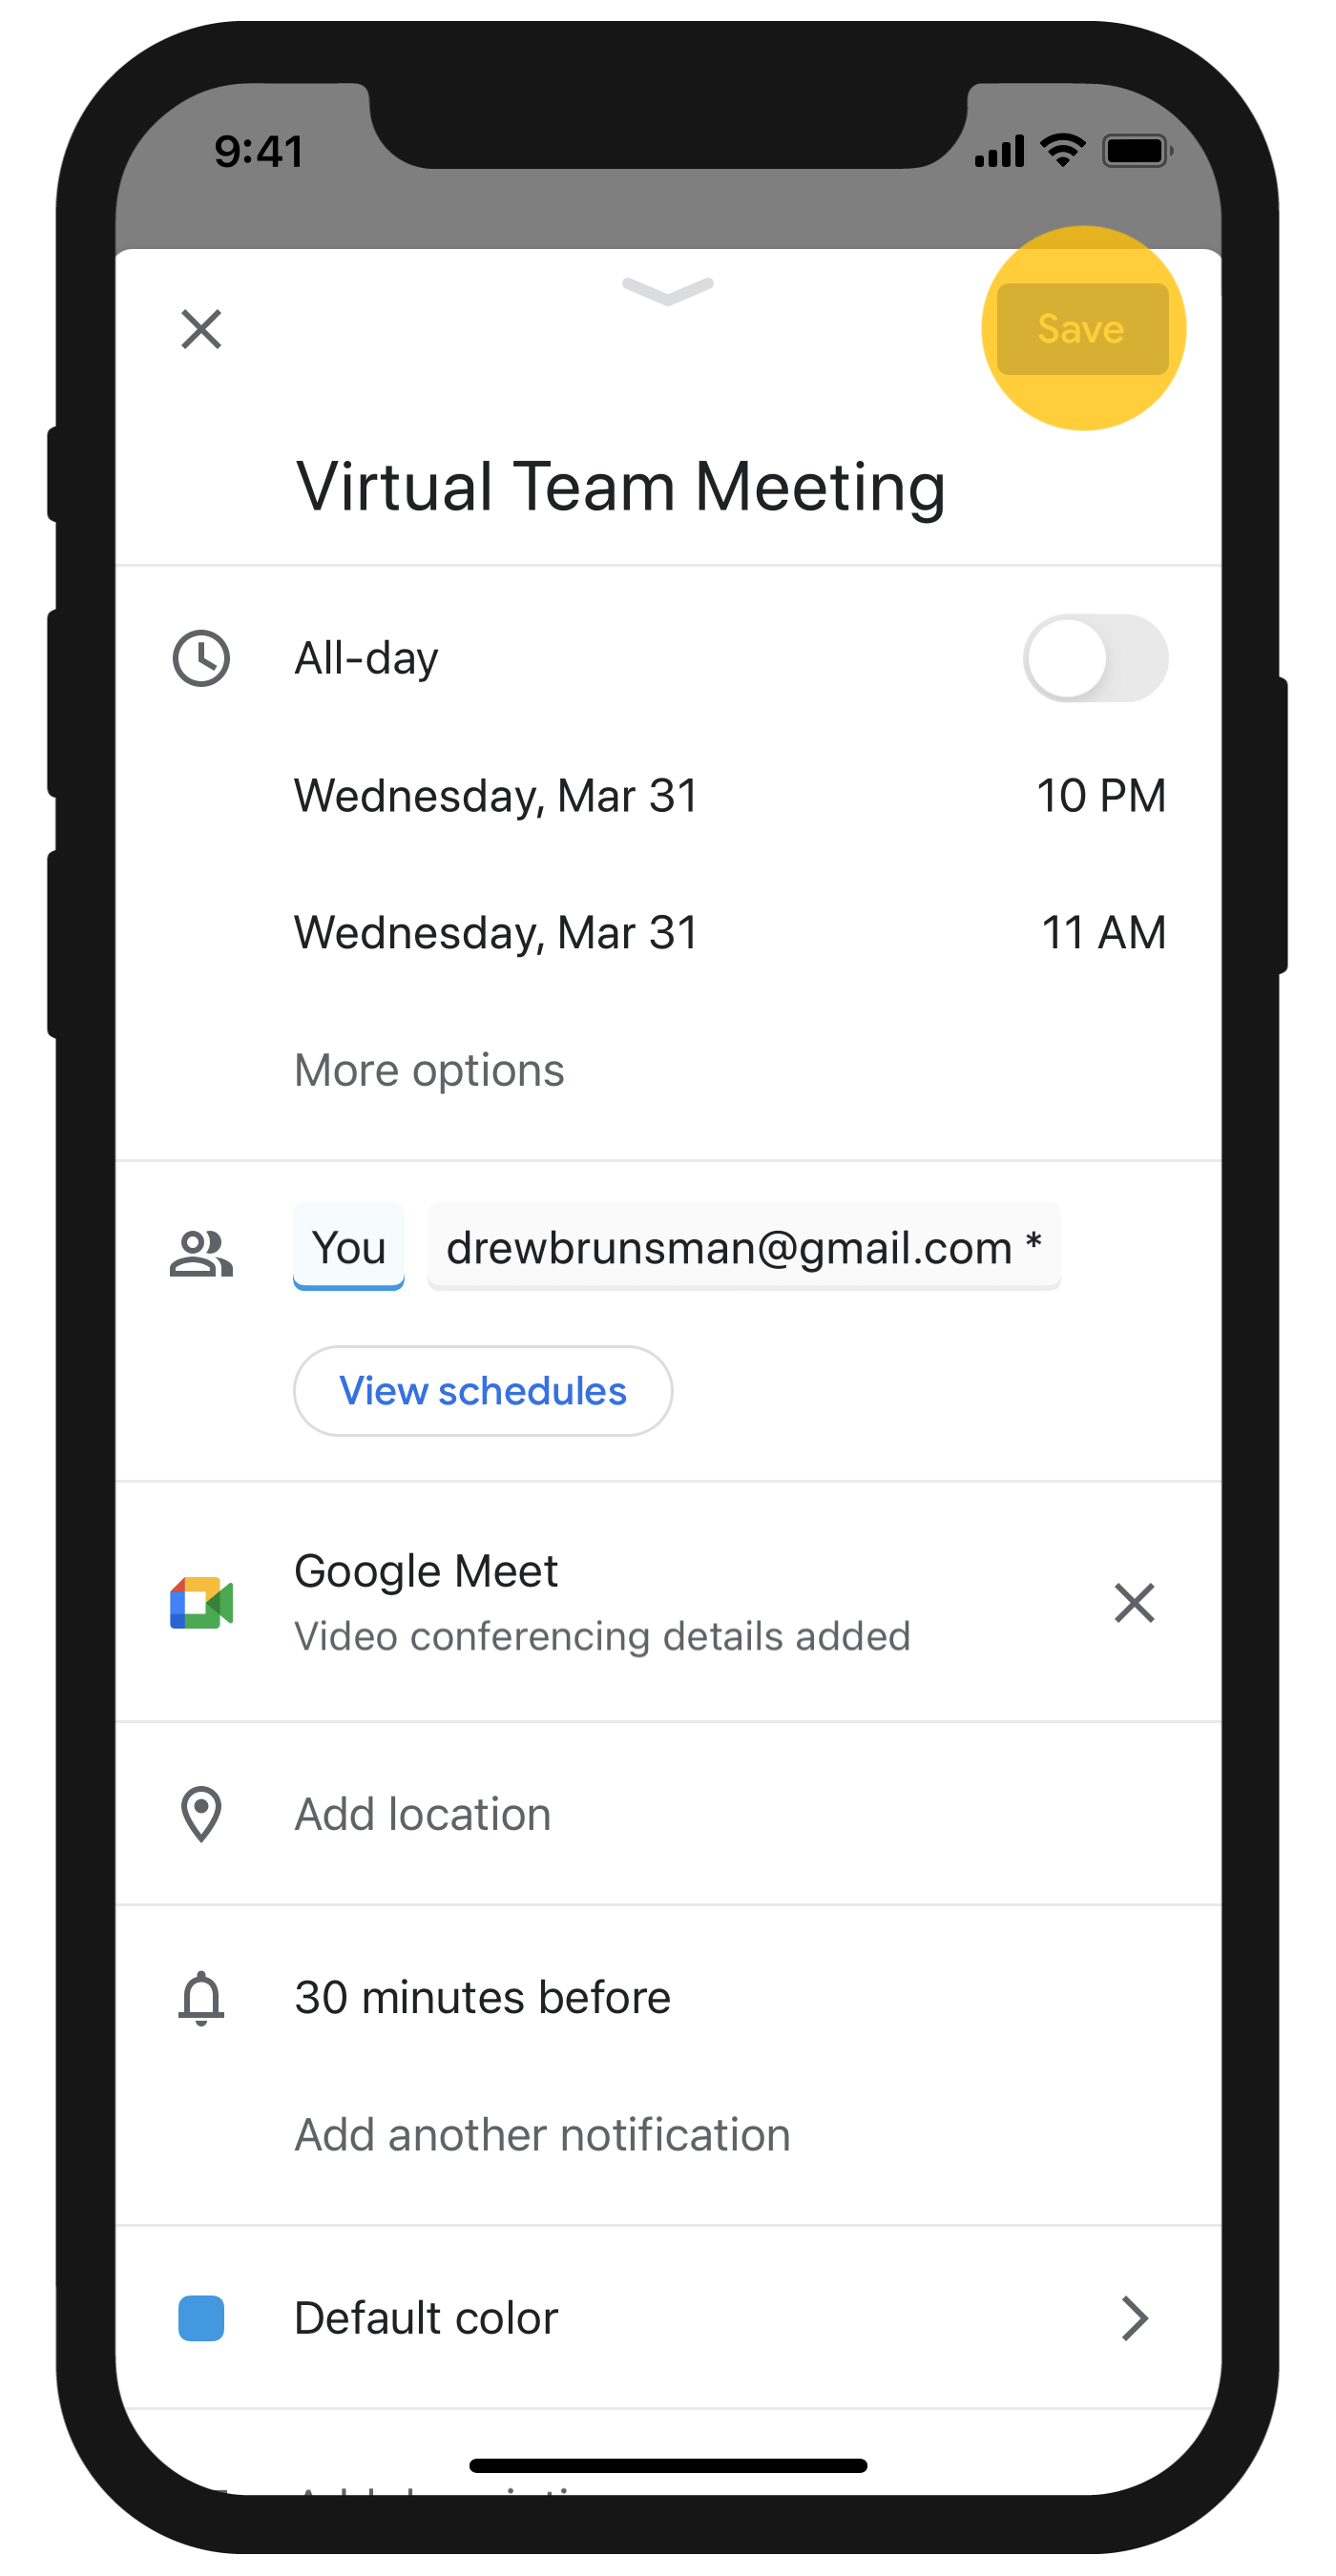
5. Send Your Invite: Once you’ve filled in all the details and added your guests, just hit “Save.” You’ll be prompted to send invitations to the people you added—tap “Send,” and your invites will be on their way.
How to Track Responses for Google Meet Invites
Once you’ve sent out your Google Meet invites, keeping track of who’s attending and who’s not can help you plan better and ensure a smooth meeting. Here’s how you can easily track responses to your Google Meet invites:
1. Open Google Calendar: Open Google Calendar on your desktop or mobile device. Find the event you’ve created for your Google Meet session.
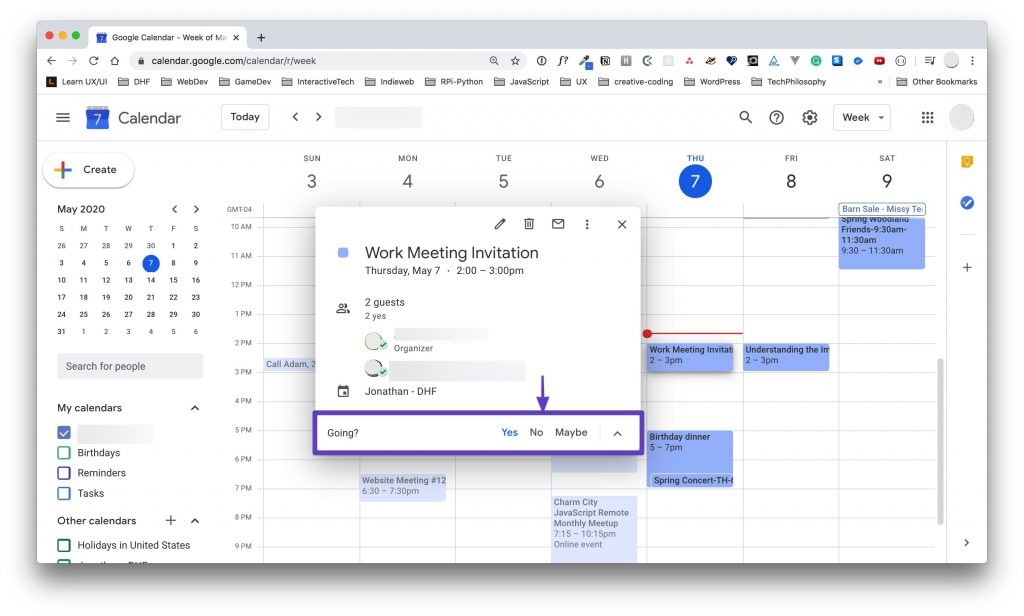
2. View Event Details: Click on the event to open its details. On the desktop, a pop-up window with all the event information will appear. On mobile, tap the event to view its details.
3. Check the Guest List: In the event details, you’ll see a list of guests and their response status. This includes options like “Yes,” “No,” or “Maybe.” You can see who has accepted, declined, or not yet responded.
4. Update and Manage Responses: If you need to follow up or make changes, you can manage responses directly from this section. You can also send reminders or adjust the invite if needed.
5. View RSVP Summary: In the event details, you’ll find a summary of responses on the desktop. It shows a breakdown of attendees by their response status. On mobile, tap the guest list to view the same information.
How to Manage A Google Calendar Invitation
Managing a Google Calendar invitation is simple, whether you’re working directly within Google Calendar or using a scheduling tool like Calendly. Here’s a quick guide on handling invitations from both platforms with ease.
From Google Calendar
Once you’ve sent out your Google Calendar invite, managing it is a breeze. Here’s what you can do:
1. Open the event: In Google Calendar, simply click on the event to view its details.
2. Review guest responses: You’ll see who has accepted, declined, or hasn’t responded yet.
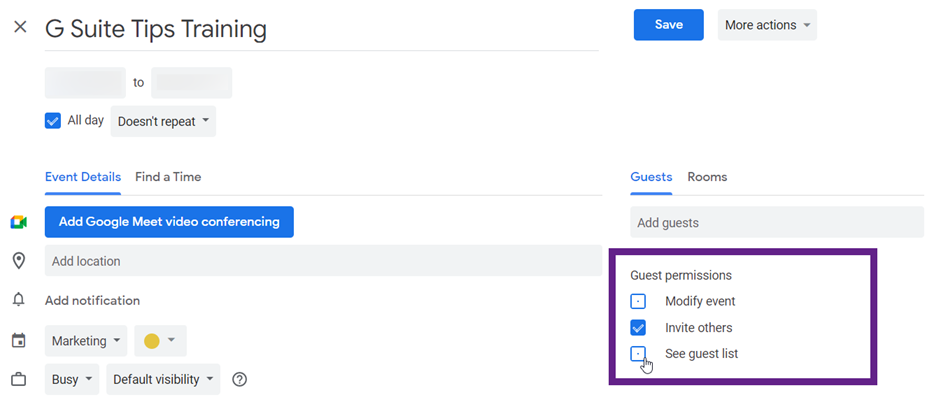
3. Manage guest permissions: You have control over what your guests can do. Under the “Guests” section, you’ll find options to:
-
- Allow guests to modify the event: This lets guests change event details like the time or location if needed.
- Allow guests to invite others: If enabled, your guests can send additional invites to others who should attend.
- Allow guests to see the guest list: You can decide whether your guests can view who else is attending.
4. Make changes or update the event: If you need to adjust the time, location, or other event details, just click “Edit” and make the necessary changes. Any updates will be automatically sent to all guests.
From Calendly
Managing your Google Calendar invitations through Calendly is super simple and keeps everything organized. Here’s how you can do it:
Calendly Dashboard:
You can manage your events directly from the Calendly dashboard. Simply log in to Calendly, and you’ll see a list of all your upcoming scheduled events. From here, you can:
1. View event details: See who’s attending, the time, and event specifics.
2. Reschedule or cancel: You can easily reschedule or cancel an event right from your dashboard. Any changes made here will automatically update the event on your Google Calendar and notify your guests.
3. Add notes or updates: You can add additional notes or updates for your guests directly in the dashboard if needed.
Mobile App:
Calendly also offers a mobile app that lets you manage events. Through the app, you can:
1. View and manage events: Just like the desktop version, you can check event details, reschedule, or cancel right from your phone.
2. Send notifications: You can send updates or reminders to your guests about upcoming events, keeping everything smooth and efficient.
Email Notifications:
Calendly sends email confirmations for each scheduled event, and you can manage events directly from those emails. In your email notification, you’ll find:
1. Links to reschedule or cancel: These links take you directly to a page where you can modify the event without logging into Calendly.
2. Event details: You can view guest information, time, and location details from your inbox.
How to Remove Someone From a Google Calendar Invite
Accidentally added someone to a meeting or need to trim down your guest list? Removing someone from a Google Calendar invite is quick and straightforward. Here’s a step-by-step guide to help you out:
1. Open Google Calendar: Open your Google Calendar on your desktop or mobile device. Find the event where you need to make the change.
2. Click on the Event: Once you’ve located the event, click on it to open up the details. If you’re on a desktop, this will usually pop up a small window where you can see all the event information. On mobile, it’ll take you to a full-screen view of the event details.
3. Edit the Event: Look for the “Edit” button (it usually looks like a pencil icon) and click it. This will allow you to change the event, including removing guests.
4. Remove the Guest: In the “Guests” section, you’ll see a list of invited people. Simply click the “X” next to the name of the person you want to remove. You can tap the guest’s name on your mobile, and an option to remove them will appear.
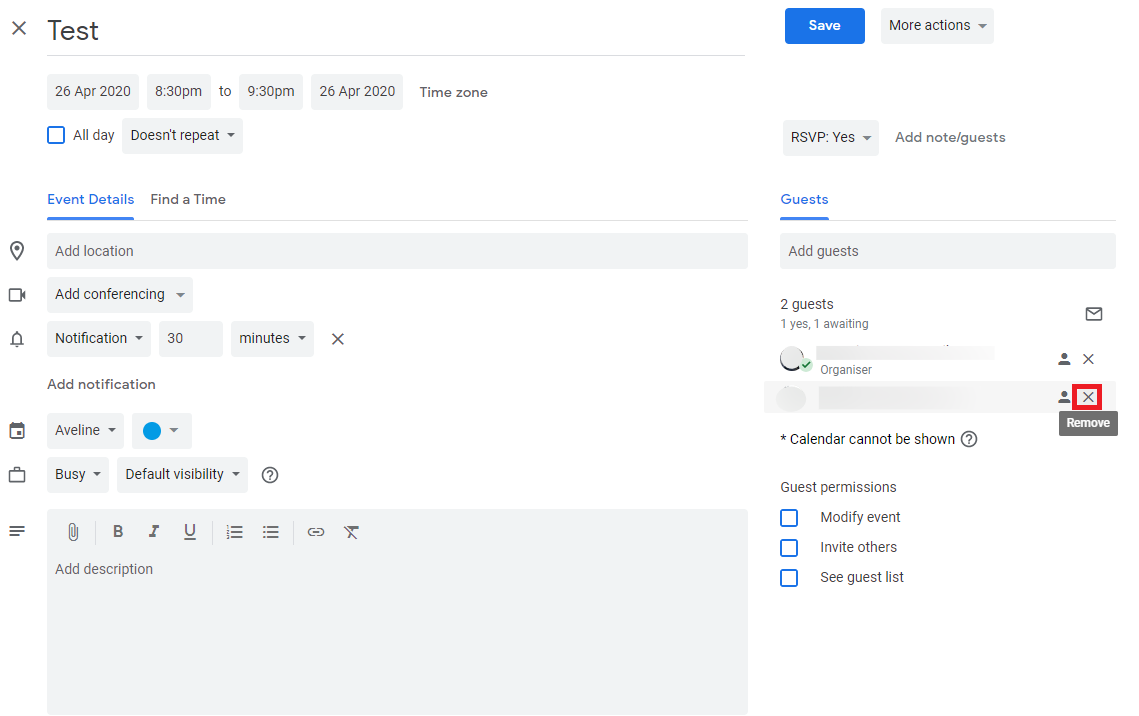
5. Save and Update: After removing the guest, click “Save.” You’ll be asked if you want to send an update to the remaining attendees—choose “Send” to notify them of the change or “Don’t Send” if it’s not necessary.
And that’s it! The person will no longer be on the invite list, and they’ll receive a notification that they’ve been removed from the event.
Quick Tip
Removing someone from an invite means they’ll get a notification unless you choose not to send one. If it’s a big change, consider letting the person know in advance to avoid any confusion or awkwardness.
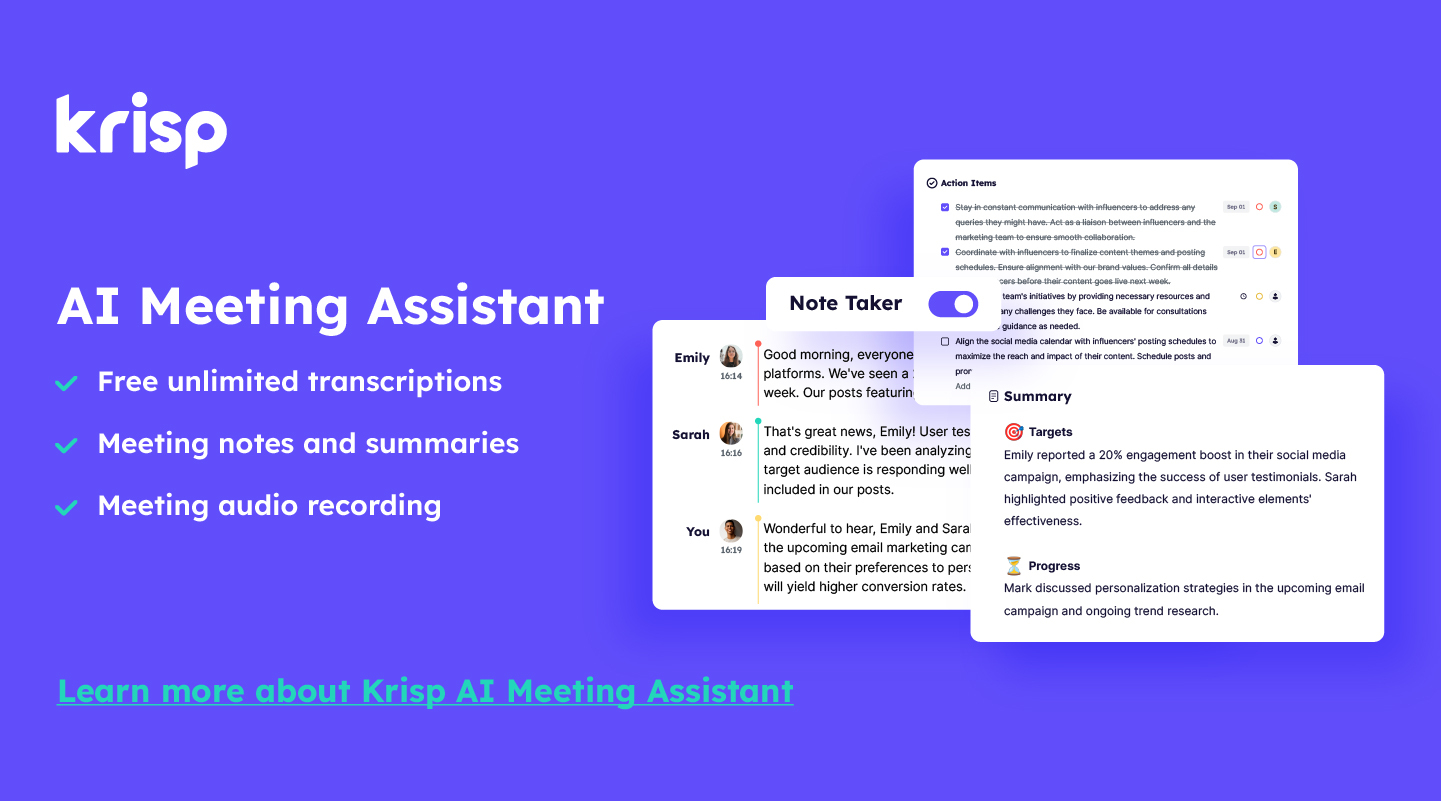
Simplify Your Google Meet Sessions with Krisp
Smooth and productive meetings are essential for effective collaboration, especially in today’s digital workspace. Krisp takes your virtual meetings to the next level by offering powerful AI-powered tools to improve focus and efficiency. Its advanced AI noise cancellation feature ensures your voice is heard clearly, without interruptions from background sounds like traffic or office chatter. Krisp works across platforms like Google Meet, Zoom, and Microsoft Teams, offering 60 minutes of noise-free daily calls on its free plan.
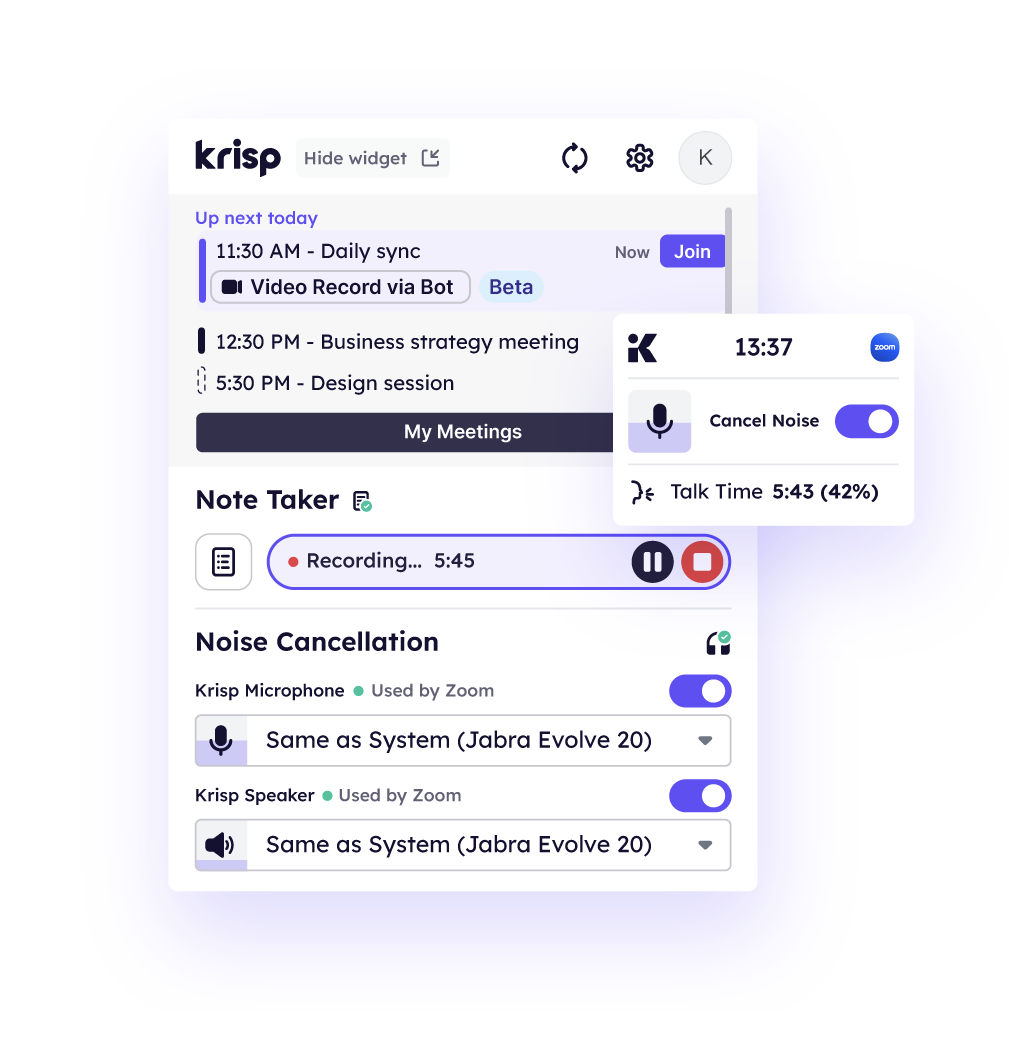
Krisp also boosts productivity by automatically transcribing meetings. At the end of the call, you’ll receive a complete transcript and a meeting summary, making it easy to review what was discussed or share it with others. Additionally, Krisp highlights action items, helping you keep track of tasks or assignments mentioned during the meeting.
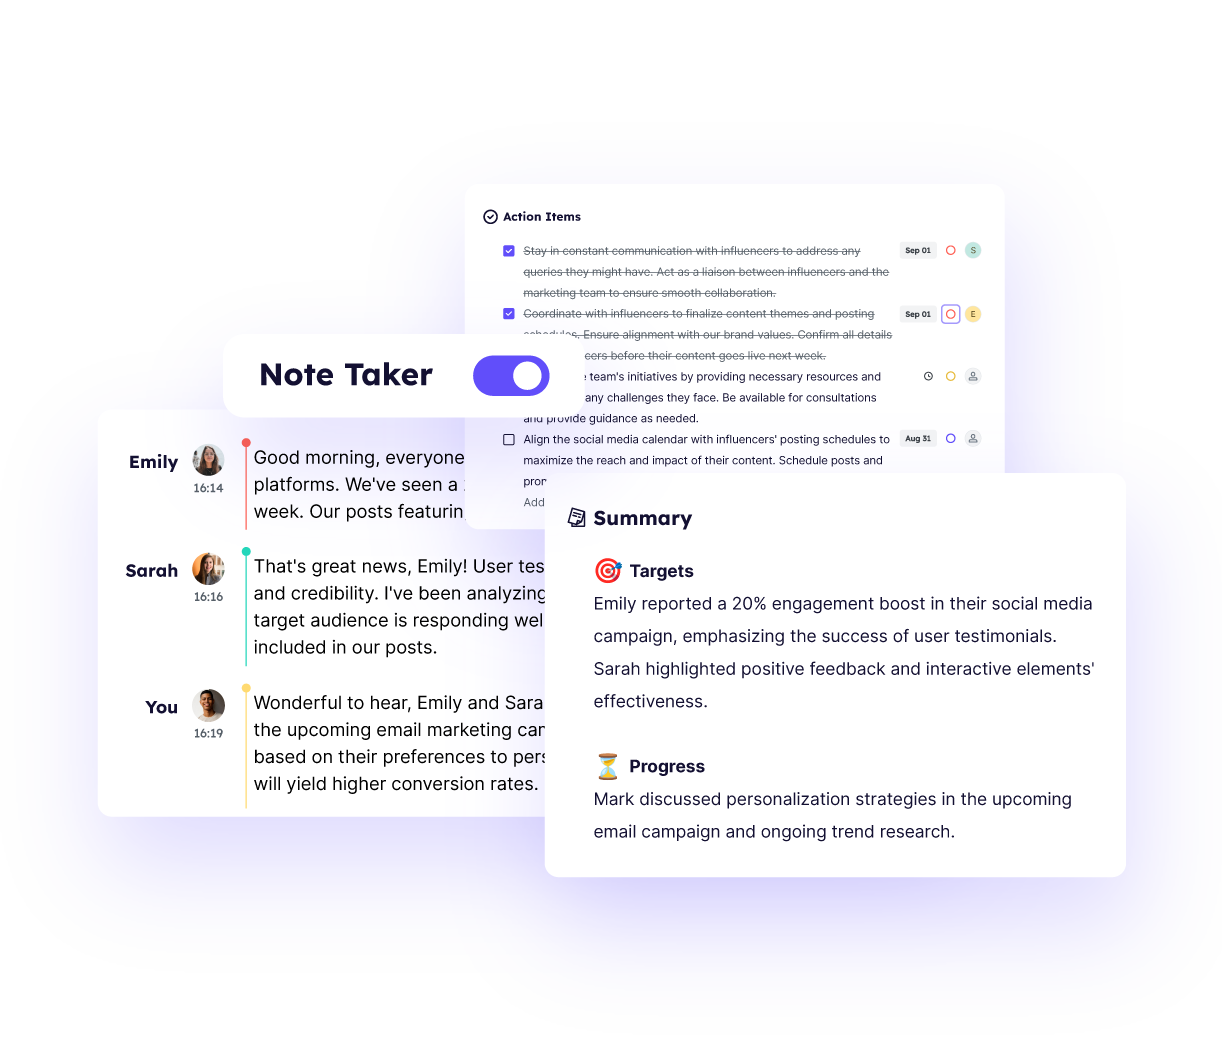
With Krisp, you’ll have clearer, more organized, and more productive meetings—every time.
Conclusion
Google Calendar makes it incredibly simple to manage your schedule and connect with others through invites, whether setting up meetings, organizing events, or planning interviews. Its user-friendly interface and handy features like guest permissions and suggested times ensure everything runs smoothly. Whether working from your desktop or on the go with your mobile device, sending and managing invites is a breeze. With its seamless integration options, Google Calendar remains a powerful and essential tool for staying organized in both personal and professional settings.