Ever wanted to save a live webinar, capture a gameplay moment, or record an important meeting for a coworker but weren’t sure how to record your screen? We’ve all been there—fumbling around, wondering which buttons to press or whether you need to download yet another app. The good news? Recording your screen on Windows doesn’t have to be complicated. You have some handy tools already built into your computer, and there are also plenty of third-party options if you need more advanced features.
In this guide, we’ll walk you through everything you need to know about screen recording on Windows. From using built-in tools like the Xbox Game Bar to exploring powerful third-party apps, we’ve got you covered. By the end, you’ll be screen recording like a pro, whether it’s for work, school, or just for fun.
How to Screen Record on Windows 10 and 11
As I mentioned earlier, there are several ways to record your screen. Some built-in options are worth knowing and using. Let’s explore them further:
How to screen record in Windows with Xbox Game Bar
The Xbox Game Bar is a built-in feature in Windows that makes screen recording quick and easy. While it was originally designed for gamers, it works great for capturing almost anything on your screen. Follow these steps to get started:
1. Open the Xbox Game Bar
- Press Windows + G on your keyboard to launch the Xbox Game Bar.
- If you don’t see the overlay, make sure it’s enabled. Go to Settings > Gaming > Xbox Game Bar and toggle it on.
2. Access the Capture Widget
- Once the overlay appears, look for the Capture widget. If it’s not visible, click the camera icon in the toolbar or press Windows + Alt + R to start recording immediately.
3. Choose What to Record
- The Xbox Game Bar records active windows or apps—not your entire desktop. Open the app or window you want to capture and make sure it’s in focus.
4. Start Recording
- Click the red Start Recording button in the Capture widget or use the shortcut Windows + Alt + R.
- A small floating toolbar will appear, showing the recording status.
5. Stop Recording
- To stop, press Windows + Alt + R again or click the stop button on the floating toolbar.
6. Find Your Recording
- Your recorded video will be saved in File Explorer > Videos > Captures.
- The file is automatically named and saved in MP4 format for easy sharing or editing.
Tips for Using Xbox Game Bar
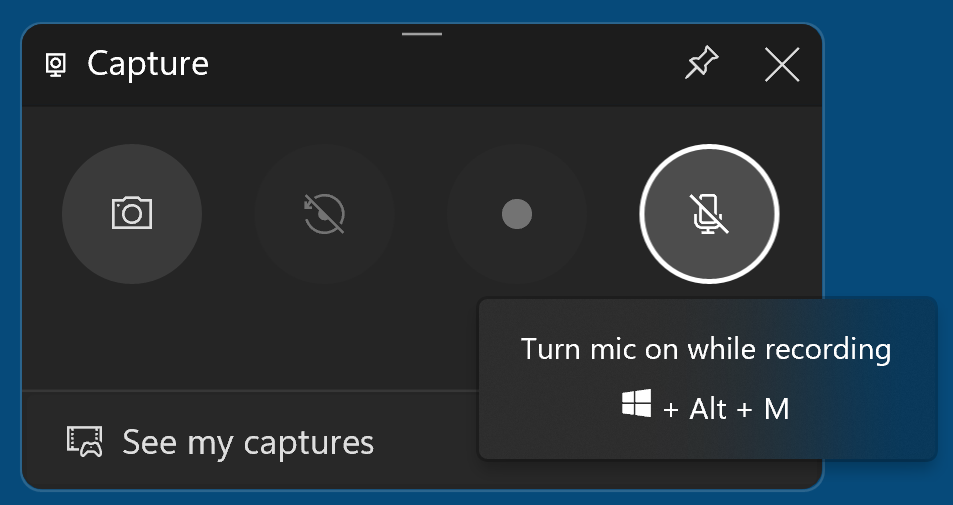
- Microphone Recording: To include audio from your microphone, toggle the mic button on the Capture widget or use the shortcut Windows + Alt + M.
- Game Mode: If you’re recording games, enable Game Mode for better performance by going to Settings > Gaming > Game Mode.
- Limitations: Xbox Game Bar doesn’t support recording File Explorer or the desktop. For full-screen or multi-window captures, you’ll need a third-party tool.
Record Screen on Windows With OBS Studio
If you’re looking for a more powerful and flexible screen recording option, OBS Studio is a fantastic choice. It’s free, open-source, and widely used by professionals and casual users alike. With OBS, you can capture your entire screen, specific windows, or even combine multiple video sources for a polished recording. Here’s how to get started:
1. Download and Install OBS Studio
- Visit the OBS Studio website and download the Windows version.
- Follow the installation prompts to set it up on your computer.
2. Launch OBS and Configure Settings
- Open OBS Studio and complete the setup wizard if prompted. This will optimize the settings for your system.
- Go to Settings > Output to choose where your recordings will be saved and in which format (MP4 is a popular choice).
- In Settings > Video, you can adjust the resolution and frame rate for your recording.
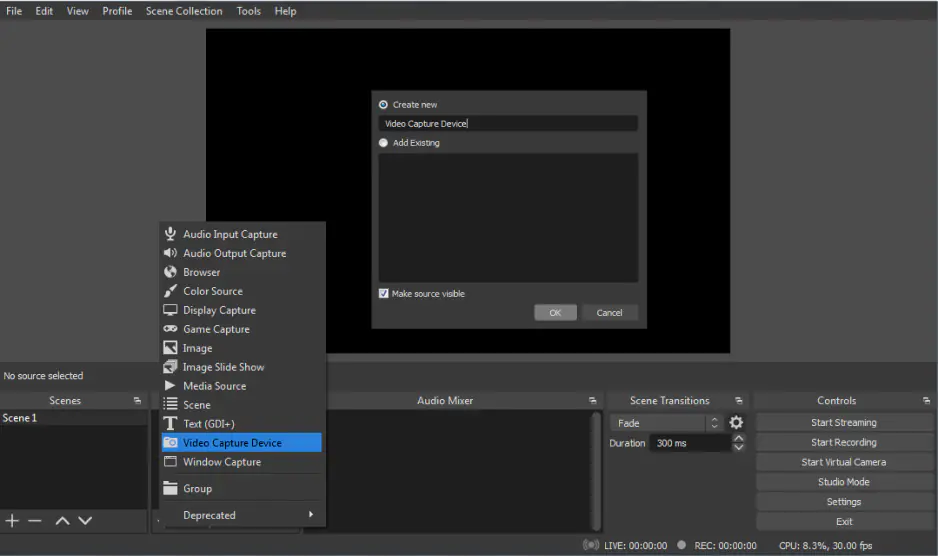
3. Add a Source to Record Your Screen
- In the main OBS interface, locate the Sources box at the bottom.
- Click the + button, then select Display Capture to record your entire screen.
- Name your source and click OK.
- Choose the display you want to capture if you have multiple monitors, then click OK again.
4. Adjust Your Audio Settings
- OBS automatically captures system audio, but you can add a microphone for voice-overs.
- Go to the Audio Mixer section and adjust the volume sliders for Desktop Audio and Mic/Aux as needed.
5. Start Recording
- Click the Start Recording button in the Controls section on the right.
- Minimize OBS if you don’t want it visible during your recording.
6. Stop Recording and Access Your File
- When you’re done, return to OBS and click Stop Recording.
- Your video will be saved in the location specified in the Output settings.
Tips for Using OBS Studio
- Scene Layouts: OBS lets you create custom scenes, which is useful if you want to switch between multiple layouts during your recording.
- Hotkeys: Set up hotkeys in Settings > Hotkeys to start, pause, or stop recording without interacting with the OBS window.
- Advanced Options: OBS also supports live streaming, advanced overlays, and plugins, making it a versatile tool for content creators.
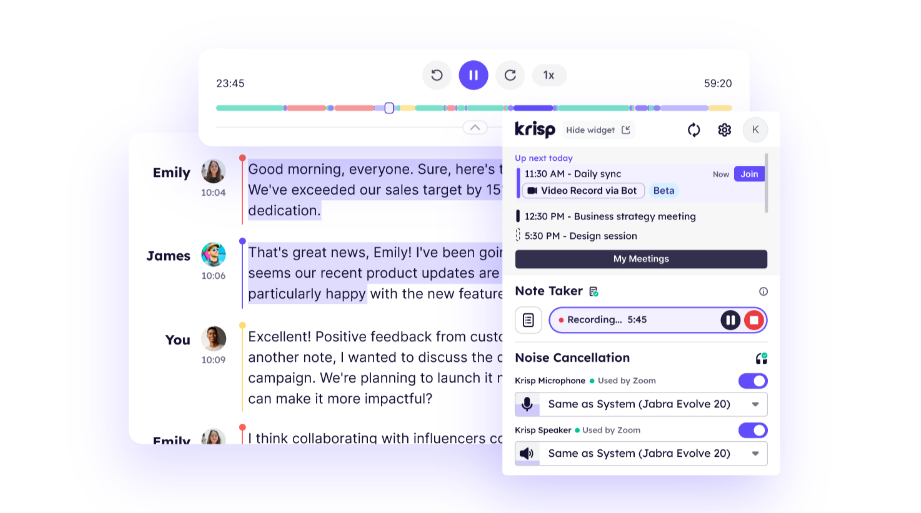
How to Screen Record Online on Windows Using Krisp
Krisp makes screen recording online meetings a breeze while offering so much more than just a basic recording tool. It’s considered one of the best software for meeting recordings thanks to its AI features. Whether you’re using Zoom, Microsoft Teams, Google Meet, or any other conferencing app, Krisp captures your meetings, ensuring that no detail is missed. Here’s how you can take advantage of Krisp’s features to record and manage your online meetings.
1. Download and Install Krisp
- Visit Krisp’s website and download the app for Windows.
- Once installed, Krisp automatically integrates with your conferencing apps—no plugins or extensions are needed.
2. Start a Meeting and Enable Krisp Recording
- Open your preferred conferencing app and start or join a meeting.
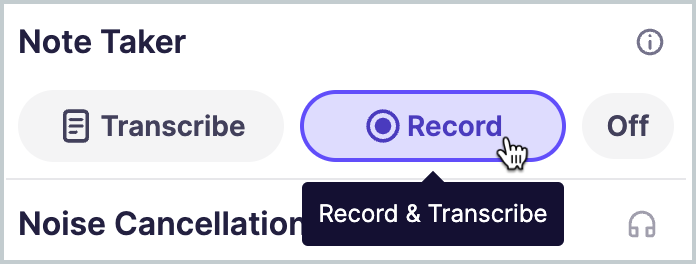
- In the Krisp app, enable the Meeting Recording feature. This will capture the meeting, including both audio and video, in high clarity.
3. Enjoy AI-Powered Features
Krisp takes your recordings to the next level with these AI-enhanced tools:
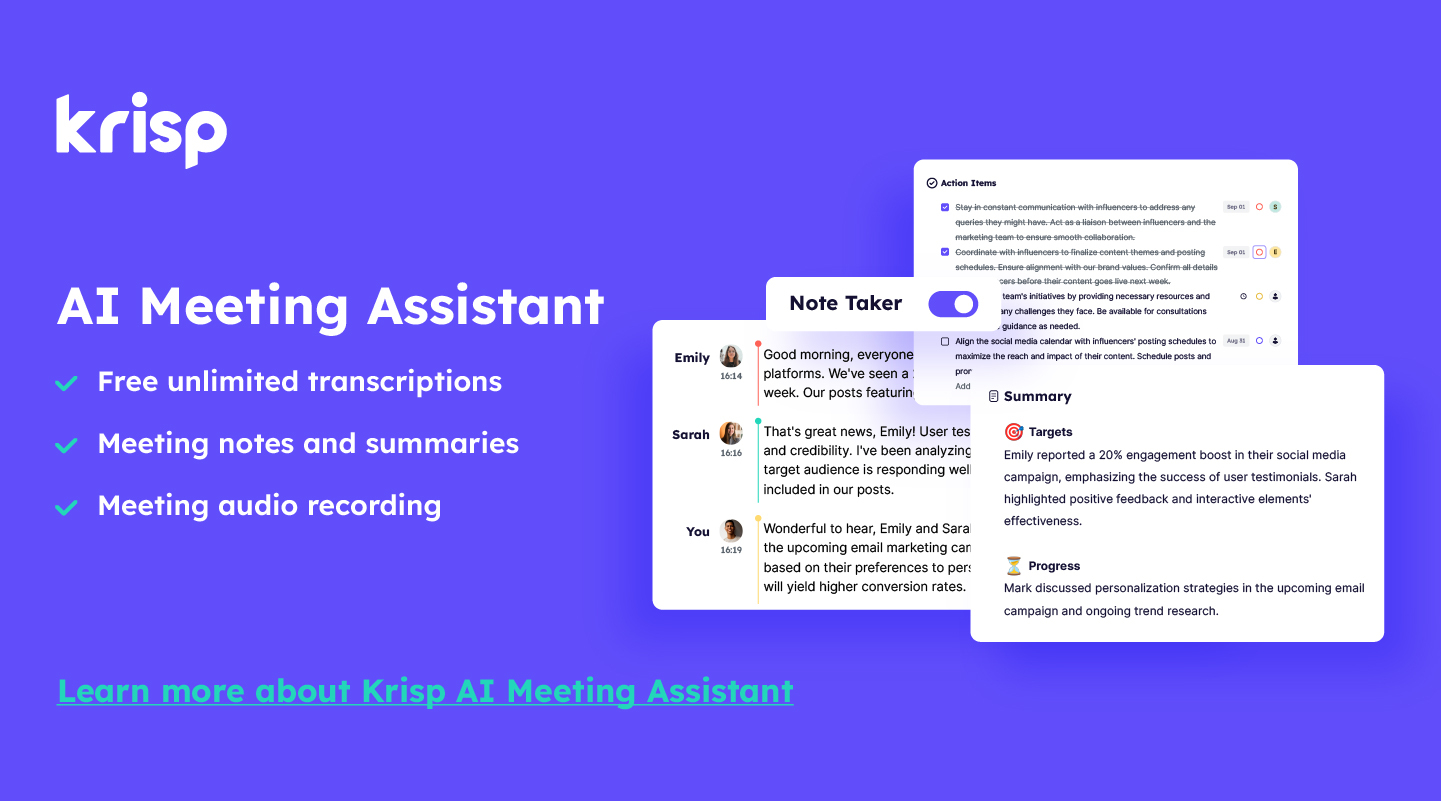
- Automatic Meeting Transcriptions: Your meetings are transcribed with up to 96% accuracy. These synchronized transcriptions make it easy to search for specific moments during playback.
- Noise Cancellation: Eliminate background noise, echo, and other distractions for a professional-quality recording.
- AI Note Taker: Automatically generate meeting summaries, action items, and key takeaways.
4. Save and Share Your Recordings
- Krisp stores your recordings in one convenient location, making them easy to access whenever you need them.
- Use Krisp’s flexible sharing options to send recordings and meeting notes to your team. You can even connect Krisp with your calendar to automate the recording and sharing process.
Why Use Krisp for Screen Recording?
- Works With Any App: Krisp is compatible with all major conferencing tools, from Zoom to Google Meet.
- Unlimited Transcriptions on the Free Plan: Enjoy the benefits of automatic transcriptions without any cost.
- Streamlined Workflow: Automate your meeting tasks and focus on the discussion, not the admin work.
- Easy Download and Playback: Download recordings in seconds and play them back with synchronized transcriptions for seamless review.
Who Can Benefit From Krisp?
- Managers and Leaders: Save time by automating note-taking and task assignments.
- Consultants: Easily share meeting summaries and action items with clients.
- Teams: Keep everyone informed and accountable with recorded discussions and clear follow-ups.
How to Screen Record on Windows With an Extension
Browser extensions are a quick and convenient way to record your screen on Windows. They’re great for capturing browser activity, presentations, or tutorials without installing full-fledged software. If you’re on a Mac, many browser extensions work just as well. Here’s how to use three popular extensions to record your screen:
1. Loom
Loom is a popular screen recording tool that’s simple, fast, and designed for easy sharing. You can record your screen, webcam, or both and share the recording with just a link.
How to Use Loom:
- Install the Loom extension from the Chrome Web Store.
- Sign in or create a free account.
- Click the Loom icon in your browser toolbar to open the recording menu.
- Choose your recording type: Screen Only, Screen + Camera, or Camera Only. Enable microphone input if you want to record audio.
- Click Start Recording and select the screen or window you want to capture.
- Once done, click Stop. Loom will automatically upload your video to the cloud.
- Copy the link to share the video or download it to your computer.
2. Nimbus Screenshot & Screen Recorder
Nimbus is a versatile extension that allows you to record your screen, take screenshots, and annotate your recordings.
How to Use Nimbus:
- Add the Nimbus Screenshot & Screen Recorder extension to your browser.
- Click on the Nimbus icon in your toolbar.
- Select your recording type: Browser Tab, Entire Desktop, or Webcam Only.
- Adjust the settings as needed, like adding audio or webcam.
- Press Start Recording to begin and Stop when you’re finished.
- Save the recording to your computer or upload it to Nimbus Note.
3. Screenity
Screenity is a free and open-source screen recorder that offers annotation tools, webcam support, and easy customization.
How to Use Screenity:
- Download and install the Screenity extension from the Chrome Web Store.
- Click the Screenity icon in your browser to open the recording menu.
- Select what to record: your screen, webcam, or both. Turn on the microphone input if needed.
- Press Record and start your screen capture. Use the toolbar to draw or highlight directly on the video while recording.
- Click Stop Recording when you’re done.
- Save the file locally or share it using a link.
Comparing Built-in Tools vs. Third-Party Tools for Screen Recording on Windows
| Factor | Xbox Game Bar | OBS Studio | Krisp |
| Ease of Use | Very easy to use; quick setup for basic recordings | Steeper learning curve; requires setup for advanced features | Simple setup, especially for online meetings and collaboration |
| Features | Basic video recording, screenshots, limited microphone use | Advanced features like multi-source recording, HD capture, live streaming, and audio mixing | AI-powered noise cancellation, transcription, meeting summaries, and action items |
| Customization | Limited customization; basic recording options | Extensive customization; control over resolution, frame rate, audio sources, and plugins | Limited customization; focuses on noise cancellation and meeting transcription |
| Best For | Casual users needing quick screen recording | Content creators, streamers, and professionals need full control over recordings | Professionals who need high-quality meeting recordings with transcription and noise cancellation |
| Limitations | Can’t record desktop or File Explorer; no editing or streaming | Can be overwhelming for beginners; requires configuration | Primarily focused on meeting recordings, not free-form screen recording |
Conclusion
Recording your screen on Windows doesn’t have to be complicated, and there are plenty of options to fit your needs. Whether you’re capturing a quick moment or recording an important meeting, there’s a tool for every occasion.
Key Takeaways:
- Xbox Game Bar is perfect for casual users who need a simple, no-fuss way to record their screen. It’s fast and easy, but it has some limits, like not being able to capture your desktop or File Explorer.
- OBS Studio offers more power and flexibility, making it ideal for creators or anyone who needs high-quality, customizable recordings. It takes a bit more time to set up and learn, but it’s great for detailed, professional-level recordings.
- Krisp shines for those who need to record online meetings. With features like noise cancellation, transcription, and automatic summaries, it’s a great tool for remote work, keeping meetings clear and organized.
- Browser Extensions like Loom, Nimbus, and Screenity are quick and easy tools for basic screen recording, especially if you’re working within your browser.
Try out these tools to see which one works best for you. The key is not just recording your screen but also sharing your ideas. With a little practice and the right tools, you’ll be able to create high-quality recordings in no time.
FAQ