Scheduling Zoom meetings has become an essential task for remote teams, professionals, and educators. But with multiple ways to set up a meeting, have you ever wondered which method is the most convenient for your needs?
Whether you’re working from your desktop, browsing the web, or using your mobile device, Zoom offers flexible options to ensure you can quickly schedule meetings anywhere, anytime. In this guide, we’ll explore three basic ways to schedule a Zoom meeting and also share some actionable tips to make the most out of your Zoom meetings.
3 Basic Ways of Scheduling Zoom Meetings
Depending on your platform, you can schedule a Zoom meeting in several ways. The three main options are the Zoom desktop app, the Zoom website (also known as Zoom on the browser), and the Zoom mobile app.
Each method allows you to easily schedule one-time and recurring meetings. Let’s explore a step-by-step guide for scheduling Zoom meetings on each platform so you can choose the option that best suits your needs.
How to Schedule a Zoom Meeting Using the Zoom Desktop App
Zoom’s desktop app provides a seamless way to schedule meetings directly from your computer. Whether you’re setting up a quick team check-in or a more formal presentation, scheduling a Zoom meeting through the desktop client is quick, efficient, and offers a variety of customizable options.
Follow these steps to schedule your next Zoom meeting using the desktop app:
Step 1: Download and Install the Zoom Desktop App
- If you haven’t already, download the Zoom desktop client from the Zoom website and install it on your computer. If you already use Zoom, consider updating your app to the latest version.
- After installation, open the app and Sign In with your Zoom account credentials.
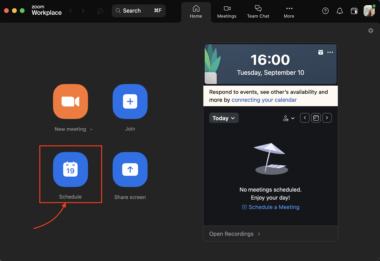
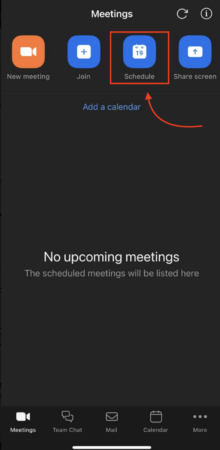
Step 2: Access the ‘Schedule’ Button
- Once logged in, you’ll land on the home screen of the Zoom app.
- Click on the Schedule button, which is on the dashboard next to “New Meeting” and “Join.”

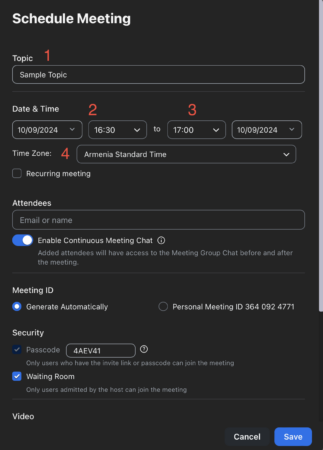
Step 3: Set Meeting Details
- Topic: Enter a title for your meeting to indicate the purpose.
- When: Select the date and time of the meeting.
- Duration: Set the meeting’s length (e.g., 30 minutes, 1 hour).
- Time Zone: Make sure the time zone is accurate, especially if participants are in different locations.

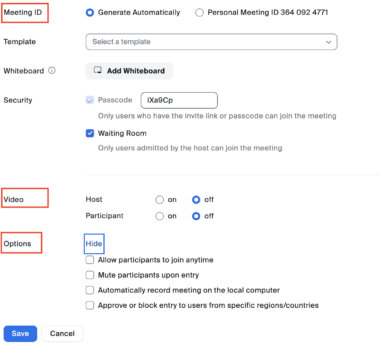
Step 4: Configure Meeting ID and Security Settings
- Meeting ID: Choose whether to generate a unique meeting ID or use your personal meeting ID (PMI).
- Passcode: Set a passcode for added security.
- Waiting Room: Enable the Waiting Room option to control who joins the meeting and when.

Step 5: Video and Audio Settings
- Host/Participants Video: Decide whether the video for both the host and participants will be on or off by default.
- Audio: Choose the audio options that participants can use to join the meeting (Computer, Phone, or Both).
Step 6: Calendar Integration
Select the calendar to send invitations (Google Calendar, Outlook, or Other Calendars). This automatically generates the meeting link and invitation within your chosen calendar application.
Step 7: Advanced Options
Click Advanced Options to set additional preferences, such as:
- Allowing participants to join before the host.
- Automatically recording the meeting.
- Muting participants upon entry.
Step 8: Save and Share Invitations
Once you’ve customized all the necessary settings, click Save.
Your chosen calendar application will open (e.g., Google Calendar or Outlook), allowing you to add attendees and send meeting invitations with the Zoom link.
How to Schedule a Zoom Meeting on the Website
Step 1: Log into Zoom
- Open your browser and go to the Zoom website.
- Click Sign In and enter your login credentials.
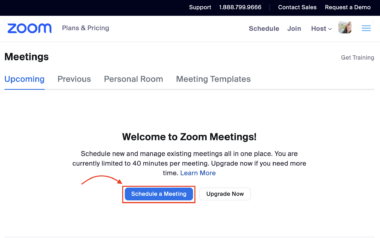
Step 2: Go to ‘Schedule a Meeting’
- After logging in, click on Schedule a Meeting in the top navigation bar.

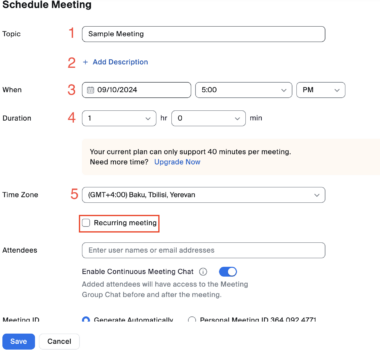
Step 3: Enter Meeting Details
- Topic: Input a title for your meeting.
- Description (optional): Add a brief description if needed.
- When: Set the meeting date and time.
- Duration: Select the meeting length.
- Time Zone: Ensure the correct time zone is chosen.
Step 4: Set Recurring Meetings (Optional)
- If it’s a recurring meeting, check the box for Recurring meeting and choose the frequency (daily, weekly, etc.).

Step 5: Configure Meeting Settings
- Meeting ID: Choose between generating a new ID or using your personal meeting ID (PMI).
- Passcode: Set a passcode for added security.
- Waiting Room: Enable this option to control participant entry.
- Video: Choose whether video is enabled for the host and participants by default.
- Audio: Select audio options (Computer, Phone, or Both).
Step 6: Customize Advanced Options
- Click Show Advanced Options to:
- Allow participants to join before the host.
- Automatically record the meeting.
- Mute participants upon entry.

Step 7: Save and Invite Participants
- Click Save to confirm your meeting details.
- After saving, click Copy Invitation to share the meeting link with participants.
How to Schedule a Zoom Meeting on Mobile (Step-by-Step)
The Zoom mobile app makes it easy to schedule meetings on the go, whether you’re using an Android or iOS device. This flexibility allows you to quickly set up a meeting from anywhere, ensuring you never miss an opportunity to connect with colleagues or clients.
Follow these steps to schedule a Zoom meeting using the mobile app:
Step 1: Download and Install the Zoom App
Step 2: Go to ‘Schedule’
- After signing in, tap the Schedule button located on the home screen, at the top next to “New Meeting” and “Join.”

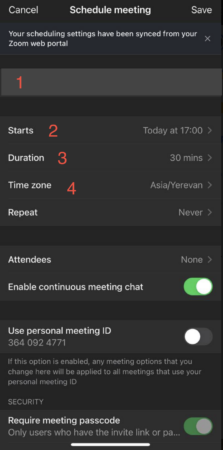
Step 3: Set Meeting Details
- Topic: Enter a name for your meeting (e.g., Team Check-in).
- When: Select the date and time for your meeting.
- Duration: Choose how long the meeting will last.
- Time Zone: Ensure the correct time zone is selected.

Step 4: Configure Meeting Settings
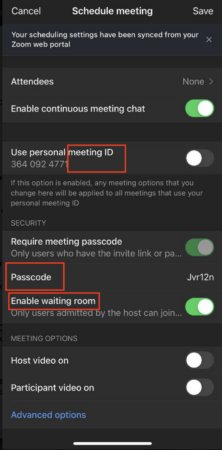
- Meeting ID: Choose to generate a unique meeting ID or use your personal meeting ID (PMI).
- Passcode: Set a passcode for meeting security.
- Waiting Room: Enable the waiting room if you want to control when participants can join.
Step 5: Video and Audio Options
- Host Video: Choose if the host’s video will start on or off.
- Participants Video: Decide if participant videos will be on or off by default.
- Audio: Select whether participants can join via phone, device audio, or both.

Step 6: Invite Participants via Calendar
- Select your preferred calendar app (Google Calendar, Outlook, or Other) to send out invitations and automatically add the Zoom meeting link.
Step 7: Save and Share Invitations
- Once you’ve entered all the necessary details, tap Save.
- The calendar app will open, allowing you to invite participants by email or other messaging platforms.
More on meeting apps: https://krisp.ai/blog/zoom-vs-google-meet/
Tips for Scheduling Productive Zoom Meetings
1. Set a Clear Agenda
Before scheduling your meeting, create a detailed agenda that outlines key topics. Sharing the agenda with participants ensures everyone is prepared and focused during the meeting.
2. Choose the Right Time
Be mindful of time zones, especially for global teams. Use scheduling tools or Zoom’s built-in time zone features to find a time that works for all participants.
3. Enable Waiting Rooms for Better Control
Use Zoom’s Waiting Room feature to admit participants at the right time and avoid interruptions, allowing you to better manage the flow of the meeting.
4. Limit Meeting Length
Keep meetings concise by limiting them to 30-60 minutes. Shorter, focused meetings are more productive and maintain participants’ attention.
5. Use Recurring Meetings for Regular Sessions
If you have weekly or monthly meetings, set them as recurring in Zoom. This eliminates the need to schedule each session manually and ensures consistency.
6. Utilize Screen Sharing Wisely
Use Zoom’s screen-sharing feature to present documents, slides, or visuals during the meeting. Ensure the host or designated presenters know how to share a screen on Zoom to enhance collaboration and understanding.
7. Send Reminders Before the Meeting
Schedule automatic calendar reminders or send a quick note to participants to ensure they’re ready and available at the scheduled time.
8. Test Equipment and Settings in Advance
Encourage participants to check their internet connection, camera, and microphone settings before the meeting to avoid delays due to technical issues.
9. Use Krisp for Distraction-Free Meetings
Incorporate Krisp’s AI noise cancellation feature to eliminate background noise and distractions, making your meetings more professional and efficient.
Integrate Zoom with Krisp for Maximum Meeting Productivity
Integrating Zoom with Krisp is a game-changer for optimizing virtual meetings. You can significantly improve meeting quality and efficiency by combining Zoom’s powerful video conferencing platform with Krisp’s advanced noise cancellation and productivity tools. Here’s how this integration can boost your virtual collaboration:
1. Crystal Clear Communication with Noise Cancellation
Background noise can disrupt even the most important meetings. By integrating Krisp with Zoom, you can enable AI-powered noise cancellation, eliminating unwanted sounds like typing, barking, or construction noise. This ensures that every participant can focus on the conversation without distractions, resulting in a smoother meeting experience.
2. Enhance Focus with Transcription
Zoom meetings often require note-taking, which can detract from participant engagement. Krisp’s transcription feature captures everything said during the meeting, allowing attendees to focus on the discussion rather than jotting down notes. Afterward, the transcript is available for easy review, helping teams stay aligned on meeting outcomes.
3. Automatic Summaries for Quick Follow-Ups
Time is precious, and long post-meeting summaries can take up valuable hours. With Krisp’s AI Meeting Assistant, you’ll receive concise summaries of the meeting’s key points and decisions.
This allows for quick follow-ups and ensures that action items are clearly outlined without sifting through a full-length transcript.
4. Streamlined Workflow with Seamless Integration
Integrating Krisp with Zoom is simple and requires no technical expertise. Once activated, you can control Krisp’s noise cancellation and transcription features directly within Zoom, ensuring a smooth and seamless meeting experience without any additional tools or complicated setups.
5. Boost Productivity and Meeting Efficiency
By eliminating noise distractions, automating transcription, and providing instant summaries, Krisp allows you to conduct more efficient meetings, reduce the time spent on follow-ups, and keep participants focused on what matters most. The result? A more productive and effective collaboration experience.
To get started, simply download Krisp, integrate it with your Zoom account, and enjoy a more efficient, distraction-free meeting environment. This powerful combination will transform how you conduct virtual meetings and ensure every session is optimized for success.
Frequently Asked Questions
How to schedule a Zoom meeting and invite others?
Log in to Zoom, click “Schedule a Meeting,” fill in the meeting details, and save it. You can then copy the invitation link and share it via email or calendar.
How to schedule a Zoom meeting in Google Calendar?
Open Google Calendar, click “Create,” set your event details, and choose “Zoom” under “Add conferencing.” Save the event and send invitations automatically to participants.
How do I schedule a Zoom meeting to start automatically?
When scheduling a meeting, select the “Enable join before host” option so participants can join the meeting, or use the recurring meeting option to auto-start at the set time.