Open Broadcaster Software (OBS) is a favorite among gamers, YouTubers, educators, and remote professionals for its reliable screen recording and streaming capabilities. This free, open-source tool has features that cater to everyone—from first-time users to experienced creators.
Whether you’re streaming your favorite game, teaching a virtual class, or producing content for YouTube, OBS equips you with the tools to achieve professional-quality results. It’s easy to tailor your recordings to your unique style with options to customize scenes, add overlays, and fine-tune audio settings.
In this article, we’ll guide you through using OBS for screen recording step by step. Additionally, we’ll compare OBS with Krisp’s screen recording feature, giving you insight into which solution might best suit your needs. If you’re ready to create high-quality screen recordings, keep reading to learn how to record with OBS.
What is OBS?
OBS, or Open Broadcaster Software, is a free and open-source application designed for video recording and live streaming. It’s a robust tool that works across Windows, macOS, and Linux, making it accessible to a wide range of users. Known for its flexibility and powerful features, OBS is widely adopted by content creators, educators, and professionals in various industries.
Key features:
Customizable Scenes and Sources
OBS allows users to create multiple scenes by layering video, audio, images, and text. This makes it easy to switch between different setups during a recording or stream, such as transitioning from a webcam view to a shared screen.
Plugin Support
OBS supports a variety of plugins, enabling users to extend its functionality. Plugins can add features like virtual camera output, advanced audio filters, or even integration with third-party tools for additional customization.
Advanced Encoding Options
OBS includes high-quality encoding options, such as hardware-accelerated encoders, to produce professional-grade outputs. This ensures smooth video playback, even for high-resolution streams.
Dynamic Scene Composition OBS allows users to create multiple scenes, each with a unique layout of video, audio, and visual elements. This is especially useful for presentations, gameplay streams, or multi-camera setups.
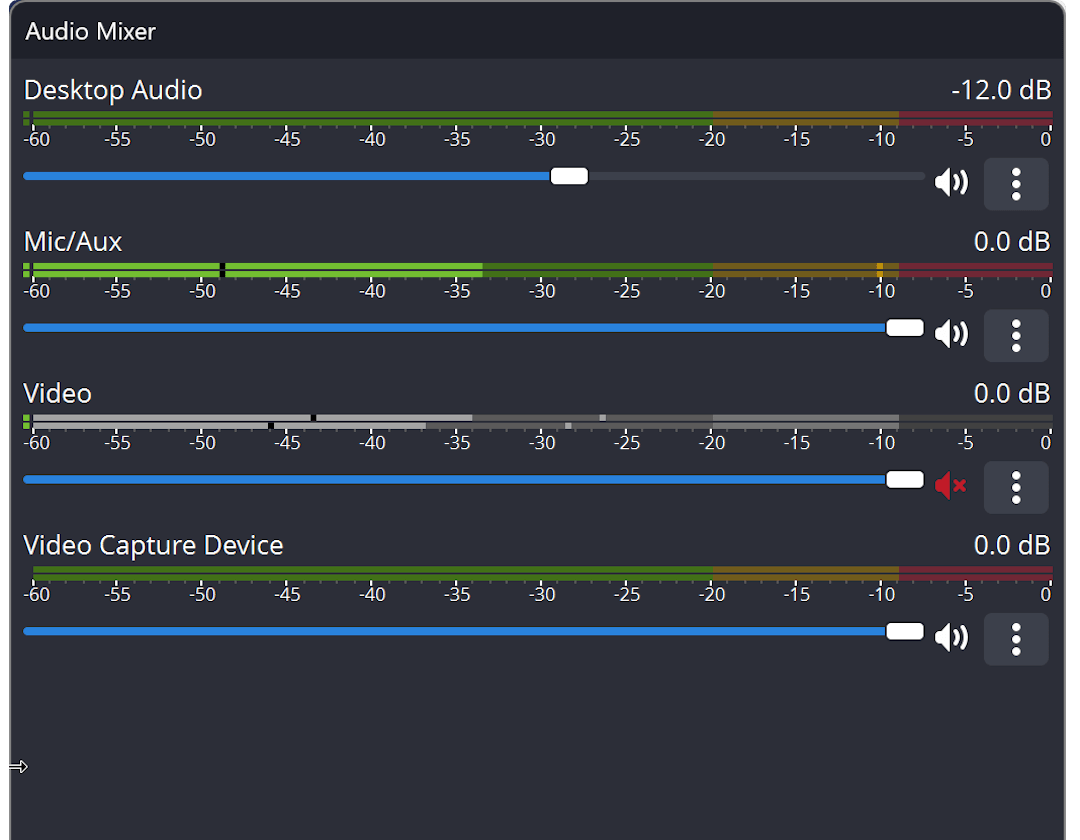
Built-In Audio Mixer OBS includes a powerful mixer for adjusting levels, muting sources, and applying filters like noise suppression and gain control. To learn more about suppressing noise on OBS, check out this article.
Source Management Users can add and manage sources like webcams, microphones, screen captures, video files, images, and browser windows. Sources can be resized, repositioned, and layered for a polished, professional appearance.
Transitions and Effects Smooth transitions between scenes (e.g., fade or slide) help maintain a seamless viewing experience, while filters and effects allow for further customization.
Endless Customization OBS supports many plugins to expand its capabilities. For example, plugins can enable features like stream deck integration, live chat overlays, or advanced audio processing.
Virtual Camera Output This plugin lets OBS function as a virtual camera, enabling users to send their OBS output to video conferencing tools like Zoom or Teams.
Third-Party Integration Many plugins integrate with external platforms and tools, such as Twitch, YouTube, or custom hardware, providing additional convenience for content creators.
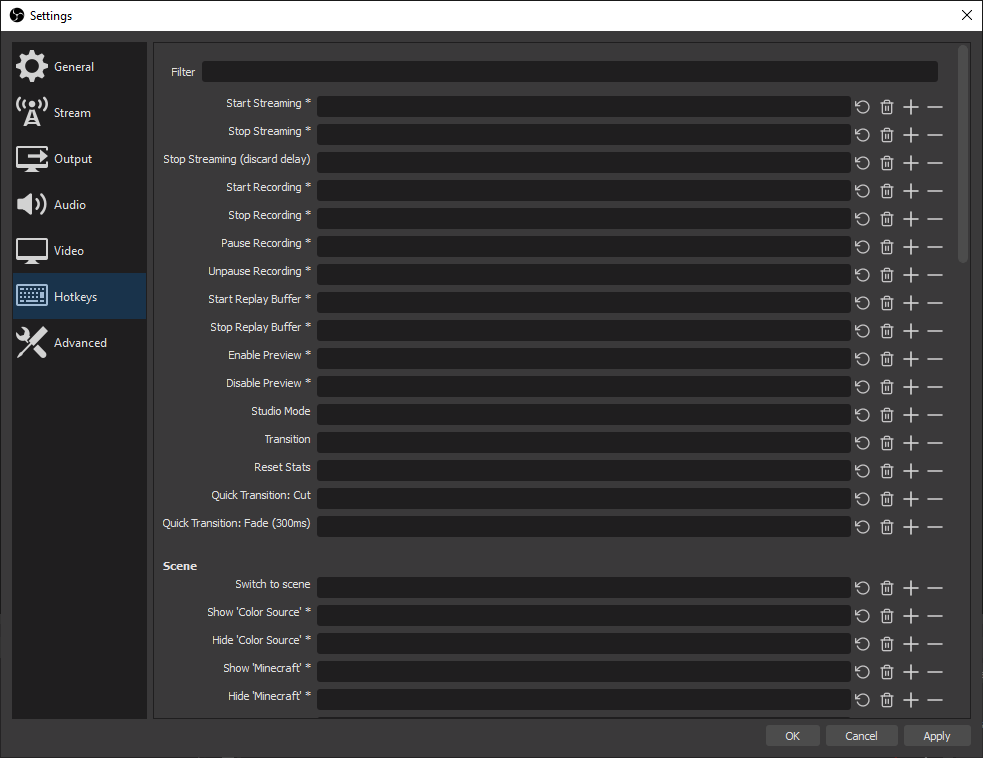
Hotkeys for Streamlined Workflow OBS supports customizable hotkeys for nearly every function, such as switching scenes, starting/stopping recordings, and adjusting audio. This enhances efficiency and reduces interruptions during live streams.
Example Use Cases
Recording Tutorials
Capture on-screen demonstrations with voiceovers, ideal for creating educational content.
Streaming Gameplay
Gamers use OBS to stream to platforms like Twitch or YouTube, adding overlays and commentary.
Hosting Webinars
Educators and professionals rely on OBS to host live webinars, integrating slides and live Q&A sessions.
Producing Podcasts
With its audio and video capabilities, OBS is perfect for creating high-quality podcast recordings.
How to Use OBS Studio for Screen and Audio Recording on a Mac
OBS Studio is compatible with macOS versions 10.13 and newer. Before you begin, ensure your Mac meets the necessary requirements, then download and install OBS Studio from the official website.
Once installed, setting up OBS Studio to record your screen and audio on a Mac is straightforward. While the process is similar to the Windows setup, here’s a simplified guide tailored for Mac users:
Step 1: Configure the Source
At the bottom of the OBS interface, locate the Sources panel and click the + button. Select Display Capture from the list of available options and click OK to confirm.
Step 2: Set the Save Location
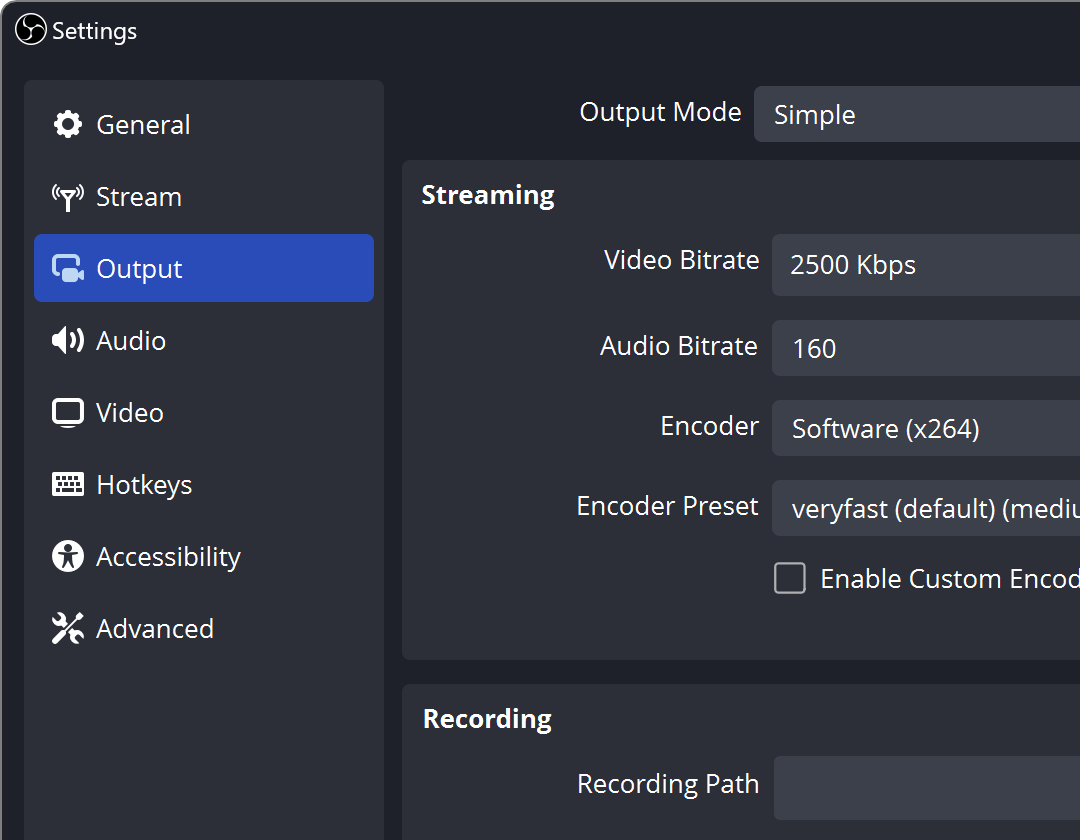
Click the Settings button in the bottom-right corner of the screen. Navigate to the Output section using the menu on the left. Under the Recording Path option, click Browse to select where your recordings will be saved.
Step 3: Start Recording
When you’re ready to record, click Start Recording on the bottom-right side of the interface. OBS will begin capturing your screen and audio. To stop, click Stop Recording, and the file will be saved in your designated folder.
How to Use OBS Studio for Screen Recording on a PC
OBS Studio is a versatile tool for screen recording on PCs running Windows 8.1, 10, or 11. If you have a relatively modern system, you can easily use OBS to capture high-quality screen recordings. When installing OBS, specify that you’ll be using it for screen recording to optimize the setup process.
Step 1: Download and Install OBS Studio
Head to the official OBS website to download the program. Once the download is complete, follow the installation prompts to set it up on your PC.
Step 2: Launch OBS Studio
Open OBS Studio via the start menu, search bar, or desktop icon. When the program launches, it should automatically include a default scene. If it doesn’t, click the + icon in the Scenes box in the bottom-left corner to manually add one.
Step 3: Configure the Settings
Next to the Scenes box, locate the Sources box. Click the + icon at the bottom of this box and select Display Capture from the menu. A pop-up window will appear—name your source and click OK to proceed.
Step 4: Set the Capture Options
In the following window, choose your preferred display and capture method. If you’re using multiple monitors, click the dropdown menu to select the correct display. You can also check a box to include or exclude your cursor in the recording. Once your selections are made, click OK to confirm.
Step 5: Choose the Output Folder
Click the Settings button in the bottom-right corner of the OBS interface. In the settings menu, select the Output tab on the left. Under the Recording section, locate the Recording Path option, click Browse, and select the folder where you’d like your recordings to be saved.
Step 6: Start Recording
With everything configured, click the Start Recording button in the bottom-right corner of the OBS interface (just below the Start Streaming button). OBS will now begin capturing your screen. When finished, click Stop Recording, and the file will be saved to your designated folder.
How to Record Using OBS Studio on Linux
To use OBS Studio for screen recording on Linux, there are a couple of prerequisites:
- Your system must be running Ubuntu 18.04 or higher.
- You need to have the FFmpeg video filter installed.
Once these requirements are met, you can download and install OBS Studio from the official website.
The process for recording your screen or any other video source is similar to the steps on Windows and Mac, with one key difference.
Step 1: Set Up Recording Settings
Open OBS Studio and find the Sources panel at the bottom of the screen. Click the + icon, and from the menu, select Screen Capture. This is different from the “Display Capture” option on Windows or Mac. Once selected, click OK. If you’re using multiple monitors, choose the one you wish to record.
Step 2: Choose a Save Location
Click the Settings icon in the bottom-right corner, then select Output from the sidebar. Under Recording Path, either type in the location or click Browse to choose a folder where your recordings will be saved.
Step 3: Start Recording
To begin recording, click the Start Recording button located at the bottom right of the interface. OBS will now capture your screen or video source.
How to Use OBS to Record Your Mobile Device Screen (iPhone and Android)
Recording your mobile device’s screen with OBS Studio is simple, but the method varies slightly depending on whether you’re using an iPhone or an Android device. Here’s a guide for both platforms:
Recording Your iPhone Screen
- Connect Your iPhone
Use a lightning cable to connect your iPhone to your Mac or PC. - Open OBS
Launch OBS and locate the Sources box at the bottom of the screen. - Add a Video Capture Device
Click the + icon in the Sources box and choose Video Capture Device from the menu. - Create a New Source
In the pop-up menu, select Create New, then click OK. - Select Your iPhone
A new window will open. Click the drop-down menu next to Devices and select your iPhone. If your iPhone doesn’t appear, check the connection and try again. - Start Recording
Once your iPhone screen appears in OBS, click the Start Recording button to begin capturing.
Recording Your Android Screen
The steps for recording your Android device screen with OBS are almost identical to the iPhone process. Here’s how:
- Connect Your Android Device
Use the appropriate cable (USB) to connect your Android device to your computer. - Open OBS
Launch OBS and go to the Sources box at the bottom of the interface. - Add a Video Capture Device
Click the + icon and select Video Capture Device. - Create a New Source
Choose Create New in the pop-up window and click OK. - Select Your Android Device
From the drop-down menu next to Devices, select your Android device. If it doesn’t appear, check your cable connection and restart the process. - Start Recording
Once your Android screen appears in OBS, click Start Recording to begin.
Note:
- OBS does not have mobile versions or specific apps for capturing mobile screens, so using it for mobile recording can be a bit glitchy, especially when connected via cable.
- If your mobile device lacks built-in screen recording, it’s a good idea to check the Apple App Store or Google Play Store for other mobile screen recording apps that may offer better functionality.
How to Record Your Webcam in OBS Studio
OBS Studio allows you to record webcam footage alongside other media like your screen. Whether you’re creating content for streaming or making tutorial videos, recording with OBS is a straightforward process. Additionally, as long as your webcam is properly connected to your desktop, OBS can capture both its video and audio.
Step 1: Add Your Webcam as a Source
To get started, you need to add your webcam as a source in OBS Studio. Open OBS and go to the Sources section. Click the Plus icon to add a new source, then select Video Capture Device. When prompted, choose Create New and name your webcam source for easy reference.
From the list of available devices, select your webcam. We recommend using the High preset for better quality, but you can adjust this based on your preferences. While you’re here, be sure to check the audio source settings to confirm whether you’re using the webcam’s microphone or another microphone.
Step 2: Set the Recording Destination
Next, navigate to the Output section in the settings to choose where you want to save your recording. Find the Recording Path option, then click Browse to select the folder where your video will be saved after recording.
Step 3: Start Recording
Once everything is set up, simply click Start Recording under the Controls section on the main OBS interface. Your recording will begin, capturing both your webcam feed and any other content you’ve set up in OBS.
Where are OBS Recordings Stored?
By default, OBS Studio saves your recordings in the Videos folder on your computer. However, you can change this location by adjusting the settings in OBS. Here’s how:
- Open OBS Studio and go to the Settings menu by clicking on the gear icon in the lower-right corner.
- Select the Output tab from the left-hand menu.
- Under the Recording section, you’ll see an option labeled Recording Path. This is the folder where OBS saves your recordings.
- To change the location, click the Browse button next to Recording Path and select a new folder on your computer.
Once you’ve selected your desired folder, OBS will save all future recordings there. If you don’t change the default setting, the recordings will continue to be saved in your Videos folder.
Now, let’s take a closer look at Krisp’s new Screen Recording feature and how it can enhance your meeting experience.
Krisp’s Screen Recording Feature
Who Can Use?
- Available to users on both Free and Pro plans
- Requires Krisp version 2.46.8 or higher
- Supported on Mac OS Sonoma 14.5+ and Windows 10+
Krisp’s Screen Recording feature allows you to capture your meetings directly from the Krisp app, without bots needing to join the session. This intuitive feature lets you record essential meeting content without switching between apps. With Krisp, you can:
- Record your entire screen or specific application windows
- Capture both video and audio in high quality
- Access and review recordings on the Meetings page of your web account
This feature makes it easier to revisit key moments from your meetings, enhancing your ability to follow up on important decisions and shared content.

Granting Permission for Screen Recording on Mac Devices
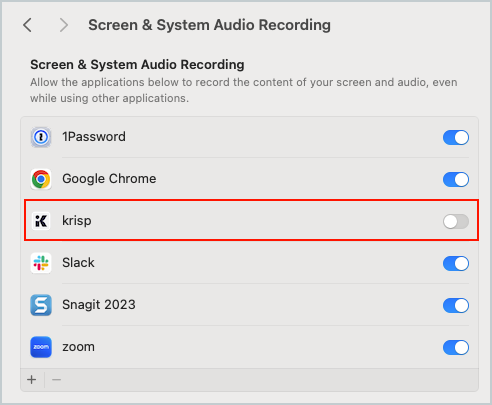
Note: On Windows, Krisp’s Screen Recording feature works immediately without additional permissions. However, on macOS, explicit user permission is required for apps that record screen and audio due to privacy and security protocols.
To enable Screen Recording on macOS:
- When using the feature for the first time, you will see a prompt asking for permission to record your screen and audio.
- Click Open System Settings to adjust permissions.
- Toggle on the screen recording permission for Krisp.
Once granted, Krisp will seamlessly capture your screen and audio while ensuring your privacy is protected in accordance with macOS guidelines.
How to Record Your Meetings with Krisp
- Start your meeting and click the Screen-Recording button in the Krisp app or widget.
- Choose whether to record the entire desktop or a specific application window.
- Grant screen recording consent (only for macOS users).
- Begin recording: Krisp will notify you when the recording starts in both the app and widget.
Tip: You can pause and resume the recording at any time during the meeting using the Pause button in the app or widget.
Access Your Screen Recordings After the Meeting
Once your meeting ends, you can access the recording on the Meetings page of your Krisp web account. Please reload the page after processing is complete to view the recording.
A Seamless Experience Without Bots
Unlike other tools that rely on meeting bots to join and record, Krisp’s Screen Recording feature works directly within the app. This streamlined approach ensures a smoother, faster, and less disruptive process, letting you focus on the meeting itself without concerns about technical interruptions.
Comparing Krisp’s Screen Recording Feature with OBS Studio
| Feature | Krisp’s Screen Recording | OBS Studio |
|---|---|---|
| Purpose | Primarily for recording meetings, presentations, and collaborations. | Primarily designed for live streaming and screen recording with advanced customization options. |
| Bots | No bots required for recording. Operates directly from the Krisp app. | Requires setup of scene and sources, typically with bots or external applications for streaming. |
| Ease of Use | Simple and intuitive interface, perfect for quick meeting recordings. | Requires more technical setup and configuration, suitable for users with more advanced needs. |
| Recording Scope | Record entire screen or specific application windows. | Highly customizable, can record multiple scenes, sources, and layers. |
| Audio Capture | High-quality audio capture integrated with the Krisp app’s noise cancellation. | Captures audio from all configured sources, including microphones and system sounds. |
| Integration with Meeting Tools | Seamlessly integrates with Krisp’s meeting tools for real-time recordings | Does not natively integrate with meeting platforms; requires third-party tools or manual setup. |
| Editing Features | No built-in editing tools; focus is on capturing meetings for future reference. | Advanced editing capabilities for video mixing and post-production. |
| Platform Availability | Available for Mac OS (Sonoma 14.5 and later) and Windows 10. | Available for Windows, macOS, and Linux. |
| Recording Quality | High-quality video and audio optimized for meeting recordings. | Can record in very high quality with extensive control over resolution, frame rate, and bitrate. |
| Privacy and Permissions | Requires user consent for screen and audio recording (especially on macOS) | No specific privacy settings; requires manual permission setup for each recording source. |
| Cost | Available to users on Free and Pro plans. | Free and open-source software. |
Final thoughts
Both OBS and Krisp offer valuable screen recording capabilities; however, they cater to different user needs. With its extensive customization options, plugin support, and flexibility, OBS truly shines, making it ideal for creators, gamers, and professionals who require full control over their recordings. Whether capturing tutorials, live streaming, or creating high-quality podcasts, OBS proves to be a powerful and versatile tool.
In contrast, Krisp’s Screen Recording feature is perfect for users who prioritize simplicity and seamless integration within meetings. Also, its ease of use, without the need for bots, along with the ability to capture both screen and audio directly from the Krisp app, makes it an excellent choice for business meetings and collaborative sessions.
FAQs


