Have you ever been pulled into work during your free time because someone scheduled a meeting outside of your working hours? Or maybe you’ve been focused on an important task, only to be interrupted by an unexpected call or meeting request? These distractions can be frustrating and throw off your entire day. Fortunately, there’s an easy solution—Google Calendar allows you to set clear working hours, helping you manage your availability and protect your time. By setting your work hours, you can ensure that you have uninterrupted time for deep work, personal activities, and breaks, all while letting others know exactly when you’re free to collaborate.
According to a German study, many employees often skipped work breaks (29%) and experienced interruptions (16%). These frequent interruptions and lack of breaks reduce productivity and increase stress levels and burnout. Setting clear work hours can help eliminate these problems by providing specific time for work and rest.
In this article, we will explore how to use Google Calendar to set your working hours.
Setting Working Hours in Google Calendar
Effectively managing your time is important for maintaining productivity and a healthy work-life balance. According to research from the University of California, Irvine, led by Gloria Mark, refocus can take 23 minutes or more after an interruption. That’s a significant amount of time lost when you’re pulled away unexpectedly. To prevent this, let’s understand how to set working hours in Google Calendar:
1. Open Google Calendar
On your computer, go to Google Calendar. While the mobile app is handy for everyday use, it’s easier to configure your working hours on the desktop version.
2. Go to Settings
Click on the gear icon in the top right corner, then select “Settings.”
3. Find the ‘Working Hours’ Section
Scroll down to the ‘Working Hours & Location‘ tab. Once there, check the box labeled ‘Enable Working Hours‘ to turn on the feature.
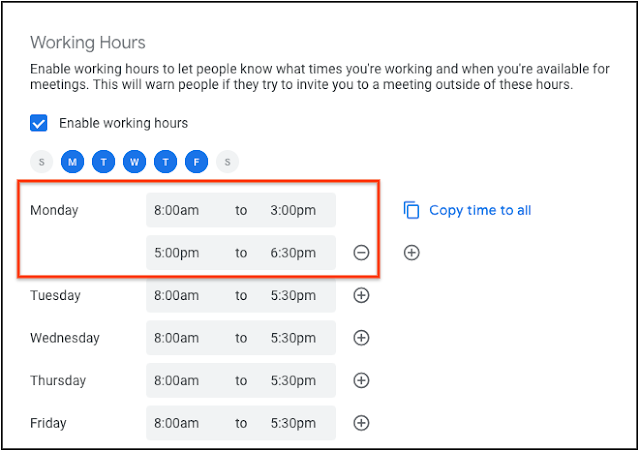
4. Customize Your Hours
Now you can customize your availability. Enter the start and end times for each workday that best matches your schedule. Whether you stick to traditional hours or have a more flexible arrangement, adjusting to your needs is easy.
5. Add Your Work Location (Optional)
You can also update your work location here if you work from different locations. It’s a great way to let your team know where you’ll be on any given day.
6. Save, and You’re Set
Once you’ve saved your preferences, Google Calendar will display your working hours for others to see. If someone tries to schedule a meeting outside of your set times, they’ll be notified that you’re unavailable.
Why Is Setting Work Hours Important?
Setting your work hours in Google Calendar is one of those simple tasks that can greatly impact your workday. Think about it—how many times have you been pulled into a meeting or received a call just as you’re wrapping up for the day? Or worse, getting pinged first thing in the morning when you haven’t even had your coffee yet. It can throw you off balance.
When you set your work hours, you’re not just managing your time—you’re helping others know when it’s best to reach you. Here’s why it matters:
- Prevents after-hours interruptions: Clearly define when you’re available so meetings and calls don’t spill into your time.
- Keeps your routine intact: Without the structure of an office, especially for remote workers, it’s easy for work to bleed into your free time. Setting hours helps you maintain a healthy balance.
- Boosts productivity: Colleagues will know when you’re focused and ready to collaborate, allowing you to maximize your working hours.
- Improves work-life boundaries: It helps you log off without guilt, knowing that your availability is clear to others.
Customizing Work Hours for Different Days
Sometimes, your work schedule isn’t the same every day, and that’s normal. Maybe Mondays are packed with meetings, but Fridays are your heads-down, focus days. The good news is that you can customize your work hours in Google Calendar for each day of the week.
Here’s how you can do it:
1. Open Google Calendar
First, log into Google Calendar on your desktop (this feature isn’t available on mobile yet).
2. Access the Settings
Click the gear icon in the top right corner and select “Settings.”
3. Navigate to Working Hours & Location
On the left-hand side, scroll down and find “Working hours & location.” Once there, you’ll see the days of the week listed.
4. Customize Your Hours
Next to each day, you can adjust your availability. Have a shorter workday on Wednesdays? Set that up by changing the start and end times for that day. You can set unique hours for every day of the week if needed.
5. Save Your Changes
Once you’re happy with your customized hours, don’t forget to click “Save.”
Overriding Work Hours for Specific Events
Sometimes, even after setting your regular work hours, one meeting or event falls outside your usual availability. Maybe it’s a time-sensitive project or a meeting with colleagues in a different time zone. The good news is that you can override your work hours for specific events in Google Calendar without permanently changing your set hours.
Here’s how to do it:
1. Create or Open the Event
First, go to Google Calendar and create a new event or open an existing one outside your usual work hours.
2. Adjust the Time
In the event details, simply set the time for the meeting or event, even if it falls outside your regular work schedule.
3. Save the Event
Once you’ve made the time adjustment, save the event like you normally would.
4. Attend Without Changing Your Regular Hours
This won’t affect your default work hours for the rest of the week. You’ll still keep your usual hours, but this one-off event will show you’re available during that time.
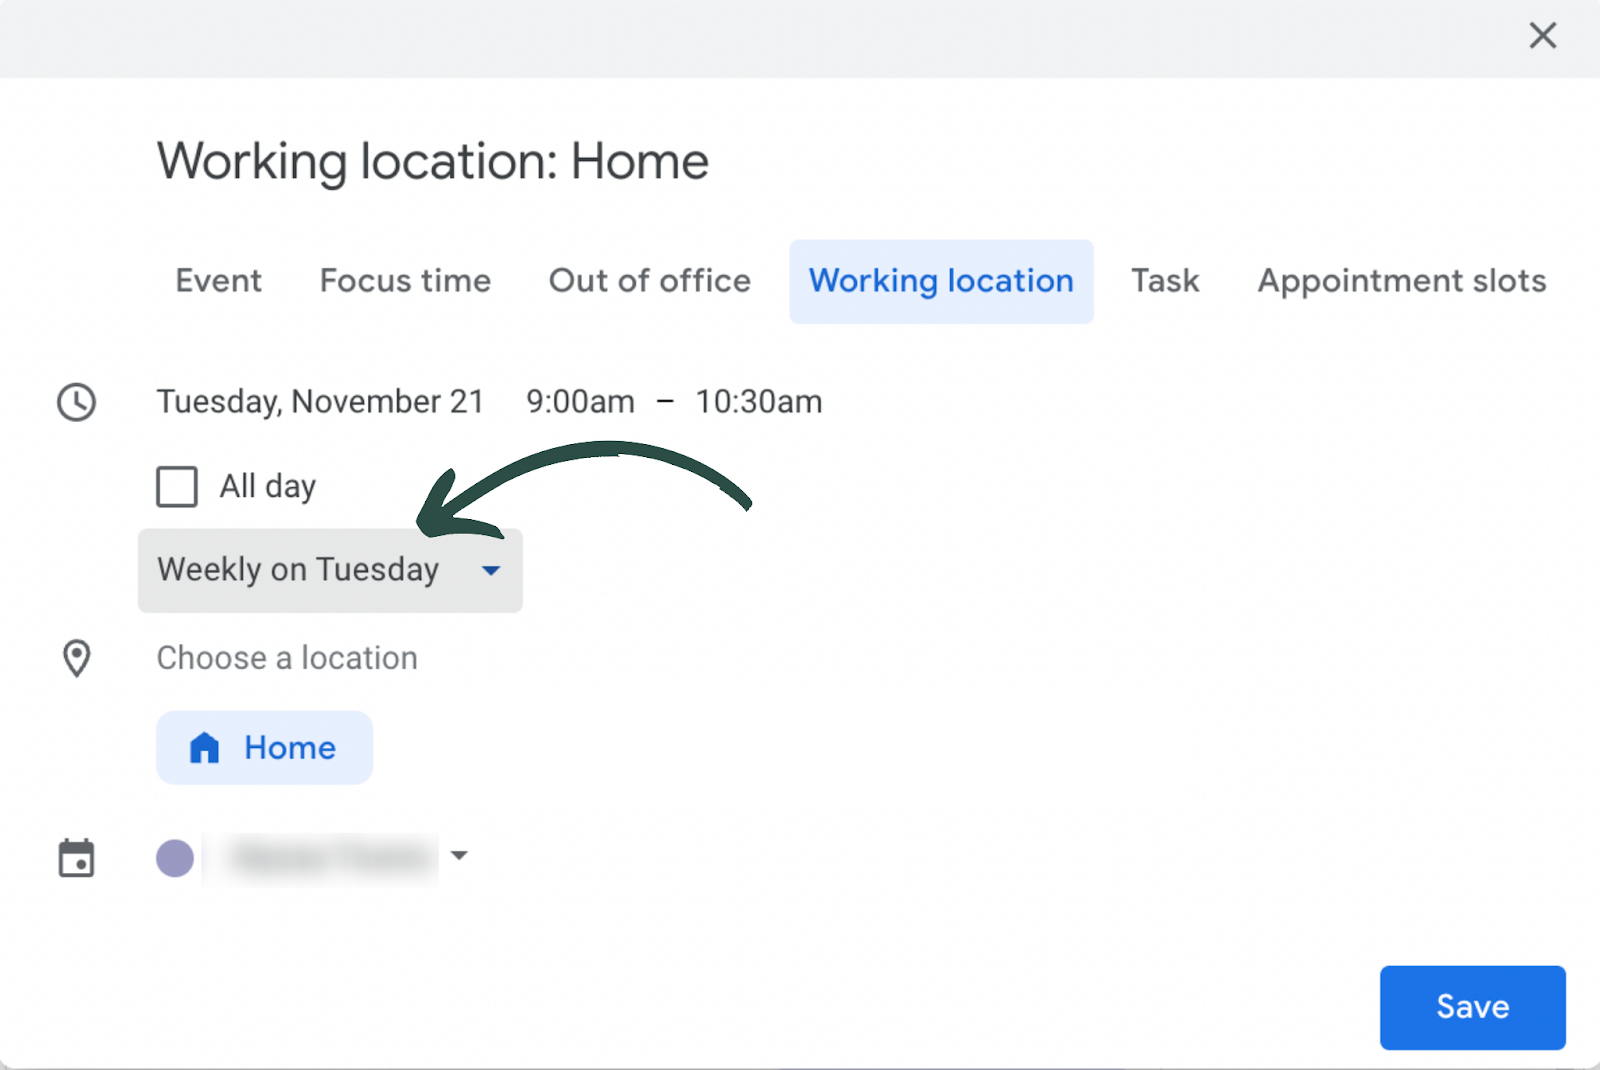
How to Set Working Location in Google Calendar
Setting your working location in Google Calendar can make a big difference for remote workers. It lets you share where you’re based in terms of time zone, helping others know when you’re available and scheduling meetings accordingly. It also allows colleagues to plan in-person meetings on office days more effectively. Here’s how you can set your working location in Google Calendar:
1. Open Google Calendar
Start by going to your Google Calendar on a web browser. The working location feature is currently available only on the desktop version.
2. Access the Settings
Click the gear icon at the top right and select “Settings” from the dropdown menu.
3. Go to Working Hours & Location
On the left-hand sidebar, scroll down to the section labeled “Working hours & location.”
4. Enable the Feature
If this is your first time using the feature, you might need to toggle the switch to enable working hours. This will also give you access to set your working location.
5. Set Your Location for Each Day
You’ll see a row of days, and next to each, a drop-down to select your working location. Choose between “Home,” “Office,” or “Another location,” and specify where you’re based for the time zone. You can even customize times for split schedules if you’re alternating between locations.
6. Save Changes
After setting your location preferences, make sure to click “Save” to apply the changes.
How to Set Out of Office in Google Calendar
Sometimes, you just need to let everyone know you’re not available—whether you’re on vacation, taking a personal day, or just need some focused time away from meetings. Setting your “Out of Office” status in Google Calendar makes this easy and sends automatic declines for any new meeting requests during that period. Here’s how you can do it from both desktop and mobile.
From Desktop
1. Open Google Calendar
Head to Google Calendar on your desktop browser.
2. Create a New Event
Click on a date or the “Create” button in the top left corner. Select the “Out of office” option when the event window pops up.
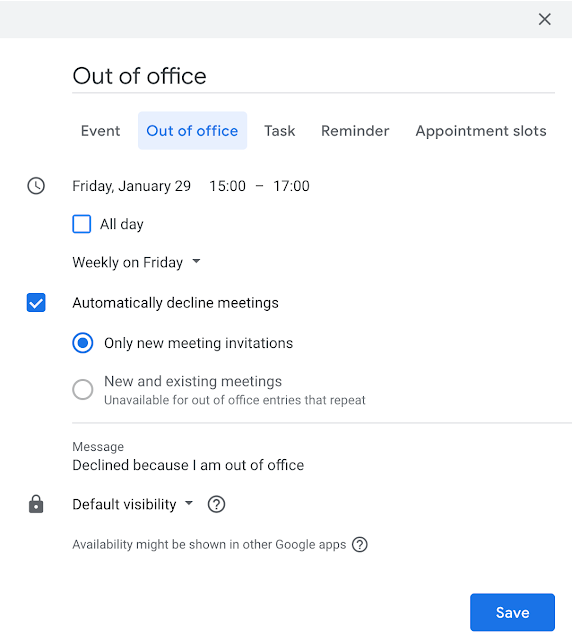
3. Set the Time Frame
Choose the start and end date, and if needed, adjust the time to match when you’ll be unavailable.
4. Customize Your Message
You’ll see an option to set an automatic decline message for meeting invitations during this time. Customize it to add a personal note or stick with the default.
5. Save and Notify
Once you’re done, hit “Save,” your out-of-office time will be blocked off on your calendar. Anyone booking a meeting with you will get an automatic decline notification.
From Mobile
1. Open the Google Calendar App
Launch the Google Calendar app on your iPhone or Android device.
2. Create a New Event
Tap the “+” icon at the bottom right to create a new event. From the list of event types, select “Out of office.”
3. Set the Date and Time
Pick the dates and times you’ll be away. Depending on your needs, you can block off a full day or set specific hours.
4. Decline Message
Customize the automatic decline message if you want to personalize it, or use the default option provided.
5. Save Your Event
Once everything looks good, tap “Save,” your calendar will automatically show you as unavailable during the out-of-office period.
How To Keep Your Work Hours Productive
Having back-to-back meetings, each lasting at least 30 minutes, can make it hard to keep track of everything that was discussed. With so many details flying around, it’s easy to miss important points or forget to follow up on action items. That’s where Krisp comes in to save the day.
Krisp is an AI meeting assistant that makes managing your meetings so much easier. It offers automatic transcription, which means you don’t have to take notes during the meeting. Once the meeting ends, Krisp provides you with a clean summary, highlighting all the key points discussed. And even better—it generates action items, so you know exactly what needs to be done next without scrambling to remember. With Krisp, you can focus more on being present in the meeting and let it handle the post-meeting details.
Here’s how you can install Krisp to get started:
1. Visit the Krisp Website
Head to the official Krisp website at krisp.ai and sign up for an account.
2. Download the App
After signing up, download the Krisp app for your desktop (available for both Mac and Windows).
3. Set Up Krisp
Once installed, open the app and follow the simple setup instructions. You’ll be able to connect it to your preferred conferencing tool like Zoom, Google Meet, or Microsoft Teams.
4. Start Using Krisp
Now, during your next meeting, turn on Krisp’s AI assistant. It’ll handle noise cancellation, transcription, summaries, and action items while you focus on the conversation.
Can Setting Work Hours Help You Track Time in Google Calendar?
You might be wondering if setting work hours in Google Calendar can help you track your hours. The short answer is not directly. While the working hours feature is a fantastic way to communicate your availability to colleagues and help them plan meetings accordingly, it doesn’t automatically track the time you spend working.
However, here’s how you can make the most of it:
1. Visual Representation: By setting your working hours, you create a visual boundary on your calendar that shows when you’re available for work-related tasks. This helps you be more intentional about allocating your time during those hours.
2. Manual Tracking: To keep track of the hours you actually spend working, you can create events or tasks within those working hours. For instance, if you have a project that you’re dedicating time to, create a time block for it in your calendar. This way, you can see how much time you spend on different tasks throughout the week.
3. Use Time Tracking Tools: If you’re serious about tracking your hours, consider integrating time-tracking tools with Google Calendar. There are various apps available that can sync with your calendar and help you log hours spent on specific projects or tasks.
4. Review Your Schedule: At the end of the week, take a look at your calendar to see how much time you allocated to different activities. This review can give you insights into where your time is going and help you adjust your schedule for better productivity in the future.
Wrapping Up
Setting your working hours in Google Calendar is more than just a time-management tool; it’s a strategy for establishing boundaries and enhancing productivity. By clearly defining when you’re available for work, you protect your focus time and help others respect your schedule.
This easy feature helps reduce interruptions and allows for better planning, ensuring your days are less chaotic and more productive. Plus, with the option to customize your hours, override them for specific events, and communicate your working location, you can tailor your calendar to fit your unique work style.
As you incorporate these practices, remember that effective time management is continuous. Regularly reviewing your schedule and making adjustments can lead to an even more balanced and efficient workflow. With the right tools and strategies in place, you can reclaim your time and make the most out of your workdays. So go ahead, set those hours, and watch your productivity soar!
Frequently Asked Questions
Will my colleagues see my working hours when they try to schedule a meeting with me?
Yes, when you set your working hours in Google Calendar, your colleagues can see when you are available for meetings. If someone tries to schedule a meeting outside your designated hours, they’ll receive a notification that you’re unavailable.
What happens to existing meetings if I change my working hours?
Changing your working hours won’t affect existing meetings. All previously scheduled events will remain in place, but future meeting requests outside your new hours will be blocked.
Are there any limitations to setting working hours in Google Calendar?
While setting working hours is a useful feature, it doesn’t track your working hours automatically or prevent notifications for meetings scheduled during your off hours. Additionally, this feature is currently only available on the desktop version of Google Calendar.
Can I use Google Calendar to manage my personal and work hours separately?
Absolutely! You can create separate calendars for personal and work events within Google Calendar. By color-coding these calendars, you can easily differentiate between work and personal commitments, helping you manage both effectively.
Can I share my working hours with others outside my organization?
Yes, if you share your calendar with external users, they will also be able to see your working hours. Just ensure you’ve configured your sharing settings appropriately to allow others to view your availability.
Does Google Calendar send notifications to colleagues who attempt to schedule meetings outside my working hours?
Yes, if a colleague tries to schedule a meeting outside your working hours, they will receive a notification informing them that you are unavailable during that time. This helps prevent any scheduling conflicts.